
How to Use Perspective in Nature and Wildlife Photography

In my first article on perspective, ‘The Use of Perspective in Landscape Photography’, I looked at how different types of perspective affect how we capture a three-dimensional scene in a two-dimensional image, and how our choices can impact how the viewer is encouraged to interpret the depth within the photo.
Clearly the same rules apply to both landscape and nature photography so, rather than repeat them, I encourage readers to start with my first article and progress onto this one.


Here, I will concentrate my efforts into describing some options for angles of view and lens choices when photographing wildlife, including birds, insects, and mammals.
Read more: What’s the Best Lens for Wildlife Photography?
Lens choice: wide-angle or telephoto?
I am going to start with a broad generalisation: when we take landscape photos we tend to use wide-angle lenses, and for nature photography we more often use telephotos, because the subjects are difficult to get close to.
Wide-angle lenses exaggerate the three-dimensional appearance of an image. They make foreground subjects look bigger, they often exaggerate the linear perspective, and sometimes introduce more atmospheric perspective. So, we tend to find that our landscape photography has a more three-dimensional appearance than our nature photography.
For this reason, a wide-angle shot of wildlife will often have more impact than the same subject shot using a telephoto. So, whenever I come across a subject that I think would tolerate a close camera, in a situation where the surrounding landscape is interesting or attractive, I try to use a wide-angle lens.

These southern rockhopper penguins (above) were tame enough for me to get close, so I used a wide-angle lens and low angle of view. This has made the main penguin look very large and subsequent penguins smaller, emphasising the linear perspective and creating a sense of depth. (Taken using a 17mm lens at f/16.)
Read more: Depth of Field for Beginners – Bokeh, Focus, and more
There are two ways of doing this: either the subject is tame enough for you to operate a camera close by, or it isn’t. If it isn’t, then some form of remote release is required. I have both wired and wireless remote releases but favour wired, which I can extend to any length I require. When using the remote release, I usually set the focus manually and wait for the subject to come to a predictable spot.

This buzzard (above) wasn’t tame enough to photograph conventionally, so I used a remote release with an 18mm lens, and used road-kill rabbits for bait. The raised wing has come very close to the camera and its scale has been distorted by the wide-angle lens. This, combined with the apparently small house beyond, gives the image a three-dimensional appearance.
Read more: 8 Tips for Approaching Animals Without Being Noticed
I also use a wide-angle lens for flower photography, where I want to show the flowers in their environment. I get the camera very close to the flowers to make them look larger than life, then use a very small aperture and hyper-focusing to get everything sharp.
Like most nature photographers, I commonly use a telephoto lens. The most versatile telephoto lens in my armoury is the 300mm f/2.8, which focuses close enough for some flowers and fungi, as well as being useful for birds and mammals, as it can be used in conjunction with 1.4x and 2x converters.
Telephoto lenses do the opposite of wide-angle lenses, so they tend to make images look more two-dimensional. That being said, our brains are perfectly able to interpret images as three-dimensional, regardless of the lens used. But, the prompts are slightly different.

Compare this buzzard photo (above) with the last one. Same buzzard, same location, but this was taken from my house with a telephoto lens. There is still a sense of depth to the image, helped by the light and the differential focus, but we get a completely different perspective.
When I use a telephoto lens for nature photography, I am almost always trying to achieve differential focus. This is where the subject is sharp, but both the background and foreground are out of focus, making the subject stand out as the main focal point. Our brains also interpret the out of focus aspects as depth, and therefore three-dimensional.
Depth can be further reinforced by light and shade, used for picking out the contours on the subject. There are also occasions when we have the same species in the foreground and background, which emphasises the linear (and sometimes overlap) perspective.
Moving from side to side
I am always aware of the possibility to move a little to the left or right when taking a photo. The reasons for this can be simple. For example, there might be a bright piece of dry grass between camera and subject, which will catch the eye in the photo.
Or, when tracking a butterfly, it might be desirable to get perpendicular to the spread of its wings, in order to get the whole subject sharply in focus. However, reasons for moving a little left or right can also be more subtle.
For example, when photographing a flower, there might be a second, out of focus flower in the background. The second flower can act as a foil for the main subject. So, I usually try to get into a position where the main flower is to one side, facing into the photo, and the second flower balances it on the other side of the image, even if it is out of focus.
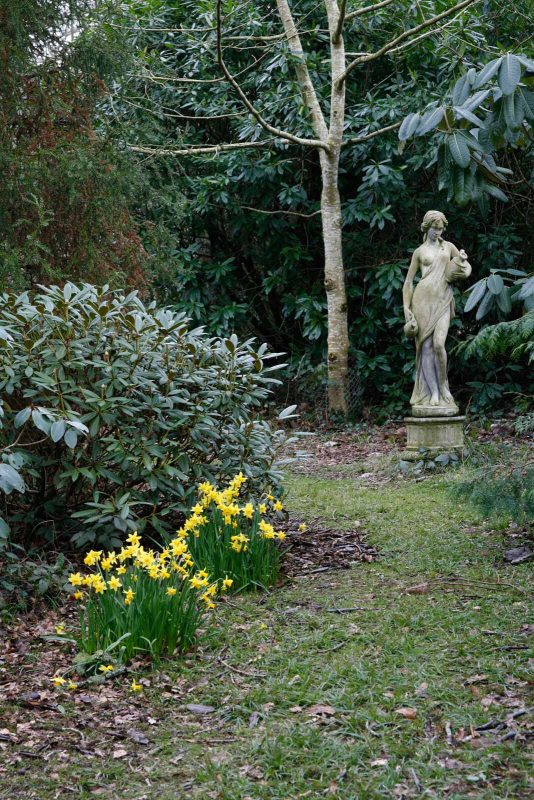
A slight sideways movement can change the perspective of the image. Notice how the three main focal points (daffodils, statue, and tree) in the second image (below) form a stronger diagonal, and are positioned more according to the rules of composition. They also form more of a triangle than a straight line, which is a better use of space.
Read more: Composition Tips – Leading Lines and Vanishing Points
Low or high viewpoints
If we take a very high viewpoint and look down on a subject, it can make it look weak and small. We often see this sort of image on nature documentaries, particularly with drone footage of animals in their environment. It especially suits those animals that are vulnerable to attack. It isn’t a technique I often have the opportunity to adopt, though I will use it with flowers.

When looking down on a subject from high above, the subject looks weak (notice the photo above). This octopus looks much more dominant and powerful when seen from its own level in the second photo (below).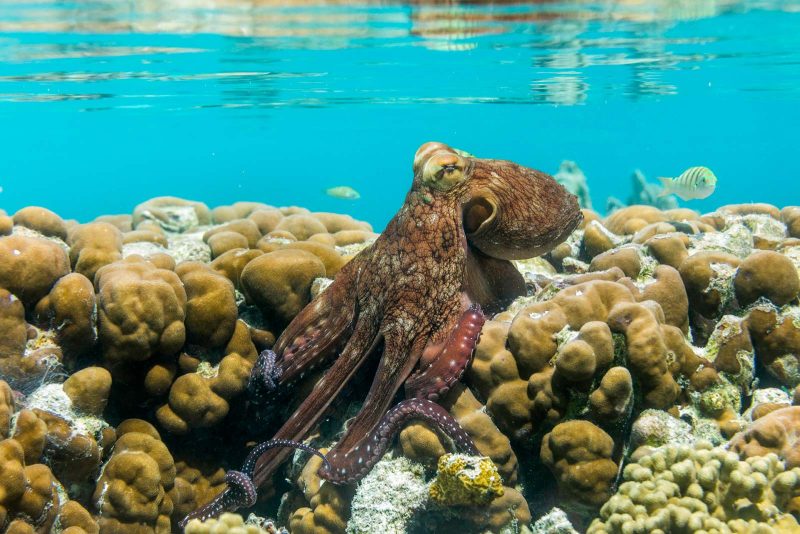
More often, I will adopt a low viewpoint. A low view gives greater significance to the subject, making it seem more important. It gives it more impact and a stronger connection with the viewer.
Getting down low has other advantages. By including more foreground, the effect of differential focusing is exaggerated. It isn’t uncommon for me to be shooting through foreground clutter, so long as I can get the subject sharply in focus.

This photo of lady’s slipper orchids was taken with a telephoto lens from a very low angle, using out of focus foreground and background to create a sense of depth. The out of focus elements in this photo have given it an ethereal feel, though the reddish-orange tones leap out and help emphasise a sense of depth.
Another advantage to the low viewpoint is the ability to hide parts of the subject behind foreground blur. This might seem undesirable, but it is sometimes the only way I can fit the whole subject into the frame (if it comes too close and I have a prime lens). Also, I find that a half-concealed subject can look more natural, giving the image an enigmatic feel.

This fox was too close to photograph with the lens I was using but, by getting down low and including foreground blur, I was able to get a portrait without cutting its head off at the edge of the frame.
I often use concealment when photographing flowers, aiming to mask the point where the stem of a flower leaves the frame. This can allow me to show the flower larger in the photo, without the need to get the whole stem in the picture.
For this photo of lily of the valley, I deliberately concealed the stem of the flower behind a foreground leaf to prevent it from going out of the frame in sharp focus. The out of focus foreground helps to create a three-dimensional appearance in the photo, as does the lighting on the flowers.
Read more: How to Photograph Plants
Near or far perspectives
A close-up perspective puts the viewer in touch with something they might not normally see, and it makes subjects look larger than they should. Physically, a small subject such as a caterpillar will be much bigger on the screen than it is in reality. In contrast, a subject such as a gannet could never be larger than life on a computer screen.
 This fly will look larger on a computer screen than it is in reality. This alone gives it impact. (Taken as a stack of images using the Canon 65mm macro lens at about 2x magnification).
Read more: The Best Habitats for Macro and Insect Photography
Though it seems acceptable to me for a small subject to be shown enlarged, I feel that small subjects should be given plenty of space in a photo. It can be a common mistake when setting out in nature photography to try to fill the frame with every subject. Often it is the space around it which gives the image character and atmosphere.
On the other hand, if we take the close-up perspective idea far enough, we can close in on small parts of a subject. Instead of showing the whole creature, we can photograph the hair of an otter, the feather of a bird, or maybe the eye of a dragonfly.
Such images can become quite artistic and abstract, and offer a whole new perspective of a species. Generally, for this to be successful, we have to be very careful to eliminate any distracting elements, particularly in the corners of the frame. For this you may favour live view rather than the viewfinder.
By getting in very close and selecting just part of a subject to photograph, we can make abstract images, such as this one of the gills of a mushroom. It’s usually best to fill the whole frame with repeating patterns for this sort of image.
As we don’t immediately know what we are looking at, the brain is fooled into a feeling of uncertainty: is this two or three dimensions? I think the gradual fall off of focus gives the clue that it is three-dimensional, and then we begin to understand the pattern of light.
In contrast, a far-off view, even when taken with a telephoto lens, leaves the viewer slightly removed from the subject. It makes the subject smaller in the frame, and will naturally emphasise its insignificance or vulnerability.
This is a good strategy to use when there is another significant element to the image, such as a rainbow or stormy sea, or if the subject stands alone amongst a sea of other things.
Even if the other element is the key to the image, and the inclusion of a bird or animal seems incidental, it will add an invaluable sense of scale to the overall image.
When a subject is portrayed as quite small in the frame, it makes it look vulnerable. This can suit certain situations, such as this gannet flying against strong winds.
Use of perspective in water
Just as we have various perspectives on land, we can also play in the water. As a terrestrial photographer, when I think about water and wildlife, my thoughts turn to subjects that float or swim. These give me the opportunity to grab a shot from dry ground, or at least with a dry camera.
I have proven to myself time and time again that a low angle of view works best with subjects on the water. The effect of differential focusing from a low angle of view is sublime and transformative.
The problem is that, when I say water level, I really do mean it. The difference between standing and kneeling is almost unnoticeable, but the difference between kneeling and lying down, with the camera almost touching the water surface, is remarkable.
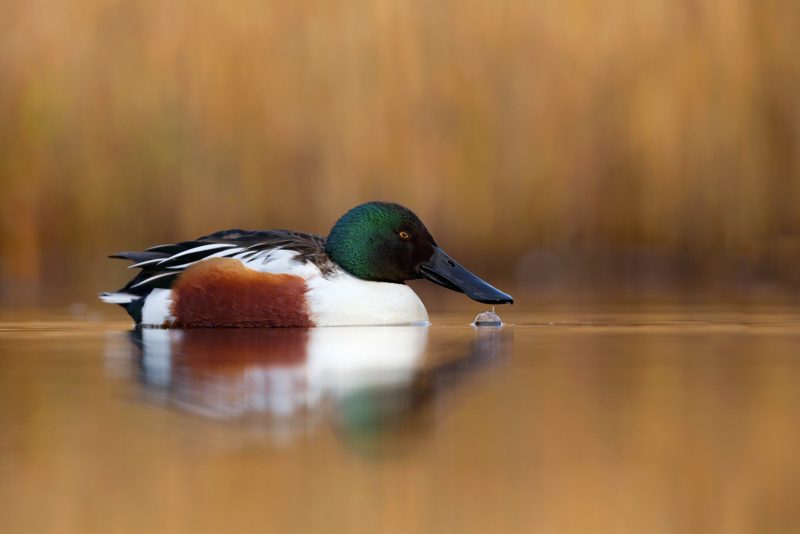
The first photo of a shoveler (above) was taken from kneeling height. The second photo (below) of the same bird, with the same lens, same aperture, and same location was taken from water level. The difference is significant.
Read more: How to Photograph Ducks, Geese and Other Wildfowl
It helps if we can use a long telephoto lens to photograph creatures on the water, and this requires them to be a reasonable distance from the shore. This distance reduces the angle between the lens and the horizontal. If the subject comes very close, it is much more difficult to get the same effect.
In fact, with subjects that are really close, I tend to dispense with the viewfinder of my DSLR, and use it on live view so I can get the camera as low as possible.
I also have a 90 degree angle finder, which fits over my viewfinder to make it more comfortable to use at ground level- though this takes a little getting used to, and it’s important to remember not to dunk the end of the lens whilst messing around!
There are lakes that lend themselves to low-angle nature photography, which you can look for to help you achieve this effect. For instance, one lake near me has a concrete path around it. This is ideal for lying and getting the camera exactly at water level.
In contrast, I know another lake which has a bank around the entire edge. It just isn’t possible to get the lens at water level there, without lying in the mud and dangling the lens out over the water.
I have on occasion been brave enough to take a purpose-built floating hide out onto lakes, but these are limited in their potential, partly by the relatively few places where they can be used.
In this modern era of photography, we have a whole range of options for photographing wildlife in, and on, water. There are a few cameras that are waterproof and can be great for experimentation. Something I have done for many years is make small glass tanks, in which I can photograph tiny pond creatures.
I also use an underwater housing for my DSLR, with which I have been able to get some good underwater images, as well as split shots. Both of these give an unusual perspective of wildlife.
These mosquito larvae were photographed in a home made glass tank using a 100mm macro lens.
 This split shot of a shore crab was taken using a wide-angle lens on my DSLR in an underwater housing.
In conclusion
Talking of unusual perspectives, it’s tempting to feel that there aren’t any new ideas to be had, and that all perspectives have been done before. However, it’s just a matter of keeping an open mind, being observant, and being prepared to have a go.
Dew drops, reflections, shadows, mist, and all sorts of unusual lenses and filters can give the opportunity for a different perspective on a familiar subject. All we can do is learn the basics, and then experiment with our own ideas.

I spotted this shadow of an ash tree on a muslin curtain and thought it looked very beautiful. It is certainly an unusual perspective, without any depth since it was two-dimensional before I took the photograph!


