
Underwater Split-Shots: Top Tips for Over-Under Photos
‘Split-shots’ also known as ‘splits’ or ‘over-under shots’ are a mix of landscape and underwater photography where the top half of the image is above water and the bottom half is below. This half-in-half-out view allows us to see topside subjects like boats, islands, and epic skies while simultaneously showing underwater subjects like fish, reefs, and divers in the same frame.
Over-under photos are fairly straightforward to shoot once you understand the technique, have the necessary equipment, and know the settings. However, they do require practice, patience and determination to master.
Equipment for Shooting Split-Shots
Underwater Housing and Dome Port
Use the largest dome port you can. The larger your dome the easier it will be to capture split shots as it allows more control over the position of the water’s surface. This also makes it easier to keep both parts of the image in focus; one of the hardest challenges with this type of photography.
Shoot Wide
Use a wide-angle lens (the wider the better) to include as much above and below the water as possible. Using these lenses will add distortion to the images, especially above the water, but you can correct this in post-processing if required. The corrections may bow the edges of the frame, if so you will need to crop in a little to remove this.
Read more: Correct Vignetting & Distortion with Lens Profiles
Use a Snorkel
Most of my split-shots have been captured when snorkelling, because there is no need to go deeper than the surface, and any extra dive gear just makes you more cumbersome. It is worth considering using floats or a thick suit to make yourself more buoyant, especially when using a heavy camera rig which can weigh you down.

Best Settings for Underwater Split-Shots
Aperture
Stop down the lens to produce a large depth of field, this will ensure both background and foreground are in focus. Preferably use higher than f/11, but ultimately this will depend on the amount of light available. The best way – I find – is to focus on the underwater subject, as this will (usually) be your main and most interesting subject.
ISO & Shutter speed
It is worth considering using a slightly higher ISO setting than usual to capture more light under the water. Keep the exposure triangle in mind and adjust your ISO and shutter speed as necessary to expose the sky properly and avoid blown-out highlights.
Read more: Understanding the Exposure Triangle
Keep an eye on your focus point
Although not immediately obvious, the image below is technically out of focus. What happened here is that the lens has focused on the dome port itself. This becomes even more of an issue if you have scratches on your dome port, as the camera will see the scratches as a point to focus on, so be mindful of this when using autofocus. To eliminate the problem altogether use manual focus to avoid ruining what could be a successful image.

Plan Your Shoot Ahead
Good Conditions
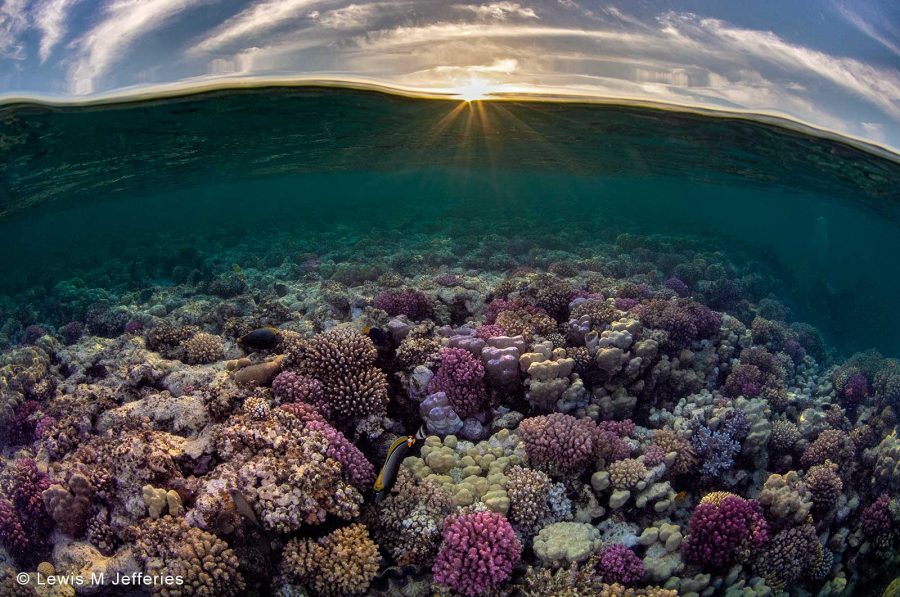
Clear and calm water usually produces the best results. Shoot on a bright sunny day if possible and use strobes or flash to light the underwater section if you can. This will allow the sky to be exposed correctly. Shooting with the sun behind you is the easiest option and gives less difference in exposure between sky and underwater scene. However, shooting into the sun can create impressive results – if executed properly – so do bear this in mind.

Droplets on your Dome
A quite frustrating issue with split-shots is when water droplets form on the dome port and create distracting marks on the above water section of the image. There are certain tricks that can be put into practice to overcome this. Some photographers claim various materials rubbed upon the surface of the dome port can help the droplets to run off. These include (but are not limited to) mask defogger, baby shampoo, saliva or even a potato!
I have always used the tried and tested “dunk and shoot” technique, whereby I fire off a frame in the couple seconds before the droplets have had a chance to form on the dome. Ensure all settings, exposure and composition are set correctly first, then dunk away to your heart’s content. This technique involves a lot of trial and error, and you have to be very patient and persistent to achieve the results you want. The other option is not to get the top half of the dome wet in the first place! While this technique is definitely possible it is still quite tricky to keep it dry.

Backscatter
As with all underwater photography, backscatter (particles in the water) can still be an issue when using strobes. So, make sure you use good strobe positioning before shooting, as this will ensure you don’t have to spend as much time in the edit removing annoying spots from your image.
Read more: 5 Easy Ways to Avoid Backscatter in Underwater Photos
Consider Low Lighting
Shooting at sunset or sunrise when the light is low can be a great time for split-shots, as it provides the amazing, golden, soft light that most photographers desire. Be aware that this makes strobes pretty much essential for lighting the underwater scene correctly.

Split-shots are a fantastic way to show the interconnected relationship between marine and terrestrial habitats, taking the viewer on a journey from their familiar environment and into the underwater realm. They enable the photographer to produce interesting, dynamic images that stand out from the crowd and are a great way to broaden your portfolio.


