
How to Photograph Ducks, Geese and Other Wildfowl

Wildfowl – that’s duck, geese, and swan species – are ideal subjects on which to hone your photographic skills. Widespread and often approachable, they are perfect for those times when you just want to get out and photograph, without having to spend too much time searching. Their colourful plumage and active behaviour also makes them great subjects for a wide variety of images using different viewpoints and techniques.
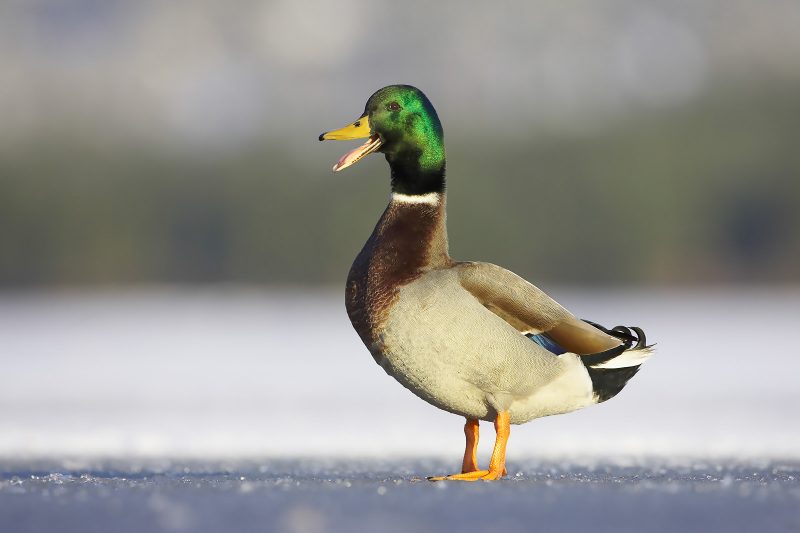
Wildfowl are attracted to bodies of water of almost any size, so you don’t usually need to travel too far from home to find an attractive pond or lake that is inhabited by a range of species. Most town or city parks have a ‘duck pond’ where you’ll typically find good numbers of the ubiquitous mallard.


They may be common, but the male sports a fantastic iridescent green and blue head which looks amazing in close-up. The gregarious mallards will likely also draw in other duck species as well as geese and swans, which can be equally as approachable in public parks where they are very accustomed to people.

One major advantage of photographing wildfowl is that you don’t need to own outrageously expensive photo gear to capture top notch images, thanks to them being so approachable. Pretty much any camera fitted with a mid-telephoto lens, such as a 75-300mm, is adequate to start producing some first-class pictures.
What counts most is making the most of what you own and adopting good techniques, with a creative approach, to make your photos stand out from the crowd. Here are some tips for photographing ducks, geese, and other wildfowl.
1. Stay low and try to blend in
Even where wildfowl are used to a human presence, it pays to keep a low profile. Always approach with caution as there may be birds feeding close to the water’s edge and you don’t want to spook them out of the range of your lens.
A good tactic is to initially scan the water from a distance using binoculars to figure out what species are present, and where they are hanging out or feeding. Watching the birds behave naturally will provide the best clues as where to position yourself.
Even if the birds drift away, there is a good chance that they will return to their favoured areas. Wildfowl also spend a lot of time preening and they’ll have favoured haul outs where they can safely spend time on important feather care.

Once you’ve decided on a good spot, try to get as low to the water level as possible – ideally laying down. It’s a good idea to bring along something to lay or kneel on to keep dry and help stay warm.
Staying low will not only mean that you blend into the surroundings and present less of a threat, but a low perspective is also far better because you’ll be shooting at eye-level. This gives more intimate and dramatic viewpoint.
For low level shooting, either use a bean bag or a tripod that will go down to ground level – one without a centre column is ideal.
2. Plan your visit
Waterfowl tend to be most active early in the morning or later in the day, so plan your visits to coincide with these times. This also has several other advantages, including that there will be less people and the birds will be more relaxed as a consequence.
Try to arrive at least one hour ahead of the optimum shooting period to allow yourself time to assess the situation and get into position. When working with very tame species this is less important, but for more shy wildfowl it pays to be settled down quietly in good time and then allow the birds to drift back towards you.
Once you’ve picked your spot, it is often best to stay in position for a period of time before moving on. This way the birds will begin to ignore you, relax, and behave naturally – leading to more opportunities and better images.

Once you’ve found a location frequented by a good variety of wildfowl, it also pays to keep returning on a regular basis. This helps to build up local knowledge of the behaviour and whereabouts of resident species, which will really help in your quest for new pictures.
Some wildfowl species may only be present at certain times of the year – and perhaps for just a few weeks as they move through on migration, for example. Armed with this kind of information, you’ll be able to plan future visits to coincide when specific species are present.
Each season also brings its own rewards. Adults with chicks in spring and summer; ducks in their finest plumage in autumn and winter. Not to mention the changing weather and lighting conditions throughout the course of the year.
Always over-dress when shooting wildfowl, whatever the time of year, as chances are you will be in contact with the ground as well as staying in one spot for extended periods of time. If you’re cold, you’ll need to leave prematurely or start fidgeting which will may cause disturbance.
Even after birds have accepted your presence it pays to move as little as possible, and also to keep noises to a minimum.
Read more: 6 Tips for Better Fieldcraft in Wildlife Photography
3. Make the best use of the light
The other significant advantage about shooting early, or late in the day, is that the sun is low in the sky and casting a beautifully soft, warm light across the water. Whilst it’s possible to capture great pictures of wildfowl on an overcast day – especially by going in close – the ideal lighting is direct low sunlight, which is perfect for bringing out the wonderful array of colours in the plumage of male ducks in particular.
Sunlight also helps with the rendering of water, which is an important element to a lot of wildfowl pictures. On an overcast day, the water will often appear grey or white in colour which makes it more difficult to achieve a pleasing result. By contrast, sunlit water will pick up the rich blue tones of the sky and make for a more colourful picture. This is especially relevant when shooting birds and their reflections.

The position of the sun will also be a factor when deciding where to position yourself, depending on the kind of picture you want to create. Conventionally, having the sun coming from over your shoulder with the light striking them directly suits wildfowl species very well by emphasising their plumage.
Low sunlight is also great for capturing a catchlight in the bird’s eye, an important element of most bird pictures. This is even more relevant with species with black heads, as it makes the eye stand out and provides that all important contact.
Watch for how small movements of birds’ heads causes the colours to change. This is due to their iridescent nature and is affected by the angle of the sunlight striking the plumage. By concentrating on an individual drake, you’ll be able to capture the precise moment when it turns its head at the perfect angle for the best colour.

Backlighting is an attractive alternative to the conventional approach. Low backlighting is a beautiful way to shoot swans, for example, as well as highlighting the fluffy plumage of ducklings and goslings in spring.
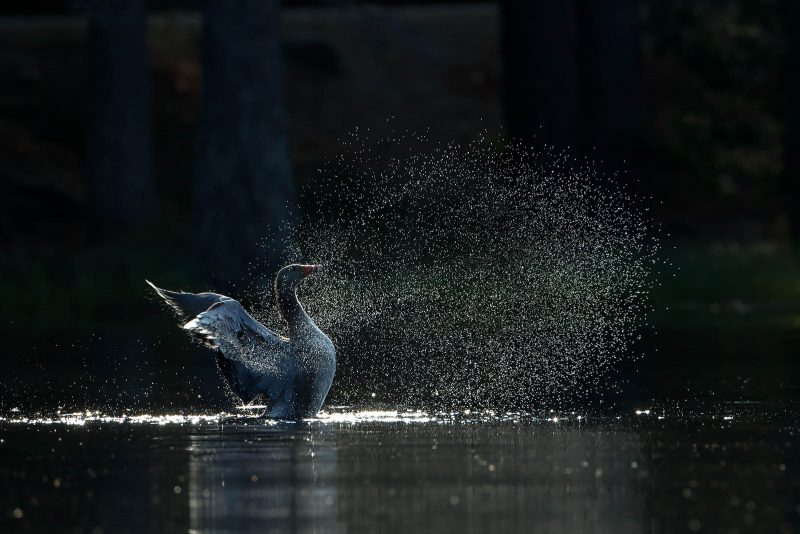
Backlighting can also be very effective at sunrise and sunset for creating dramatic silhouettes against colourful reflections in the water. For even more drama, watch out for bathing birds at either end of the day – the warm backlighting will pick out water droplets flying from their plumage in all directions as they splash around.
If possible, try to shoot backlit images against a dark or black background. This will accentuate the backlit effect and make feathers and water droplets stand out more clearly.

4. Recommended camera settings
Wildfowl species are rarely still for long and you never know when they are going to burst into action, so it’s important to have the right camera settings to capture this at a moment’s notice.
Shutter speed is the main consideration and whilst a slow speed of 1/60th second is okay for a stationary bird, it isn’t going to be fast enough to freeze any serious movement such as a bird flapping its wings or shaking the water from its bill.
For a typical ‘go-to’ setting, aim for 1/500th second (or faster) in order to capture sharp action shots. But as a rule, the faster the better; particularly if you are shooting birds in flight or frenetic bathing activity.

The aperture setting is less important, so prioritise shutter speed and shoot with the lens at its maximum aperture.
For large birds such as wildfowl, when shooting at mid-distance the depth of field is usually sufficient at a wide aperture setting to capture the entire bird in focus. A wide aperture also helps blur out the foreground and background water, which makes the bird stand out from its surroundings.
As always, try to shoot at a low or mid-range ISO setting for best quality images. Typically, this would be in the range of ISO 200 to 800, although modern cameras are exceptionally good at capturing high quality images at higher ISO settings. So, work within the parameters of your camera’s capabilities. That said, it’s always better to have a sharp picture with a bit of image noise as opposed to a blurry one with better image quality.

Accurate exposure can be tricky with wildfowl species as they can be high contrast and many have brilliant white as well as dark plumage colourings. Add to this the reflective qualities and changing tones of water, and achieving a well-exposed photograph can be challenging.
Generally it’s better to expose for the highlights to avoid burning out (clipping) bright areas and completely losing detail. This may mean that the dark areas are a little under-exposed but it’s often possible to recover detail in these areas during processing.
Manual metering is therefore a good option as this provides greater control over exposure. Once set, the metering remains constant unlike with one of the semi-auto settings (such as aperture priority mode) which will vary depending on the tone of the subject and reflected light from the water. Also, make use of your histogram to check exposure with the aim of recording detail in the full range of tones if possible.
5. Study your subjects to learn how to predict behaviour
The more you watch and photograph ducks, geese, and other wildfowl, the better you will become at predicting their movements and behaviour. This means that you will be better prepared for what’s going to unfold and be ready and poised with the appropriate camera settings.
Anticipating action is one of the best skills you can learn, but this takes time, practice, and keen observation. Watch for predictable actions such as birds taking off and landing. They may do this in a particular part of the lake or follow a regular flight path as they approach the water.
Some species, like geese and swans, will run across the water gradually gaining height. Other lighter, more agile species such as teal will take off almost vertically. After a while, you will be able to predict with a degree of certainty when a bird is about to do something of interest.

It also pays to concentrate on one type of shot at a time, especially when there a lot of birds around and lots going on. Don’t allow yourself to get distracted, and stick at trying to secure a good shot of one aspect of behaviour before moving on. Flitting around from one subject to the next will usually result in a lot of near misses. If you’ve seen the action and then try to swing the camera around to capture it, then it’s usually already too late and the moment has gone.
Sometimes a simple approach of tracking the movements and behaviour of a single bird is the best option, and this means when it does do something interesting you’ll be ready to nail the shot.
6. Follow the action
When shooting action, there are some settings that will help you you capture the dream shot.
First of all, set your camera to its continuous focus / predictive focus mode (e.g. Servo on Canon bodies). This means that the camera will continuously readjust focus as your subject moves around the frame, so long as you maintain the focus point on the bird. The key here is to keep the focus point on the bird’s head if possible (although for birds in flight this is particularly difficult and its easier to aim of the side of the bird).
If necessary, move the active focus point away from the centre of the frame to help with this. If your camera / lens is supported on a bean bag or tripod, it’s a lot easier to do this compared to hand-holding.

You should also set the motordrive to high speed continuous to allow you to capture the maximum burst of images as the action unfolds. A fast (rapid data transfer) memory card is also useful so that you can capture the maximum number of images before the buffer fills. If it’s too slow, you’ll have to wait for the images to download to the card, which can be really frustrating if you’re missing shots.
Also, maintain a fast shutter speed – ideally 1/1000th second or faster – to capture the quickest action. Increase the ISO if necessary to achieve this.

Another useful tip is to limit the focus range of your lens. Most lenses have a switch that allows you to limit the range over which the lens will focus (e.g. from 10m to infinity; ignoring anything closer).
Assuming your subjects are more than 10m away, this is a good choice as it prevents the lens searching for focus at closer distances. Consequently, it speeds up the time it takes to lock on to the subject.
If you lose focus completely, for example with a bird in flight, then briefly override the autofocus by manually focusing the lens to regain focus and then revert back to follow focus.
Read more: Back Button Focus – When and Why to Use It

In conclusion
Whether you visit your local park with some treats for the mallards and swans (remember – no bread!), or set up for the morning on a nearby lake or reservoir, there are so many possibilities for eye-catching images of this colourful and active group of birds.
There are few better places to be on a calm misty morning than at the water’s edge, quietly anticipating your next picture. From small in the frame atmospheric pictures of swans gliding serenely through a veil of mist, to full-frame close ups of a drake’s head in all its technicolour glory, there is never any shortage of photographic potential. Oh, and don’t forget to pack a hot flask and a stack of sandwiches – you may be gone some time!


