
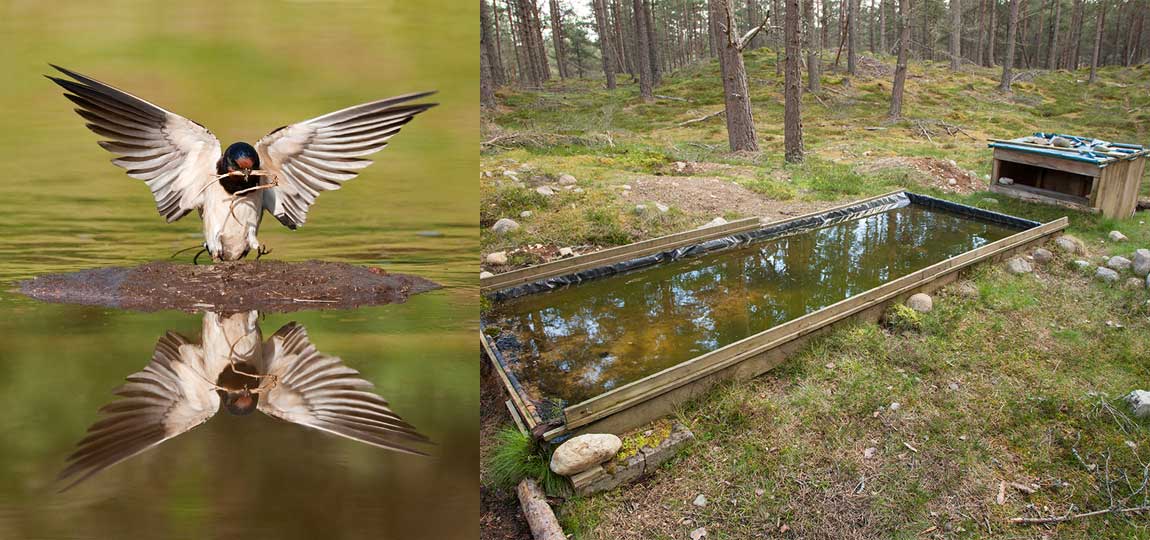
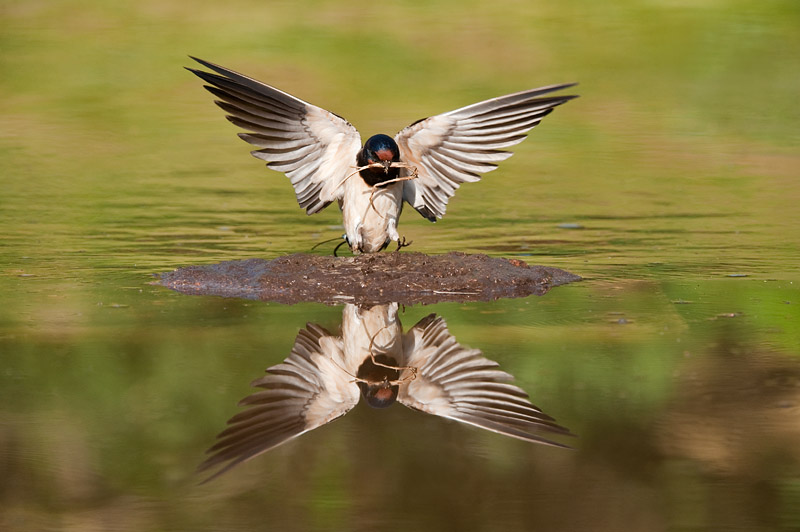
How to Build a Bird Reflection Pool
Getting close to your subject is one of the biggest challenge facing wildlife photographers, so it’s often necessary to devise ways of attracting birds and other animals nearer to the camera. Attracting birds with food is one way that works well, but what is equally effective is to provide birds with a reliable source of water for drinking and bathing. Birds need to drink all year round, but from my experience I have found that the optimum months for pond photography are late April until late July.


So first things first, you need a suitable pond. Most often, an established garden pond is not ideal for the purpose of photography, and so it is a good idea to start from scratch with a design that allows you to create tailor made images. There are several things to consider here. The pond needs to be accessible and user-friendly for visiting birds. It should be sited in a position that receives front lit early morning sun as this is most often the time of day when bird activity is greatest. And thirdly it needs to have a good, preferably plain background such as grass (although this can be overcome with a false wooden background and good painting skills!).

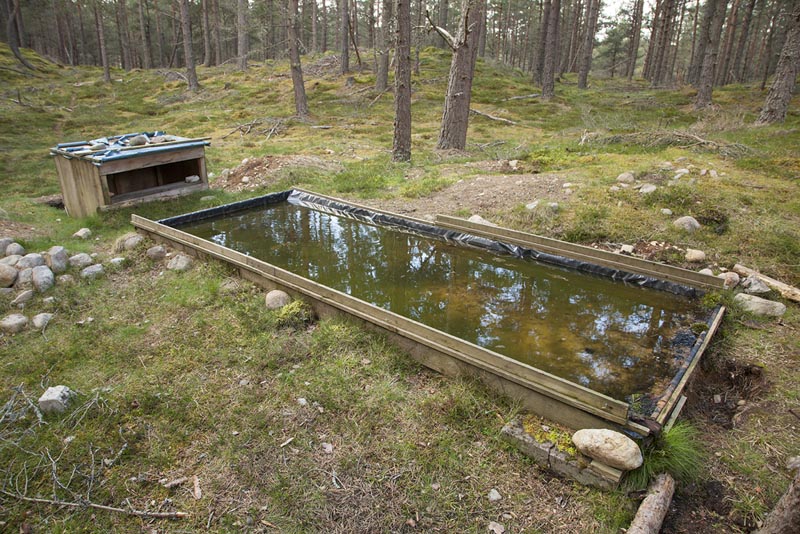
My original garden pond was a ‘dish-shaped’ design sunk into the lawn, which worked well, although to achieve a low shooting angle I had to lie on the ground for long periods and this can be very painful! So, the solution was to raise the pond off the ground. Not only does this make it easier to shoot at water level, but it also produces cleaner backgrounds and better reflections. This is not new of course; Bence Máté pioneered this technique in Hungary a number of years ago, but if it’s a good idea then it’s worth copying!
The basic design of the pond is very simple but you may want to adapt this to suit your own situation. I used an 8×4 foot standard sheet of 12mm marine plywood as the base and formed the sides using 170mm x 45mm softwood although you could use smaller dimensions for the sides, which would be cheaper. The front and back of the pond were formed with 130mm x 45mm softwood thereby making them lower than the sides. The logic here is that you want birds to drink at the back of the pond. So to deter them from drinking at the sides, they should be higher, making it harder for them to reach the water Alternatively, you could make all four sides at 130mm depth and then nail on additional strips to the sides to make them higher.

This wooden tray was then lined with thick horticultural black polythene (it must be black to get good reflections). Take care to make the fit of the polythene as neat and tight as you can on the back edge, pulling it down and tacking it onto the wood (above the intended water level!!). I then nailed additional strips of wood onto the two sides to hold it all in place. I have raised my pond by placing it onto ‘joists’ and cross members (to support the weight) so that the bottom of the pond sits about 180mm off the ground. The key here is to make sure that everything is absolutely level. Check and re-check using a spirit level so that when filled, the water is level. Once everything is spot on, fill the pond using a garden hose.
You now have a basic pond, but to make the ‘photographic’ end more attractive to birds you’ll need to back-fill it to form a shallow end suitable for bathing. To cut down on loose material I used 3 concrete blocks butted up against each other and then laid some coarse grit and small pebbles over the top so that the water depth was a maximum of 40mm sloping the back edge. Make sure that the black polythene in covered completely but you’ll find you need to re-cover this each time you photograph as it can easily get washed off. An alternative is to lay a log or a flat stone along the back edge for birds to perch on when drinking. If you have swallows or house martins nesting close-by also provide a source of gloopy mud for nest building in late April/early May.

I then sunk a hide into the ground at a distance of approximately 5m from the far edge of the pond, which is about right when using a 500mm lens. But of course there is a big size difference between a blue tit and a collared dove, so a telephoto-zoom such as a 100-400mm is ideal – or if you have two camera bodies, then set up both with different focal length lenses. A semi-permanent (wooden) hide is best so that visiting birds are well accustomed to it and this also means that you can quickly pop into the hide whenever there is good light.
As an alternative I have now extended the length of the pond to 16 feet (5m) by using two pieces of 8’ x 4’ plywood and extending the sides. This means that I can now place perches part way down the length of the pond instead of along the back edge and photograph birds with water directly behind them. This isn’t necessarily any better than the other approach but it gives more options and means that it’s now possible to photograph either in the middle or at the end of the pond depending on where I create the shallow area.
Photography doesn’t have to be restricted to the morning of course, and on bright but overcast days it’s possible to shoot all day with good even lighting. In some ways this can be preferable to all but the earliest sun because it can get too bright and create problems with contrast and harsh unflattering shadows. Another option is to shoot later in the day from the same position and make use of low backlighting during the early evening, This can work really well if the birds are bathing as is emphasises the water splashes especially when shooting against a dark background.

And that’s it! Keep adapting and fine-tuning your pool to get exactly the types of photographs you want. If you do create your own reflection pool, please submit a photo of it in the comments below – we’d love to see!


