
How to Get Sharper Photos Without Expensive Lenses

There’s no doubt about it: one of the best ways to get sharper photos is to have better glass on your camera. But lenses that produce the crispest details tend to cost the most, especially if you’re looking at telephotos as a wildlife photographer. The typical kit lens you get when buying a DSLR camera in a combo deal tends to be fairly poor in the grand scheme of things. They’re great if you’re starting out, but if you’re serious about your photography then it won’t be long until you have your eye on something a little different.
Third party brands, like Sigma or Tamron, have seriously upped their game in recent years. The lenses they are producing, at a much reduced cost compared to the main Nikon and Canon brand lenses, are sharper and of a much better build quality nowadays. The price tag has increased a little to reflect this, but they are still the cheaper option if you’re looking to save money. The popular Sigma 150-600mm lens is capable of producing sharp shots, although the slow focus and smaller maximum aperture will still frustrate many photographers looking to shoot action-packed images. We recently reviewed the new Sigma 500mm f/4 lens, and even though it’s still pricey, it’s a lot cheaper than the main brand alternatives. It produces really sharp images too, just like you’d expect from a 500mm prime lens.


Perhaps even the third party lenses are out of your budget, or you’re already shooting with one but want to get sharper photos without shelling out thousands for the main brand lenses. Luckily, there are still some things you can do to improve image sharpness by utilising both good technique and good processing skills.
Improving Your Technique for Sharper Photos
Even if you’re shooting on the best lens and camera body ever made, you’ll still find that you get poor quality images if your technique is not up to scratch. It’s just like with anything: practice makes perfect. If you have the best running shoes in the world, it doesn’t make you win a race. You can read about different techniques as much as you want, but you still need to actively make the effort to practise it. Think about it… when was the last time you really went out with your camera with the sole intention of practising technique? If you’re photographing something really exciting, it’s easy to forget all about the technique improvements you’re trying to implement.
For this tutorial I’m not going to look at the really basic things like ‘use a tripod’. Instead, let’s look at some more overlooked things that you can fix quickly and easily to eliminate all unnecessary blur and softness in your photos.
1. Try Back Button Focus
When you take a photo normally, half-pressing the shutter button focuses the image and fully depressing it takes the shot. Having your focus and trigger combined into one button can mean that you take images before they’re properly in focus. It can be hard to determine the right moment to click, and if you’re not in continuous focusing modes the camera definitely won’t adjust the focus afterwards to maintain a sharp shot.

Back button focus removes this doubt. It separates the control of the focus action from the shutter button, and assigns it to one of the rear buttons on your camera. It’s probably labelled as AF-On or AE-L. This way, you can continually refocus the shot using the rear button whilst you are taking photos. It also allows you to utilise AF-S, AF-C and manual focus modes at the same time (for Canon users, that’s One Shot, AI servo and manual focus). How? Well by setting your camera into its continuous focus mode, you just hold down the rear button to continually adjust the focus. If you want to get the benefits of AF-S, or One Shot, you just focus until you’re happy, let go of the rear button and fire away. You’re free to move around and recompose, and the focus won’t change when you press the shutter, as long as you don’t touch the rear button again. To use manual mode, you just ignore the rear button and adjust the focus ring as you see fit.
The added flexibility from back button focusing is a big help. Not everyone finds it to their liking, and getting your head around the changed controls can take a little while to adapt to. I recommend, however, that you try this technique out if you’re having trouble keeping focused on your subject, especially if it’s moving.
Sounds interesting? Have a read of our back button focus tutorial to find out more about it and how to implement it on your camera.
2. Know How & When to Use Vibration Reduction
You might know it as VR, OS, or IS depending on the brand of lens you’re using. But if you have vibration reduction on your equipment, it’s not always going to help you achieve sharper shots. It’s fantastic when you’re handholding; you can shoot at slower shutter speeds, meaning it is great for photographing in low light. If you’re not utilising vibration reduction and you are handholding your lens a lot, then this is a big mistake. Enable it, engage it and look through the viewfinder. You’ll see that when it’s engaged, the viewfinder becomes more steady despite your movement. It’s quite fascinating to watch it work, actually. Or maybe that’s just me being a little nerdy.

If you’ve got the camera on a tripod, however, vibration reduction can become your enemy. This isn’t the case with all lenses, but a general rule (even on high end telephotos) is to disable vibration reduction when you have the camera mounted on a tripod. This is because the vibration reduction is always trying to stabilise your camera. If there’s no vibration at all for it to counter, it may end up introducing unnecessary movement as a consequence.
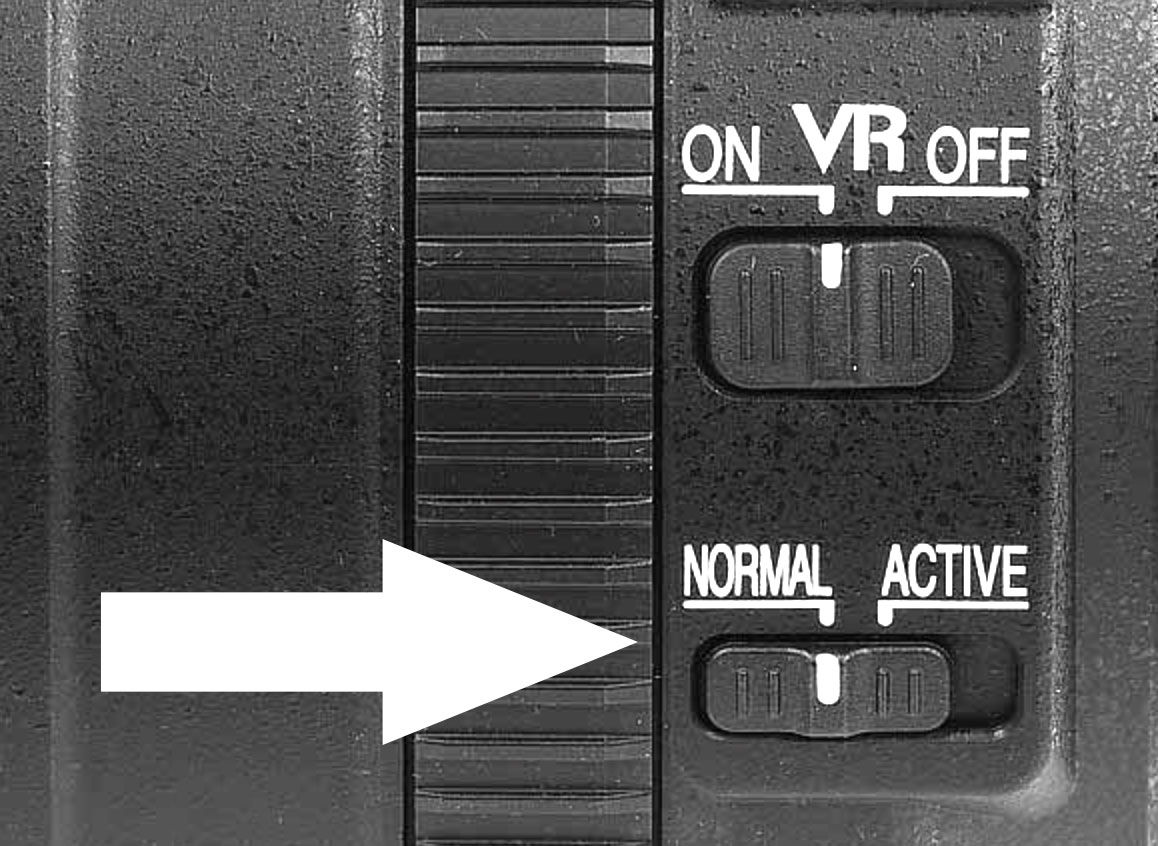
Nikon users looking at their lens will see ‘Normal’ and ‘Active’ modes for their VR. ‘Normal’ should be utilised when you are stood still, photographing a subject. ‘Active’ should be used when you yourself are moving, such as in a car or on a boat, whilst trying to photographing something outside of your vehicle.
Canon users will see modes 1 and 2. Mode 1 engages the image stabilisation on all axis (up and down; left and right). This would not be good if you were, for example, trying to pan when photographing a bird in flight. Mode 2 looks for the biggest degree of movement on one axis, and stops countering it. So when panning, your movement left to right (on the horizontal axis) would not be countered by the image stabilisation, but any movement up and down (on the vertical axis) would be. The Sigma lenses have similar vibration reduction as to the way Canon lenses work.
3. Use a Faster Shutter Speed
This is a simple one, sure, but easily overlooked. If your shutter speed is not fast enough, you’re not going to get a sharp image. A good rule is to shoot at a speed of at least 1 over the focal length of your lens when handholding. For example, on a 400mm lens you would not want to shoot slower than 1/400th of a second. This will help eliminate unnecessary camera shake.

Sometimes getting a faster speed is not easy though. If you’re photographing in low light, then your options are limited. Don’t be afraid to increase your ISO speed to enable you to achieve the necessary speeds. It’s better to get a noisy image than a completely blurred image. You can always remove noise in post production later.
Further Reading: Choosing the Optimum ISO Speed
If you really don’t want to increase your ISO too far, then you can always employ other techniques for low light shooting. Panning is a great way to use a slower shutter speed to get (mostly) sharp photos. It’s a bit of a hit and miss technique, but the results can be very impressive.
4. Focus points, apertures & more
There are some other problems that you may face, with both your technique and equipment, that are reducing the sharpness of your photos. To avoid going into detail on too many things in this article, I recommend you read an earlier article on Nature TTL: ‘The Real Reasons Your Photos Aren’t Sharp‘. It covers some other things you’ll need to think about if getting sharp photos is proving difficult.
Use Effective Post Production Adjustments
There’s no shame in editing your photos. In fact, if you’re shooting in a raw file format then it’s absolutely necessary for you to process your images. If you are not sure about sharpening in post production, then have a read of our discussion article Editing Your Photos: How Far Should You Go?.
Even images taken on the most expensive lenses will be sharpened to some degree. It’s just normal. If you’re compressing images for viewing on the web, you’ll need to sharpen them again as they will look significantly softer after they’ve been shrunken down and compressed. I’ve always sharpened my images in post production, although you need to be careful not to over sharpen a photo.
Sharpening is just part of the process you should adhere to in your digital darkroom that is Photoshop or Lightroom. To learn how to properly sharpen a photo, read our tutorial ‘How to Sharpen Photos in Lightroom‘. Even if you already know how, it’s worth a read – there’s a special ‘magic button’ that changes the view when sharpening and makes things a lot easier.


