
How to Photograph Wildlife at Golden Hour

Wildlife photography at golden hour is a great way to take photos with dramatic lighting. Golden hour photography allows you to master the art of using light to create stronger images. It will transform your wildlife photography into something truly magical.
The hours following sunrise and leading up to sunset are both known as ‘the golden hour’. During this time, the temperature of the light will measure in the region of 3,000 degrees Kelvin.


The wavelengths of the light are longer, creating a warm, rich quality which soon disappears as the sun starts to climb higher.
This quality of light does not last long so you will have a relatively short window in which to work. You will need to be prepared and plan.
Go out with a specific goal in mind, even a visualised image, or perhaps plan to have a certain location and subject you would like to tackle.
Set your camera up beforehand and become as familiar as possible with the required settings. This prevents fumbling around in the moment and potentially missing that magic shot.
Capturing your subject bathed in golden rays of light can be hugely inspiring and create truly magical images. It is the perfect time for wildlife photography – exploring the opportunities during the golden hour can help to take your work to the next level.
In this article, we’ll explore some tips for making the most of this brief but stunning light in your wildlife images.
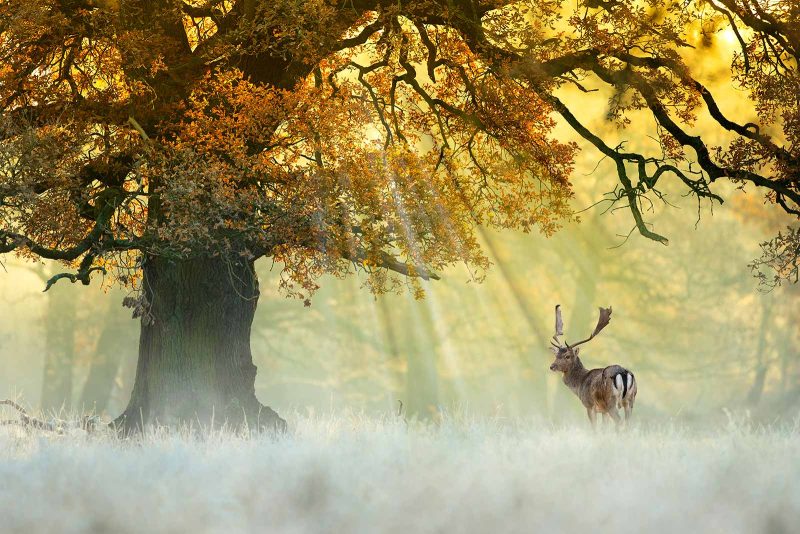
The benefits of winter
Although the golden hour occurs all year round, in winter the sun’s arc is lower, resulting in an extended period of warm, rich light. For this reason, winter is the perfect season for exploring the effects of the golden hour.
The later sunrise makes it a little more forgiving on the body clock, too!
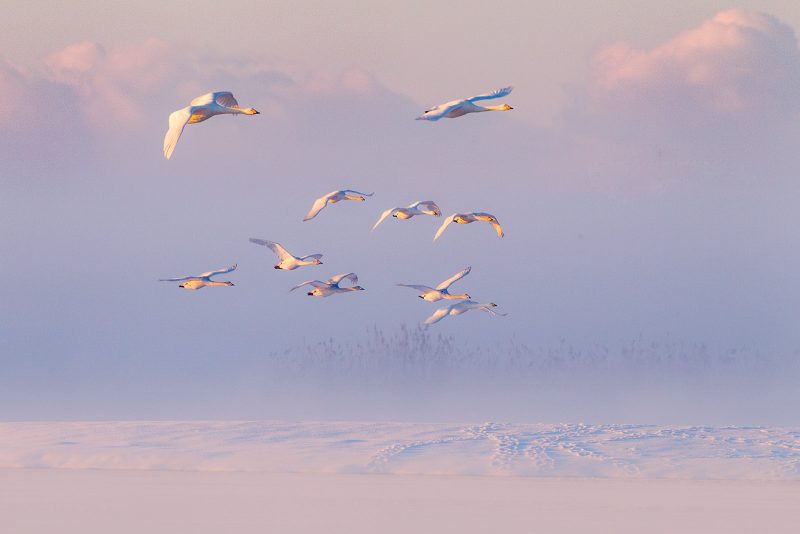
Some places, like the UK for example, will also see an influx of birds every winter, so there should be no shortage of suitable subjects. Whooper swans and pink-footed geese overwinter in the UK and make great subjects to shoot during the golden hour.
There are several Wildfowl and Wetlands Trust (WWT) reserves spread around the UK with purpose-built hides that offer easy access to these stunning birds.
Watch the forecast closely and arrive early on a clear day to take advantage of the warm, golden light.
When tackling swans and geese during the golden hour, I like to concentrate mainly on flight shots. The low sun will create a beautiful glow as it shines through the wing feathers.

Exposure is critical to ensure maximum detail is captured. When shooting against the sky, you will likely need to increase the exposure by up to two stops to prevent underexposure.
The exact amount of exposure compensation will depend entirely on the tones in the scene, so getting into a habit of checking the histogram regularly is good practice.
Aim to expose to the right to capture the most shadow detail, and this will also result in the largest file size possible.
Read more: How to Master Exposure in Your Wildlife Photography
Catching the golden hour
To catch the very best of the golden hour, you should be prepared to head out well in advance and check the weather forecast closely.
Overcast days are not ideal as the light will lack colour. The golden hour is particularly effective following rainfall or a storm as the colours will become even more vibrant.
Several golden hour calculator apps on the market are designed to find the first or last moments of sunlight where the indirect light is evenly diffused to produce a soft, warm light.
Three good ones to try are Photo Ephemeris, GoldenHour.One, and PhotoPills.
If you are shooting during the evening golden hour, you will need to keep a close eye on your settings as the light will fade fast.
Depending on how much depth of field you would like, one option is to open your aperture to allow more light into the lens.
If you are already at your widest aperture, or you are worried about your depth of field becoming too shallow, increase your ISO as the available light fades to prevent your shutter speed from becoming too slow.

It is often worth waiting a while even after the sun has disappeared completely. This is when the light transitions from the golden hour into the blue hour, and it can be perfect for capturing images with a serene and peaceful quality.
When shooting at dawn, the light will increase, so you may want to lower your ISO to reduce potential noise and improve the quality of your images.
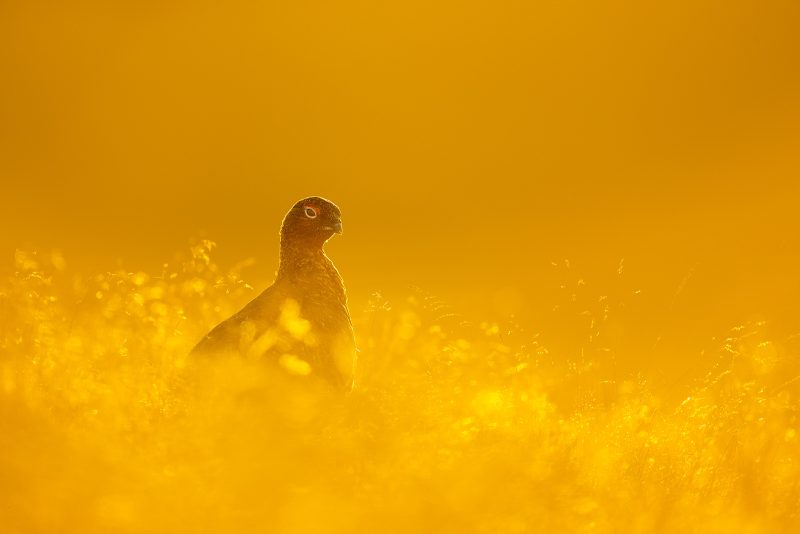
Backlighting
Backlighting during the golden hour can produce a wonderfully evocative effect in your wildlife images. The halo of light that appears around the outline of the subject during backlit conditions is known as ‘rim lighting.’
It can be a great way of highlighting shape and form and can result in simple yet visually striking images that are full of atmosphere.

Any subject can be suitable for backlit (sometimes called contre-jour) photography, but mammals work particularly well as the rim light will highlight and illuminate each strand of fur around the edges of their coats.
Birds in flight can also look spectacular, as golden light will burn through the wing feathers and give them an almost translucent appearance. If you find yourself stuck for ideas, try experimenting with exposure.
When backlighting your subject, look for areas of deep shadow to place your subject against and underexpose by up to 3 stops.
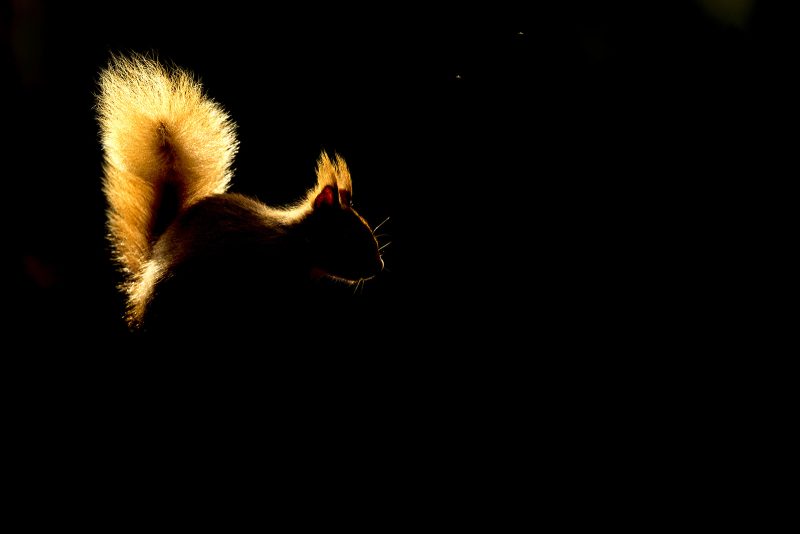
The shadows will be drastically underexposed and should appear black, with only the rim-lighting visible. This will reduce the image to its most simple form and can yield spectacular results.
Backlighting can also be particularly effective when photographing birds on the water.
I like to look for birds that are washing, as the backlighting will highlight the water droplets, especially against a dark background. Your local park will be an ideal place to explore such opportunities.
Read more: Backlighting in Wildlife Photography – Creative Use of Light
Top tips for golden hour bird photography on water
Spend plenty of time observing your subjects and you should soon begin to notice behavioural patterns.
Pay careful attention to the backgrounds and aim to shoot towards an area of shadow as this will make the water droplets appear much more visible.

Switch to the high-speed drive mode on your camera and fire a burst of images to increase your chance of capturing the ultimate moment.
Read more: Bird Photography Tips – Shooting Bird Portraits
Silhouettes
A silhouette is the most extreme form of golden hour lighting for wildlife photography.
With the right subject choice, combined with the right lighting conditions, silhouettes can result in striking and graphic images with a strong emphasis on shape, form, and colour.
As dawn approaches and the colour of the sky intensifies, this is the perfect time to search for silhouettes. Your subject should be instantly recognisable, so animals or birds with distinctive shapes are ideal.
When shooting against the sky, positioning yourself lower than your subject and shooting slightly upwards will help you to capture its full shape against the brightly lit background.
To expose for a silhouette against the sky, take a reading from the brightest area of the sky and either use the exposure lock function, or set the exposure manually.
This will ensure that the highlights will be exposed correctly, and the subject should naturally fall into silhouette due to underexposure.

You may need to increase exposure slightly but be careful not to blow any highlights which would result in a loss of important detail.
When it comes to silhouettes, be imaginative and remember, a silhouette doesn’t always need to be taken against the sky. As long as there is sufficient contrast, there are other backgrounds to explore.
Birds on the water can look stunning in silhouette, especially during a misty dawn. Watch the forecast closely and on the morning following a cold, clear night, head to your local park lake; there’s a good chance that as the sun rises, there will be mist clinging to the water.
A dark background will help the mist to become more visible. By placing your subject carefully against a bright area of the frame, you should be able to silhouette it against the rising mist.

You will need to shoot from a very low angle to avoid a distracting background. A beanbag will allow you to get down low whilst providing solid support and excellent freedom of movement.
Remember that the foreground should hold just as much importance as the background, especially when shooting from ground level.
Use a wide aperture to throw the surroundings out of focus whilst allowing your subject to ‘pop’.
Read more: How to Shoot Striking Silhouettes
Direction of light
The beauty of shooting during the golden hour is the rich and intense colours that the light produces. Depending on your orientation to the light, the colours can change dramatically.
We have already discussed backlighting and its benefits to wildlife photographs, and although backlighting is my preferred method, there are times when front lighting or side lighting might be preferable.

Front lighting will illuminate your subject evenly, revealing detail and reducing the risk of unwanted shadows. Front lighting is also the most forgiving in terms of exposure, with adjustments needed only if there are predominantly pale or dark tones in the scene.
Side lighting can be tricky to work with due to the long shadows that it creates and the higher contrast levels. However, the high-contrast nature of side lighting can be used as a creative tool, especially when combined with effective use of exposure.
By underexposing you may find it possible to create a mostly dark image with strong areas of shadow, illuminating only the parts of the frame that you would like to appear visible.
This is a great way of exploring a low-key style and producing images that are full of atmosphere and mood. It is also an effective way of eliminating unwanted distractions.
To create low-key images, you will need to reduce exposure. The exact amount of negative exposure compensation needed will depend on both your creative interpretation of the scene, and the tones in the image, but between 1 and 3 stops is a good place to start.
Checking the histogram will give you a much clearer idea of where the tones lie compared to simply looking at the image on the LCD.
Read more: How to Harness Artificial Light for Stand-Out Urban Wildlife Photos
Bokeh
The word Bokeh comes from the Japanese word ‘boke’, which means blur. It is the effect that occurs when a wide aperture is used, and the background appears completely out of focus.
Any highlights that appear in the soft background will take on the shape of the diaphragm blades in the aperture of the lens used.
Lenses that have circular-shaped blades will produce round orbs, whereas lenses with a hexagonal shaped aperture will create hexagonal orbs.
This effect can be used creatively to produce images that are full of light and colour, with a warm and uplifting mood. For the most extreme results, you will need to set the widest aperture possible.
A distant background will exaggerate the effect, but you may need to move closer to your subject to achieve a smaller depth of field.
Bokeh can enhance any image and will suit all types of subjects. I like to search for opportunities when photographing my local swans.
As the light hits the water it creates specular highlights, these bright spots of light are perfect for creating bokeh, especially against a dark, shadowy background.
You will need to shoot from a low angle and experiment with different positions until you find the desired effect.

I like to set the white balance in-camera to suit each situation I find myself in. I usually switch to a cloudy white balance when shooting during the golden hour. This setting enhances the warmth in the light and will bring the colours to life.
When shooting with auto white balance selected, the camera will partially “correct” for the warm hues and the beautiful quality of the golden hour often becomes lost.
Of course, white balance can be altered in post-production, so I recommend using the colour temperature slider until you achieve the desired result.
Read more: Depth of Field for Beginners – Bokeh, Focus, and more
In conclusion
Shooting during the golden hour has a host of advantages and is a great time for exploring a wealth of different techniques, from graphic silhouettes to low-key atmospheric portraits.
Colour can be used creatively to depict different moods, and whichever way you decide to explore the golden hour, the rich yellow and red hues that are present are sure to inspire.
Head out early and late in the day, watch the light carefully and experiment with different angles and you will soon get a feel of how to make the best of this magical time of day. Good luck and have fun!


