
Bird Photography Tips: Shooting Bird Portraits

Bird close-ups are a popular subject, especially in the winter and spring when they are sporting their finest plumage. With the exception of a couple of species, males don the most colourful plumage and consequently they tend to be the target for most photographers.
Don’t ignore the females, though. Their colours may be more muted – largely for camouflage when they are incubating eggs – but the tones and subtlety of the plumage of species such as grouse are exquisite when seen in close-up detail. The variety and distribution of bird species also adds to their appeal, as you don’t have to travel far to find a suitable subject.


Back gardens, city parks, woodlands, farmland, estuaries, cliffs, moors and mountains, all have their associated bird species, from the diminutive wren to the mighty eagle and everything in between.
In this feature I’ll provide an insight into the gear, camera settings, fieldcraft and techniques needed to help you capture stunning bird portraits.

Equipment for bird portraits
It is easy to get hung up on equipment, but to be honest it really doesn’t matter what kit you own. It’s still possible to obtain rewarding bird portraits with most gear.
That being said, there are some camera functions that will make life easier, such as continuous autofocus, mid to high speed burst mode, and multiple focusing points. However, most modern cameras have these functions as standard.
What’s more important is the lens. This is what really makes a difference to the quality of your images, and this may be more evident when shooting bird portraits where you want to reveal the fine detail in the plumage.

Most modern lenses are of very high standard with excellent image quality, so you certainly don’t need to break the bank and rush out to buy the latest 500mm f/4. Zooms are great as they provide flexibility and are especially useful when photographing different-sized species from a fixed position, such as a bird hide.
Ideally, a focal length of 300mm upwards is recommended to help capture the subject at a decent size in the frame. The addition of teleconverters is an option to increase the focal length, and don’t forget that if you’re using a camera with a cropped sensor then this will also increase the effective focal length.
Getting closer to your subject
Having the right equipment is one thing, but getting close enough to capture intimate bird portraits can sometimes be a challenge depending on the species in question.
A knowledge of birds and their approachability provides a good foundation to help you in your quest, but if you are new to bird photography then your garden or local park is an ideal place to start. In places where birds are accustomed to people they can be very approachable, which means that you can concentrate on photography.
Seabird breeding colonies are also great places for close-up bird photography, with species like puffin, auks, terns and gulls in good numbers and in close proximity.
Read more: How to Photograph Puffins

Bird reserves, such as those managed by the RSPB or Wildlife Trusts, usually have hides that provide good views of resident species. These can be rather hit and miss and are not always in the best positions for photography, but it’s worth checking out ones local to you; you may be surprised how productive some of them can be especially if you are prepared to wait around and make regular visits.
Commercial hides run by photographers tend to be more reliable for producing the goods, with a range of species on offer including species that may prove to be difficult to try to tackle on your own. Some photographers prefer a DIY approach and build their own hides or use portable hides that are commercially available.

Read more: Wildlife Photography Hides – What to Know About Workshops
Certainly, concealing yourself in some way will increase your chances of getting close to more wary species. Providing a regular supply of food, especially in winter, close to your hide will also ensure a regular supply of birdlife.
Using light
It goes without saying that lighting is fundamental to any photograph, and for bird portraits there are a few things to consider.
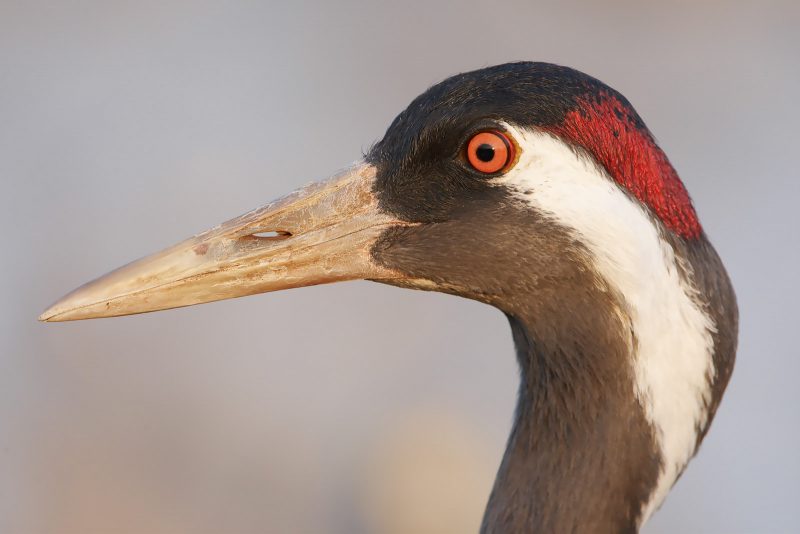
Feather detail is an important aspect of a good bird portrait. You want to be able to clearly see the colours and detail in the bird’s plumage, and of course the lighting conditions play a part in this. If, for example, you photograph a puffin on a bright sunny day, with the sun high in the sky, it will be difficult to render good detail in both the black and white plumage because of the very high dynamic range.
As a result, the whites will be blown out or the blacks will be clogged up; either way you’ll be lacking detail in some areas. Shoot on an overcast day, or when the light is softer, and the dynamic range is reduced by several stops. This means that the entire range of tones can be recorded.
Some cameras are better at recording a high dynamic range than others, but as a rule try to photograph in lighting conditions that will allow your camera to capture a full range of tones. You can easily check this on the histogram.

Bright overhead sunlight also creates shadows, and this can be unflattering in a bird portrait. So, if you are shooting in sunlight, try to shoot at either end of the day when the sun is low, meaning there are less shadows and warmer tones.
In winter and early spring, the sun is lower in the sky and this really makes a difference to the quality of the available light. The direction of sunlight is also a factor and generally it is preferable to shoot either with front lighting or backlighting.
Side-lighting tends to be less effective for bird portraits (although there are always exceptions), often throwing a shadow across part of the bird’s head. Front lighting is best for bringing out the colours in a bird’s plumage and will produce a more evenly lit portrait. It also makes it easier to expose correctly as the contrast is lower.
Read more: Choosing the Best Lighting for Wildlife Photos


Backlighting can be very effective for bird portraits, especially those with a clearly defined and recognisable shape or plumage that picks up sunlight to create an attractive rim lit effect.
Exposure can be more tricky in these circumstances and some compromise may be necessary. For example, do you choose to retain detail in the highlights, in which case the front of the bird may become very dark or even silhouetted. Alternatively, exposing for the front of the bird may well lead to burn out on the highlights.
It depends on the effect you are after, as well as the part of the bird that you feel is the most important to portray. Sometimes, a little fill-in flash can be effective with backlit subjects to brighten the front of the bird and lift the colours. It should be subtle though, too much flash and the effect can look false and the backlighting effect masked.
Read more: Does Flash Photography Harm Animals?

Keep an eye on the backgrounds
I always feel that the background or surroundings are as important as the subject itself when trying to create a good bird portrait. So what makes a good background? It’s perhaps easier to say what makes a poor background or what to avoid.
Any part of the picture that distracts from the main subject is a no-no. Clutter, hot spots, bright background, too much being in-focus – anything that takes the eye away from the subject – these are all things that could be considered a distraction and therefore reduce the overall quality of the photograph.
Likewise, branches or stems of vegetation that cut through the bird either in front or behind can be very distracting, so look for subjects that have a pleasing complimentary background.

If you like very simple out of focus, diffused backgrounds – and these certainly can be very effective – then the best way to achieve this is by using a long focal length lens and a wide aperture.
This combination of factors reduces depth of field so that only the bird will be in focus with the background and surroundings thrown out of focus. A focal length of 400mm upwards is best, and set your camera to the widest aperture for that lens. This does require critical focusing however, so it’s important to focus accurately on the bird’s eye.
If you are shooting small garden birds from close range (4-6m), then you should stop the lens down a little to round f/8. This will increase depth of field sufficiently to bring the bird into sharp focus whilst still blurring out the background.
Read more: How to Create a Beautiful Bokeh

Usually, it is best that the background is lit to the same degree as the subject. Try to avoid a situation where the bird is in shade and the background is brightly lit.
However, the opposite can be very effective where the bird is illuminated and the background is in shade. This adds a sense of drama to your portrait and makes it stand out even more clearly. This also works very well with backlit images, as it accentuates the rim-lighting effect.

Camera settings for bird photography
I would suggest either Manual or Aperture Priority (Av) are the most useful camera modes when shooting bird portraits.
Accurate metering can be achieved using any of the metering options available on your camera. Evaluative / Average metering is a good default option, but for more precise readings then try using Spot metering to take a meter reading directly from a neutral (mid-tone) part of the bird and thereby excluding the background from the calculation.
Spot metering can be particularly useful when shooting backlit images, as it allows you to expose accurately for the most important part of the subject.

Shutter speed is important when shooting birds as they rarely remain stationary for long. Whilst it is possible to obtain sharp images at shutter speeds of 1/30th second or slower – when using a tripod or bean bag for support – I would advocate setting a shutter speed of 1/250th or faster even for ‘static’ portraits to arrest any movement in the bird’s head.
This not only helps ensure sharp portraits, but if the bird suddenly becomes active then you stand a better chance of freezing the action if you have a fast shutter speed already set. Achieving an appropriate shutter speed may mean that you have to increase the ISO setting, but most cameras can easily cope with ISO 800 and some up to even ISO 6400 without introducing any significant noise.
Most cameras have the option of either Single Shot or Continuous (Servo) Autofocus mode. You can use either for bird portraits, but I tend to leave my camera set on Continuous so that focus is automatically tweaked if the bird moves.
The downside to using Continuous AF is that the focus point must be maintained on the bird’s eye nearest the camera at all times, although it is possible to lock the focus on most cameras. You may also want to investigate the pros and cons of back button focusing for this.
For precise focusing, switch to single auto-focus point mode and select the point that corresponds most closely with the position of the bird’s eye in the frame. This makes it far easier to maintain focus without the need to alter the composition. Alternatively, you can use the central focusing point, secure focus on the bird’s eye and then re-compose.
If your camera has Continuous Drive mode (most do), then switch to it. It’s a good idea to take shots in small bursts, even of a fairly static subject, as the bird may blink or move its head very slightly between shots and this then ensures that you capture a great pose. Plus, if the bird does suddenly shake or call then you have the correct setting to capture a burst of images.
Personally, I prefer to use a tripod or bean bag for stability and to aid composition, but you may prefer to hand-hold for greater flexibility. In which case, remember to switch on image stabilisation, if your camera or lens has this feature, to reduce the possibility of camera shake.

Composing your bird portrait
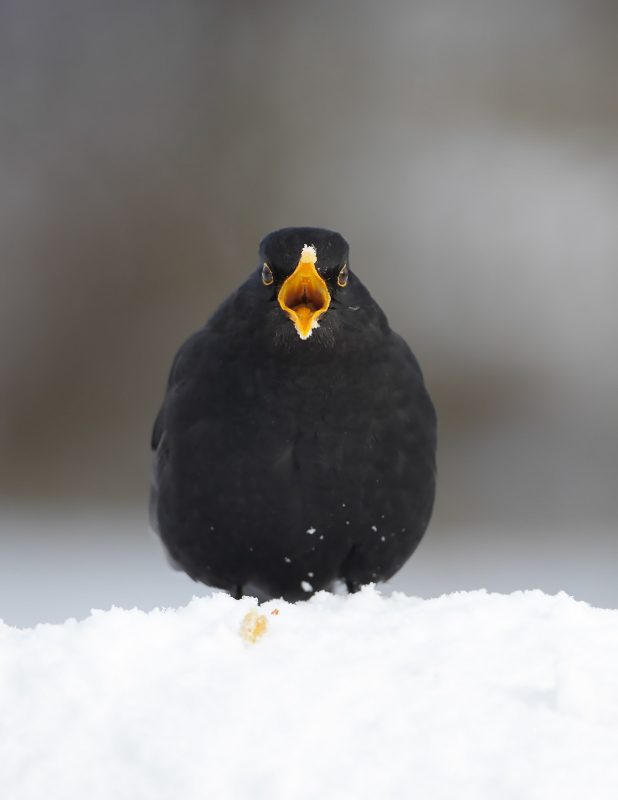
For bird portraits, the subject is typically quite large in the frame – but you still want to give it room to breathe, with some space around the subject. As a general rule, the bird should be looking into the picture (i.e. there should be more space in the direction the bird is looking).
This would usually mean placing the bird off-centre. You could also try implementing the rule of thirds by placing the bird’s eye on one of the intersecting ‘thirds’. If the bird is looking directly at the camera then a more central composition may work best for added impact.
Also consider whether a horizontal or vertical format suits the subject best. A bird side-on to the camera will usually look best as a horizontal image, whereas as bird perched upright facing the camera would look better as a vertical. If in doubt, and the bird holds its pose, then shoot both.

Where possible, try to shoot at eye level with the bird. For ground-dwelling birds, lie on the ground and use a bean bag or low tripod to achieve the desired shooting level. This will produce a far better image and help to separate the subject from the background.
Be bold with your compositions and go in very tight on subjects that will allow it. Your images don’t need to conform to any rules, so try something different and perhaps create an image that is more abstract in nature.

In conclusion
Birds are arguably the most visible and accessible of all animals, and they make fantastic subjects for wildlife photographers. Capturing close-up portraits is a great way to highlight their fantastic plumage.
Whether you live in town or in the countryside, there are bound to be birds in your local area that you can train your lens upon. Big or small, rare or commonplace, the techniques and approach to obtaining rewarding portraits of any bird species remains pretty much the same.
Master the fundamentals outlined above and you’ll be well on your way to producing top notch bird portraits on a consistent basis.


