
How to Photograph Coral Reefscapes

Coral reefs have been described as ‘the pinnacle of nature’s achievement in the oceans’, and support higher biodiversity than any other marine ecosystem. Recent estimates suggest over 800,000 species of multicellular life inhabit coral reefs, a number rivalled only by tropical rainforests.
One key difference between these two ecosystems is that so many rainforest taxa are hard to spot and even harder to photograph, hidden away in the dense vegetation or high up in the canopy. In contrast, a healthy reef appears like nature’s equivalent of a vibrant city, bustling with life of all shapes and sizes in every direction.
At first, this abundance of life, colour, and movement may seem like an easy place to take underwater photographs; however, capturing a good reefscape image involves making sense of all the chaos, and overcoming the technical challenges of underwater photography.
After many years as underwater photography enthusiasts, shooting all sorts of subjects for work and pleasure, reefscapes have become our favourite ‘genre’ of image. While animal portraits can be very exciting, the detail within a wide scenic reefscape captures the viewer and invites lingering exploration. For these reasons, most of the images that we like to print large to hang on the wall are reefscapes.
The attributes we generally consider part of a great reefscape image include: (1) a long depth of field, with features to explore in the background as well as the foreground, (2) dramatic lighting, with a naturally high dynamic range across the scene, and (3) a sense of movement and/or direction, such as schooling fish.

Despite these broad themes, there are many different ways to capture a good reefscape. Understanding how external (time of day, direction of light, tides, behaviour of the subject) and internal (shutter speeds, aperture, strobe position, and power) factors, and the interactions between them, influence our images, can dramatically improve your chances of taking aesthetically pleasing reefscapes.
In this article, we will provide some insight from our experiences of taking reefscapes in different conditions on reefs around the world, and highlight how our different styles can result in quite different reefscape images – even when shooting at the same time in the same place.
Tom, Matt, and Ed, from Tethys Images, a website and underwater photography gallery based in Australia, will provide some insight from our experiences taking reefscapes in different conditions on reefs around the world.
We are fortunate in that all three of us are professional marine research scientists. This has provided us with the opportunity to visit reefs and other wild places all around the world, from some of the most remote reefs on Earth, through to Australia’s sub-Antarctic Islands.

We decided to write this article together because considerable time taking pictures underwater (as well as many hours discussing underwater photography over craft beer) has really impressed upon us that there are many different ways to take pleasing reefscape images (or any images, for that matter).
Even though we often shoot together in the same place at the same time, our different styles and preferences can lead to very different images. In this article we explain how different factors contribute to different results when taking reefscape images, and provide some insight into our thought processes behind why we choose to take images the way we do.
Equipment
Reefscape images are generally taken using wide-angle lenses to capture as much of the scene as possible. While it is certainly possible to capture good reefscapes on compact cameras, a good DSL camera equipped with an ultrawide angle lens (generally over 120-180°) is preferable.
Not only does this allow a wide angle of view, but (crucially) it allows you to get close to your subject – a golden rule of underwater photography. However, shooting such wide angles underwater presents a challenge because of the refraction of light as it passes through water– and the wider the lens, the greater the effect.
Without going into details of the physics of why this occurs (there are plenty of interesting articles about this online, such as this one by Adam Hanlon), it is important to understand that the wider the field of view, the greater the distortion towards the edge of the image.
The most common way to reduce this effect is to use a dome port, and usually a fisheye lens. Larger dome ports tend to have better optical quality, particularly at the corners, but smaller dome ports allow you to get closer to the subject, so are better for close focus wide-angle.
We often carry a range of different dome ports on a trip, from a very large (12”) acrylic dome for splits, right through to a 4” dome for lower visibility conditions, where proximity to the subject is critical. In addition, many underwater photographers choose to shoot with cropped sensor cameras, since the wider field of view on full frames simply results in more soft pixels around the edge of the image.
Tom and Matt both shoot with the cropped sensor Nikon D7200, generally with a Tokina 10-17mm fisheye zoom lens. Ed spent many years with a similar setup on an older Nikon D300S, although he has recently upgraded to a full frame Nikon D850 with a Sigma 15mm fisheye.
The issue of soft corners has been addressed somewhat in recent years by the development of specialised lenses, such as the Nauticam Wide Angle Conversion Port, which corrects for distortion to produce pin-sharp rectilinear images.
However, as with any camera setup, there are additional considerations, such as file sizes and associated data management, that need to be considered. In addition to a camera and lens, wide-angle images often (but not always) require strobes.
Again, there is a trade-off between size and power: more powerful strobes have advantages in certain circumstances, but smaller strobes are easier to travel with. We all use Inon strobes: Tom and Matt both currently uses Inon Z330s, which have a good balance between relatively light weight and high power.
Matt has added strobe colour temperature diffusers (4600K) to warm, soften, and widen the strobe light. The scratches all over Ed’s twin Inon Z240s are also a testament to the incredible robustness of these strobes.
Read more: What Equipment Do You Need for Underwater Photography?
Locations, conditions, and subjects
Coral reefs are photogenic, not only because of their diversity, but also because they occur in relatively clear, tropical waters with sufficient sunlight to enable photosynthesis: ideal conditions for underwater photography.
Even so, not all reefs have gin-clear, 50 metre visibility – indeed, some of the best sites for photography can have quite low and/or variable visibility and water colour from time to time. For example, many reefs in regions such as Raja Ampat and Komodo in Indonesia are subjected to currents that bring nutrients from the deep.
These currents are a primary reason for the abundance of fish, particularly big, swirling schools of planktivores, in these locations. However, these conditions can also present challenges, particularly when shooting wide-angle reefscapes, which we will expand on below.
There is no ‘right’ time and place to shoot a reefscape, but it is important to understand how these factors influence the types of image you try to capture. As a general rule, reefs with a diversity of corals, some ‘habitat complexity’, and other features of interest, such as schools of fish, are good starting point.
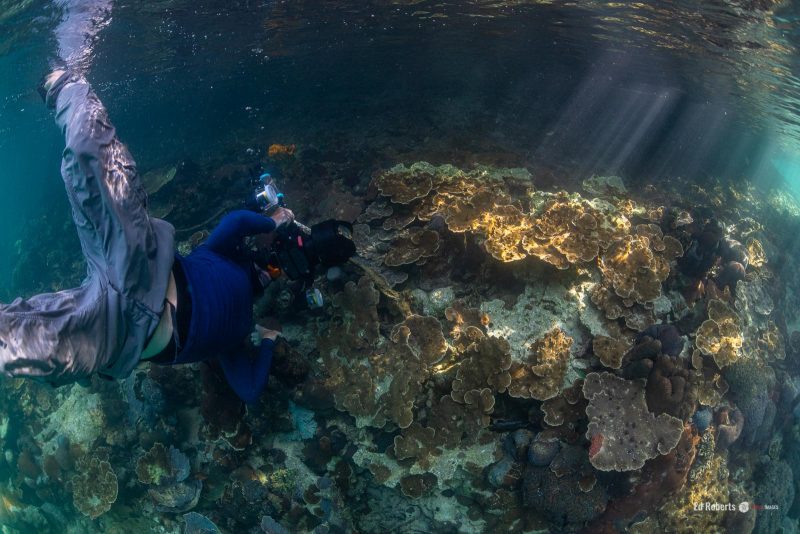
However, the types of images you can capture, even on exactly the same patch of reef with exactly the same corals, will vary markedly in time. For example, early morning and late afternoon provide much softer light, and allow angled light rays to be incorporated into the scene.

The harsh light in the middle of the day is generally less preferable, although, when the water surface is really flat, pleasing mid-day images are possible. These conditions can also allow you to use the water surface as a mirror, adding a new dimension to the reef scene.
If shooting split-level images, it is important to ensure that the tide is sufficiently low, and that there is something of interest above the surface. In some cases this is straightforward: in places like Raja Ampat and Milne Bay in Papua New Guinea, vibrant reefs grow directly below jungle-clad mountains.

However, most reefs on the Great Barrier Reef, for example, are out of sight of land. Things like dramatic skies and sunsets can make all the difference in these situations.

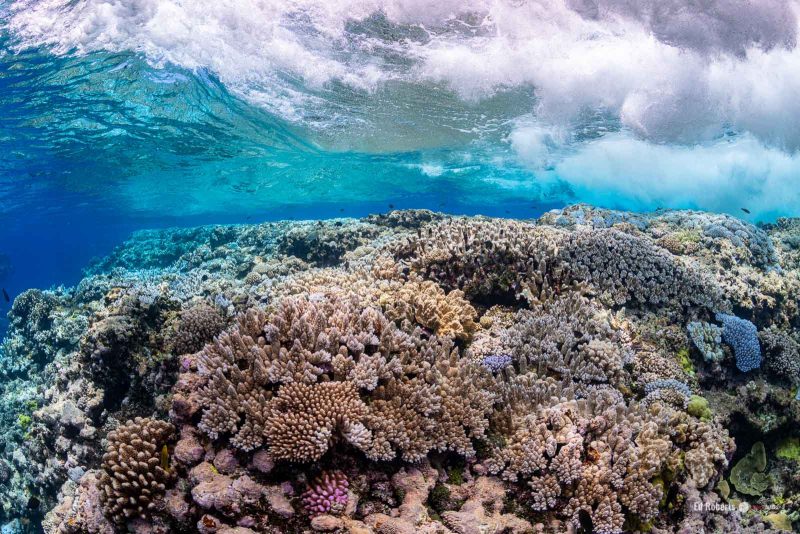
Some other factors are more out of your control, so you have to work with the cards you’re dealt on any particular day. If the water is flat calm, you generally have more options than if it is rough. Swell makes splits very difficult, but you can capture images of waves rolling over the corals that capture the mood and energy of a windy day on an outer reef.
Reefscapes are also not limited to the shallows, and exploring the deeper regions can bring new opportunities. Down deeper, the wind and waves matter less, but the colour and intensity of natural light is sucked away.
Slowing down the shutter speed can allow you to bring back the depth of colour in your images, and using careful strobe lighting (as well as the natural tripod stabilising effect you get from floating in the water) can freeze your foreground subjects in mid motion. By really slowing things down, you can also use this technique to capture blur and movement.

The more familiar you are with a site, the more prepared you will be to execute your ideas within a scene. Knowing a site well allows you to plan for taking a particular type of image, or to photograph a particular event that happens only on a certain tide, moon phase, or at a certain time of year.
However, we also love exploring new places for the first time, and really enjoy the inspiration of discovering new reefs, features, and fauna.
Read more: Underwater Split-Shots – Top Tips for Over-Under Photos
Use of ambient light
One of the biggest differences between shooting images underwater, compared to topside, is the effect of the water column on light. For example, all underwater photographers will be aware of the golden rule of getting as close as possible to the subject.
However, getting a pleasing water colour in the background can make or break a reefscape image, and ambient light is key. In very shallow water (less than a couple of metres), it is possible to shoot nice reefscapes using only natural light, on sunny days under the right conditions.

However, supplementing natural light with strobes provides you with more options, such as shooting into the sun, or at sunrise or sunset.
It is important to consider not only the intensity of ambient light, but also the direction. Shooting with the light behind your back generally provides a beautiful deep blue water colour, so long as you can avoid including your shadow in the foreground.
Furthermore, because natural light is illuminating the entire scene, you can often capture soft colours right through the reefscape. In contrast, shooting into the sun illuminates particles in the water column (less of an issue when shooting with the light), increasing backscatter and often giving the water a ‘milky’ appearance.

Since the scene you are looking at is shaded, it is also imperative to use high strobe power and fast shutter speeds, to both illuminate the reef and counteract the light from the sun. Insufficient strobe power will result in a silhouette of the subject you’re trying to capture.
Careful strobe placement is required to minimise backscatter. Fine-tuning of strobe power is needed to avoid overexposing nearby and reflective surfaces (e.g. silver bait fish).
Reefscapes shot into the sun can be trickier to achieve, but balancing the natural and strobe lighting can produce an image with the bright sunball illuminating the corals in the reefscape, which is a real crowd-pleaser.

It is important to carefully check corners of images by zooming in on your LCD display at regular intervals, as even small changes in ambient light (e.g. drifting clouds) can make a big difference to your images.
It can be frustrating to think you have taken some stunning reefscapes, only to realise, once they’re downloaded onto your computer, that the light is too flat, or a corner is blown out by improper strobe placement. So, be vigilant.
Read more: 8 Tips for Creating Amazing Lighting in Underwater Photos
Camera and strobe settings
One of the things we hope you take from this article is that there is no single way to take a reefscape image. Instead, it is important to understand how different factors affect the type of image you take, and to then adjust accordingly to achieve the image you want to capture.
While this is the case for virtually all the topics discussed so far, it is particularly true for camera settings. You can’t control weather, tides, or sometimes even when you shoot – you may have to shoot when the dive boat is there.
Tourist boats often visit reefs or sites in the middle of the day, not at dawn or dusk which are preferable for photography. However, one thing you always have complete control over is your camera settings.

Tom, Matt, and Ed regularly shoot reefscapes together, at the same time and in the same place, so this is where the individual style of the photographer is really borne out. Seeing the different images we take, and discussing the technical details of how and why particular settings or techniques were employed, has taught us a great deal about reefscape photography.
While there are some things we all agree on (e.g., using manual exposure and power for both camera and strobes, to allow for easy change of exposure setting to suit changing light conditions, and shooting in RAW image format), virtually everything else is subject to interpretation.
For example, Matt tends to shoot with fast shutter speeds and high strobe power, producing images with high contrast that really ‘pop’. In general, he aims to expose for nice deep blue water column, perhaps a little darker than some people, but he likes the dramatic effect.
For Matt, a typical starting point for shooting reefscapes in mid-afternoon with a clear sky would be 1/200s, f/10, and ISO 100. We also choose settings and compositions that play to the strengths of our respective camera set ups.

For example, Tom and Matt exploit the crop sensor Tokina lens to remove distortion and get a great depth of field, while Ed often leverages the high dynamic range and high ISO capability of the full frame sensor. Learning the strengths and weaknesses of your equipment will allow you to fully exploit its capabilities, and can encourage you to explore novel compositions which you might not otherwise have considered.
Composition and ‘wow’ factor
As discussed above, a healthy reef is a riot of colour and movement. Our challenge is to provide some semblance of order to the chaos. A good reefscape, therefore, needs a good focal point: something that draws the eye of the viewer.

This could be a ‘feature’ coral, such as a big sea fan, or perhaps just a coral that is a different colour to the others. Schools of fish swirling around or across the reef, rather than just blue water, certainly add to the vibrancy, and convey the feeling of movement.
Having fish school in some sort of order is important – there is nothing like a strobe flash to send a school of small reef fish scattering in all directions, so getting this right requires patience and timing. Factors such as surface detail are also important. If the surface is flat calm, you can often get some beautiful reflections; if it is rough, then use that to capture the movement and feeling of the waves crashing over the reef.

Finally, technical aspects, like the soft corners and distortion that haunts the edges of wide-angle images underwater, can be accounted for using careful composition. For instance, composing your image so that open water sits in the most distorted edge of the frame effectively removes this effect, and a strong foreground subject should never be placed in these compromised spots.
Reefscapes can be shot in either landscape or portrait mode. While many reefs lend themselves to landscape, particularly on reef flats, some photographers, including Matt, prefer to shoot in portrait mode. Framing vertically creates an image that has greater natural dynamic range, and contrast between the sky and substrate.

Strobes in this orientation often need to be shifted 90 degrees, to be at the equivalent nine and three o’clock positions, and long strobe arms will help to enable a sufficiently wide placement. When you find an inspiring scene, take multiple test shots to fine tune the strobes and exposure, and frame the image carefully around corals and other static features in the foreground and background.
Once you’re confident you’ve got these factors right, wait patiently for the ‘peak of the action’, such as a school of fish moving through the frame, then try to capture this moment, shooting rapidly when they’re moving quickly or synchronously.
Read more: 13 Ways to Improve Your Underwater Photos
Post-shoot processing
We firmly believe that a good image should always be captured in-camera. Having said that, there is no doubt that post-processing is becoming increasingly important in the age of digital photography. We do all our post-processing in Adobe Lightroom.
We all shoot in RAW, as it allows the all-important colour balance to be corrected in post-processing. We each have our own personal preferences, but in general we all lift the shadows, adjust the highlights to improve contrast, and colour correct. We rarely adjust the colour saturation, as we try to present the ‘natural’ colours perceived in the water.
Due to Matt’s penchant for shooting into the sun, his images will often have lots of unavoidable backscatter, but he is happy to spend a bit of extra time post-processing, as a trade-off for capturing a dynamic and inspiring image. If the image is special, he’ll spend more time removing backscatter, but won’t go so far to attempt removing it all – just the particles that are most distracting.

The one exception, where we all edit a little more heavily, is split shots. The addition of Lightroom’s graduated filter over the last few years has made a huge difference in the types of splits that can be captured. The main reason for this is that, when shooting a split, the underwater scene is normally several stops darker than the topside scene, particularly if shooting around the middle of the day.
In some cases, there will be nice cloud patterns in the sky that would form a nice topside scene over a reef, but the problem is that most digital cameras still lack the dynamic range to capture both scenes effectively (although high spec full frame sensors like that in the D850 really help).
Good splits require a number of factors to align, including both weather and tides, so it is important to take advantage of these when they occur. For example, on a recent trip to the remote far northern Great Barrier Reef, we had several days of glassy, calm conditions, ideal for splits over some beautiful reefs.
However, the low tide was always in the middle of the day under a harsh summer sun. In the old days, taking a good split would have been virtually impossible but, with the capacity to differentially alter the exposure of different image segments, it is possible to obtain a pleasing image even though the contrast is beyond the dynamic range of the camera.

When shooting in raw, you generally lose less data when darkening light pixels, than lightening dark ones. Therefore, we tend to expose for the underwater scene, with the knowledge that we can darken the sky by a couple of stops in post-processing.
The same technique can also be applied when shooting into the sun. Particularly in portrait images, there are often several stops of exposure between the sunball at the top and the blue water at the bottom of the image.
While some change in tone is wanted, we don’t want an image with a nicely exposed subject, a blown out surface/sky, and a dark, underexposed background. Indeed, blown out backgrounds when shooting into the sun are one of the most common mistakes made by photographers starting out.
Shooting in RAW certainly provides some level of insurance against mistakes in-camera, and capturing good images in camera is certainly the preference. However, understanding post-processing can allow you to create images that are beyond the capacity of the camera, which is a real advantage of digital photography.
Read more: 4 Ways to Fix and Edit Underwater Photos
In conclusion
Coral reefs are diverse, vibrant, and photogenic subjects for underwater photographers, but creating a sense of order from the chaos can be challenging. It’s also important to remember that, while we often think of ‘coral reefs’ as one type of habitat, they are incredibly diverse.
The bath-warm reefs that fringe the jungle-clad volcanoes of Papua New Guinea can feel a world away from the cold, windswept reefs of the Tasman Sea, 3000 kilometres to the south. Understanding how different techniques can be employed to capture the very different feels of these diverse ecosystems, is the key to successful reefscape photography.


