
A Shot in the Dark – 7 Underwater Photography Tips for Fluorescent Coral

Peering out into the endless night, I feel the cold water creep down the back of my wetsuit and fumble to switch my torch on. Splattering a golden halo of light onto the seabed, a flurry of fish peer out from behind a rocky ledge as I descend into the dark. Night diving for the first time can often feel daunting but quickly becomes addictive. The array of wildlife that clambers out of the dusky shadows at night is completely different to what you might experience in the day. For this reason alone, it’s the perfect opportunity for underwater photography. The main draw for many divers, however, is the chance to ‘fluoro’ dive. Using UV or blue lights, you can experience a phenomenon which has baffled scientists for decades – the ability coral has to glow in the dark.


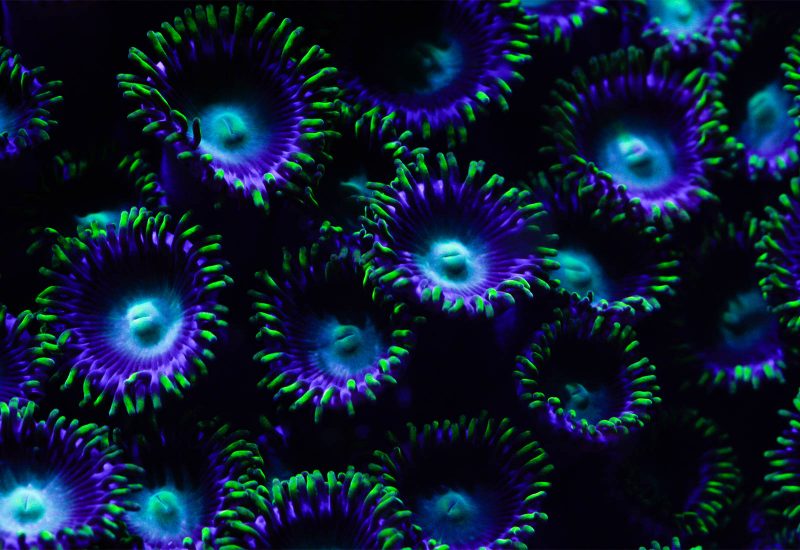
A stunning fluorescent display at night; coral polyps can appear in a variety of UV colours. Vibrant greens and sparkling purples loom out of the dark, appearing in different colours depending on the reefs depth, condition, and ecology. These fluorescent pigments are in actual fact zooxanthellae, symbiotic algae which act as a form of sunscreen to coral reefs. But how do you capture this anomaly on camera?
This article will give you a few easy tips to improve your night diving and get the most out of your camera in challenging underwater conditions. And above all, it will show you how to get the beautiful UV coral photographs you desire.
#1 Diving in the Dark
For safety, it’s a very good idea to dive on a coral reef in the daytime and familiarise yourself with its’ structure. Diving in the dark can be disorientating and it helps if you can recognise markers on your dive, even if it’s only with the dim light of a torch. Another way to help orientate yourself is climbing into the water just before nightfall when there is just enough light to catch your bearings.
It’s always best to discuss with your buddy which signals you will use under torchlight during your dive and practise them before you enter the water. If suddenly hit with challenging currents or visibility conditions, it helps you to easily communicate any issues you may have under the cover of night. The most important thing to remember is to never to shine your torch directly at another divers face. Not only will you temporarily blind them but it will take at least 10 minutes for their eyes to adjust again to the dark, stealing a precious amount of photographing time from their dive.

# 2 Watching Your Step
Because nocturnal predators emerge at night with food in mind, many fish are out of sight within minutes of sunset. This means that you are essentially diving in an altered ecosystem to what you are used to and there are many new residents to look out for. Your first descent should be taken slowly and with care, there will most likely be something hunting on the seabed below you. It’s always best to take your dive slowly and calmly and not worry if something brushes against you – it’s probably only a grouper doing his night rounds.
# 3 Finding the Right Lights
You should always have one primary dive light and one backup light. These should be small enough to easily stow in your BCD; strong enough to use in an emergency, and for photographing fluorescence – have a blue UV option. If possible, it’s a good idea to attach your primary light source to the top of your camera. This will help you use both hands to aim your camera, without having to fumble with a torch in one hand. My favourite primary light to use is a Sea Life Sea Dragon Mini 900 for its compact design, but there are many affordable options available for keen night divers.

# 4 Navigation and Currents
It’s important to remember that when you are using a blue light source to search for fluorescence underwater, there will be far less ambient light than on a normal dive. The absence of typical white light can make non-fluorescent parts of the reef seem invisible in the dark, and it’s easy to forget where you are. This can often lead to accidental reef damage and losing track of which direction you are heading in. For this reason, it’s important to turn on your primary white dive light whenever you feel unsure of your surroundings, and always maintain good buoyancy. A trick to help navigate tricky currents is to turn your blue light on and flip it vertically towards the ocean’s surface. In the dim surface light of your torch you will be able to see fluorescent plankton in the water, and quickly spot which way the current is pushing them. You should expect the current to also push you in this direction and alter your dive plan accordingly.
#5 Equipment
To photograph coral fluorescence whilst diving, you’ll need two extra pieces of equipment. Firstly, you will need either a strong blue UV torch or blue filters to strap onto your external strobes. This will enable you to see underwater fluorescence in your photographs but will also, unfortunately, reflect a generous amount of blue light back into your camera. To counteract this blue light source, you will also need a simple yellow filter attached to your camera lens. This combination allows your camera sensor to pick up a variety of vibrant fluorescent colours that present themselves in coral at night. Alternatively, to photograph fluorescent coral in a controlled environment you will need timed UV lights, a steady tripod, and a long exposure.

#6 Settings
For photographing coral fluorescence, it’s best to work with a DSLR with high ISO capabilities. Saying this, the noise that comes with pushing your ISO too high can often be eased in post-production. As you will most likely be shooting macro you’re going to need a shutter speed fast enough to hold focus – especially if you are using a handheld torch as your main blue light source. It’s a good idea to start with an aperture of F8 and slowly stop this down according to how your camera picks up the fluorescence. A useful tip is to switch your white balance onto ‘cloudy’. This will help draw out authentic colours in camera and reduce the amount of post-production you need.

#7 Post Production
The main issue that you may get when shooting fluorescent coral at night is an increase of noise in your photographs. This is often due to pushing your ISO too high, and post-production is sometimes necessary to make the most of your night diving images. Pushing up the highlights on a slightly underexposed photograph can cause the amount of noise in your image to double, so it’s always best to try and first get it right in camera. However, a small alteration of the ‘luminance’ in-camera RAW will help ease some of the ISO noise, whilst drawing your shadows down will deepen the blacks in your image concealing any background noise.
Although bringing your camera underwater at night can seem intimidating, ‘fluoro’ diving is a relatively new photography technique and there is still a lot of scope for experimentation. It’s important to have fun, and remember to relax! Seeing this phenomenon with your own eyes is a moment that you are unlikely to forget, and capturing it on camera is a rewarding experience. Dip your toes into the dark on your next dive – you might be surprised at what you find.


