
Dark and Moody Photography: Landscape Editing Tips
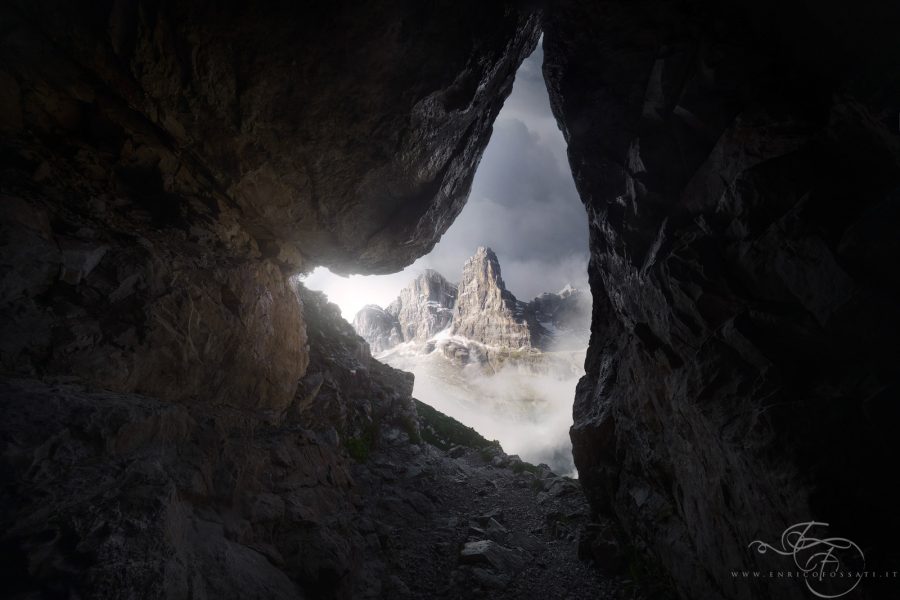
Dark and moody photography is an art form. When photographing landscapes, the decision to lean into the dark and moody photography genre can allow your images to transcend mere documentation, delving deep into the soul of the natural world.
Its goal is to capture not just the physical reality of the landscape, but also the emotions, narratives, and dreams that it evokes.


Landscape photographers hoping to create work in this genre might aim to imbue their images with a sense of grandeur and the sublime. They may seek to celebrate the untamed wilderness, the serenity of vast vistas, and the raw power of nature itself.
My own dark and moody landscape photography is inspired by the rich and evocative traditions of aesthetics like Romanticism, Luminism, and Dark Fantasy.
Dark and moody images, in particular, may focus on a contrast of light and shadow to create mood and atmosphere.
Read more: How to Create Drama and Mood in Landscape Photography
The importance of pre-visualisation and planning
Pre-visualization is the process of mentally composing your image before capturing it. It is a critical step in all landscape photography, allowing you to plan your shot and convey the emotions and the story you want to tell.
You can prepare everything at home before heading out for a shoot, and this will only help you later in creating the finalized image.

Study the light direction on the terrain, conduct composition research, and build a concept around your work. You can even conduct a scouting mission with only your mobile phone, and then return with the gear at the right time.
For dark and moody images, changing weather is the best option, particularly when it’s raining or misty. This makes winter and autumn great times of year for capturing this style of work.
Top tip: In preparation for the work you will need to do in post-production, always shoot in RAW format for maximum data capture. RAW files provide greater flexibility in post-processing and better quality compared to JPEGs.
Read more: 8 Ways to Improve Your Landscape Photography Workflow
Using colour in dark and moody landscape photography
Colour also plays a significant role in creating mood and atmosphere in your landscape photos, especially in dark and moody compositions.

Here are some of the most important ones to focus on when editing this style of imagery:
Green
Green can add a sense of tranquillity and balance to your images. It’s often associated with lush, natural landscapes, but when used in the right why, can also create an eerie or even magical tone in a scene.
Blue
Blue often conveys a sense of calm and serenity. It’s commonly used for capturing the feeling of peaceful, reflective moments in landscapes, and can be used to great effect when brought out in foggy or misty landscape photos.
Purple
Purple tones can add a touch of mystery and sophistication to your photos. This is colour not so commonly noticed in nature, but it’s a great choice to enhance in twilight or dusk shots.
Grey
Grey tones can create a neutral and timeless atmosphere. They work very well in monochromatic or minimalist compositions, and again with fog or mist.

One of the most important steps for creating captivating dark and moody images is colour grading.
Colour grading is a powerful post-processing technique that allows photographers and artists to add depth, mood, and style to their images. It’s an essential step in the editing process that can transform a good photograph into a stunning work of art.

One remarkable tool for colour grading is the “Colorise” filter found in Nik Collection, a suite of plugins for Photoshop and other image editing software. We will explore how to use this tool later on in the article.
Read more: An Introduction to the Power of Colour Photography
Understanding how to use light and dark
In the ‘Luminist tradition,’ landscape photography embraces the play of light and its profound effect on the composition and mood of an image.
‘Luminists,’ whether using a paintbrush or a camera, are captivated by the way light transforms the landscape, revealing hidden nuances and infusing scenes with a serene radiance. Their work becomes a meditation on the interplay of light and nature.
Darker aesthetics may delve into the more mysterious, eerie, and enigmatic facets of the natural world. These images may explore hidden realms, forgotten places, and the shadows that dance on the periphery of our imagination.

In these photographs, landscapes can become settings for dark tales, inviting viewers to embrace the unknown, confront their fears, and perhaps even discover beauty in the eerie and the macabre.
Naturally, to be able to create such alchemy between photography and our inspiration and imagination, we need to spend time at the computer working with Photoshop.
Photoshop is a versatile and powerful tool that allows photographers to bring their creative visions to life through post-processing.
In this article, we’ll walk through some of the key photoshop tools for dark and moody landscape images.
Read more: How to Find and Use Light in Landscape Photography
Basic edits in Camera Raw
To start with, you can open your image in Camera Raw to make some simple adjustments that will immediately make your images have a moodier effect.

Here are some examples for you to experiment with:
1. Reduce the saturation of vibrant colours
You may be surprised by how quickly this influences your image, so toggle the slider only a little bit at a time! The drop in bright colours immediately creates a moodier feeling.
Keeping a little bit of colour is still key to allow you to continue to colour-grade your images later on – unless of course, you want to work in black and white!
Read more: Lightroom Colour Correction: Hue, Saturation, and Luminance
2. Mute the highlights
This will help to soften the overall tone of your image and take away any areas that might feel ‘too bright,’ which can disrupt the feeling of a dark and moody image.
3. Lighten the shadows
Again, use the tool with caution, as lifting the shadows too much can also ruin the tonal qualities.

If you’re truly looking to create a ‘dark and moody’ image, you may only need the tiniest of adjustments here.
4. Fine-tune the colour grading
Within the Camera Raw filter, we can adjust the colour temperature, contrast, and brightness.
This is ultimately down to experimentation and personal preference, but leaning towards the cooler tones (green and blue) on the toggle slider is often the most useful for darker images.
Also be aware when individually manipulating the brightness of colours than you can create grain in your images If you push these sliders too far, so be sure to keep adjustments minimal.
Read more: An Introduction to the Power of Colour Photography
5. Add a vignette
Within the Camera Raw filter we can easily create a vignetting effect. This will darken the edges of the image and can help create a moody effect.
6. Sharpening
It can be worth sharpening your image to help preserve and enhance the details when we publish them on the web (there are many methods of sharpening. Personally, I love the websharpener by Andreas Resch).
Beyond Camera RAW, I also recommend looking into the Orton Effect.

You can create this mystical ‘glowing light’ effect with a transparent layer set in soft light mode, and with a soft brush, you can paint the brightest areas to create a real fairytale look.
Read more: 11 Editing Tips to Greatly Improve Your Landscape Photos
Using Photoshop luminosity masks for dodging and burning
Among the many techniques and tools available, luminosity masks stand out as a cornerstone of advanced workflows, particularly when it comes to dodging and burning for your dark and moody images.
These masks enable photographers to make precise and subtle adjustments to the exposure, contrast, and tonal balance of an image, enhancing its depth and impact.
Top tip: When editing in post-processing software like Adobe Photoshop, save your work as layers. This enables you to make non-destructive adjustments, fine-tuning different aspects of the image without altering the original photo.
Read more: 9 Essential Things to Know for Editing Landscape Photos
Understanding luminosity masks
At its core, a luminosity mask is a selection of pixels in an image based on their brightness values. This selection is used as a mask that can be applied to various adjustment layers, allowing for targeted and localized editing.

Unlike simple selections or layer masks, luminosity masks are highly specific, enabling you to target areas of an image that fall within a particular tonal range.
Balancing shadows and contrast is essential in landscape photography, especially when aiming for a dark and moody look. It’s crucial to maintain detail in both shadows and highlights while keeping the desired mood.
Why use luminosity masks for dodging and burning?
There are three main reasons to use luminosity masks when dodging and burning.
- Precision: Luminosity masks provide unparalleled precision. By isolating specific tonal ranges, you can adjust highlights, midtones, and shadows separately, ensuring that your edits are seamlessly integrated into the image.
- Subtlety: Dodging and burning require a gentle touch to avoid harsh, unnatural results. Luminosity masks allow for subtle adjustments, enabling you to create dimension and depth without compromising the image’s integrity.
- Control: Luminosity masks give you complete control over the areas you want to affect, preventing changes in unintended parts of the image. This level of control is particularly crucial in complex and high-contrast scenes.
How to create luminosity masks
To get started with luminosity masks in Photoshop, follow these steps:
1. Select the Channels Panel
In Photoshop, go to the “Window” menu and choose “Channels” to open the Channels panel.
2. Create a Selection
Ctrl+Click (Cmd+Click on a Mac) on the RGB channel thumbnail. This will create a selection based on the luminance values of the image.

3. Load as a Selection
Click the “Load selection” button at the bottom of the Channels panel. This will create an active selection based on the luminosity of the image.
4. Refine the Mask
To refine the mask further, you can apply levels or curves adjustments to the selection.
5. Create an Adjustment Layer
With your selection active, create a new adjustment layer, such as Levels, Curves, or Exposure. Your adjustment will be automatically confined to the selected luminosity range.
Dodging and burning with luminosity masks
Now that you have your luminosity mask in place, you can begin the dodging and burning process following the steps below.
1. Create two new layers
Add two new blank layers above your image. Label one “Dodge” and the other “Burn.”
2. Select the Dodge layer
Set the blending mode to Overlay. On the “Dodge” layer, use a soft brush set to a low opacity (usually between 5-10%) to lighten areas of the image that need enhancement. Paint over the areas selectively, following the luminosity mask. Select a color that fits the source of light or the surface of the area you want to improve (when you select a colour, set the brightness of the colour in the colour palette at 100% and a saturation max of 30%).
3. Select the Burn layer
On the “Burn” layer, use the same soft brush with low opacity to darken areas of the image where increased contrast or depth is required. Usually for burning, I use pure black, and I keep the transparent layer in normal mode.
4. Refine and experiment
Adjust the opacity of the “Dodge” and “Burn” layers as needed to fine-tune your edits. You can also use blending modes like Overlay or Soft Light for a more natural effect.
5. Repeat as necessary
Create additional luminosity masks and layers for different tonal ranges, as each part of the image may require unique dodging and burning adjustments.
Luminosity masks in Photoshop are a game-changer when it comes to dodging and burning.
They offer a level of precision, subtlety, and control that can elevate your post-processing workflow to new heights.
By applying these masks, you can sculpt the light and shadow in your images, creating a sense of depth, dimension, and mood that can transform a good photograph into an outstanding one, or a ‘flat’ image into a dark and moody one.
Experiment, practice, and harness the full potential of luminosity masks to take your photography to the next level.
Using the Nik Collection and Colorise filter
Nik Collection is a collection of creative plugins that integrate seamlessly with Adobe Photoshop, Lightroom, and other popular editing software.
One of its standout tools is the Colorise filter, a feature that allows you to apply colour toning and grading to your photos with precision and control. This filter can help elevate your photography and unlock the full potential of your images.

It is a fast and effective way to colour grade your image with the possibility of adjusting the settings related to the highlights and shadows.
Select a colour tone that fits your concept. Some of my personal favourites include ‘Pure Black,’ ‘Dark Blue,’ ‘Dark Green’ and ‘Dark Brown.’
1. Open your image
Open the image you want to colour grade in Photoshop.
2. Access Nik Collection
With your image open, go to the “Filter” menu, then select “Nik Collection” and choose “Color Efex Pro 4,” which is where the Colorise filter is located.
3. Select the Colorise filter
In the Color Efex Pro 4 interface, navigate to the Colorise filter from the list on the left.
The Colorise filter provides you with a multitude of options to manipulate the colours in your image. Here are a few options:
Presets
Start by exploring the filter’s presets. These are pre-configured settings that offer various colour-grading effects. They are an excellent way to get inspired and understand the filter’s capabilities.
Basic adjustments
The Colorise filter offers basic adjustments for hue, saturation, and brightness. You can fine-tune the overall colour grading by adjusting these parameters.
Strength and Blending options
You can control the strength of the colour effect, which allows you to make it more subtle or intense. Additionally, the blending options enable you to choose how the colourisation interacts with your image. Experiment with different blending modes to find the look that best suits your photograph.
Further customization
Beyond these options, you can also fine-tune the highlights and shadows separately, enabling you to add subtle toning to various parts of your image. This level of customization is especially useful for adding depth and dimension to your photographs.
Experiment and refine
The key to effective colour grading for dark and moody images is experimentation and refinement.

As you work with the Colorise filter, don’t be afraid to try different presets, adjust the parameters, and use Control Points to isolate specific areas.
The goal is to enhance the mood and atmosphere of your image while maintaining a harmonious and balanced result.
How to avoid over-processing your images
Over-processing in dark and moody landscape photography can lead to unnatural-looking images with excessive contrast, saturation, or sharpness. Here’s how to avoid it:
Use a Light Touch: Apply adjustments conservatively. Gradual changes often lead to more natural results.

Take Regular Breaks: Take breaks during post-processing to come back with fresh eyes and avoid over-processing by making unnecessary adjustments.
Seek Feedback: Seek feedback from peers or mentors to gain outside perspectives on your work.
Read more: Editing Your Photos – How Far Should You Go?
In conclusion
Dark and moody landscape photography is a blend of technical expertise and creative vision.
By pre-visualizing your image, following a thoughtful workflow, applying what you learn about utilising colour effectively, and avoiding over-processing, you can create captivating, dark, moody landscape photographs that leave a lasting impact.
Remember, practice, patience, and a deep connection to the landscapes you photograph are keys to mastering this art! Enjoy the process; dark and moody landscape images offer a chance to wander into the enchanting, the mysterious, and even the unsettling.
You are creating a piece of art!


