
How to Edit and Process Raw Photos in Luminar 2018 & Luminar 3
Raw photos give you the maximum amount of flexibility when it comes to post processing and editing your photos. Luminar 2018 is a great piece of software for editing raw files, giving you a wealth of tools you can harness to have your photos looking their best. In this tutorial, we’ll look at how you can take a raw photo into Luminar 2018 and how to make the first (and most important) raw adjustments.
If you haven’t downloaded Luminar 2018 yet, then read our review of the software on our website or download your copy from the developer’s website.


Importing a Raw File into Luminar 2018
This bit is simple, but if you’re just starting out with raw files then you are likely shooting in both JPEG and Raw formats at the same time. Whilst this gives you a familiar format to fall back on, or review quickly, you’ll save yourself a lot of time by ensuring you are definitely opening the correct file.
To import a raw into Luminar 2018, just select “Open Image…” from the startup screen. Ensure you’re selecting the .NEF (or equivalent raw file extension) file, and not the JPEG, before opening it up.

Once you’re there, you’ll see a layout that is slightly familiar to that of Adobe Lightroom. If you’re switching over to Luminar 2018 from Lightroom, this will be a welcome sight. Once you’ve got over the initial hump of learning how to use a new software, you’ll be right at home with Luminar.
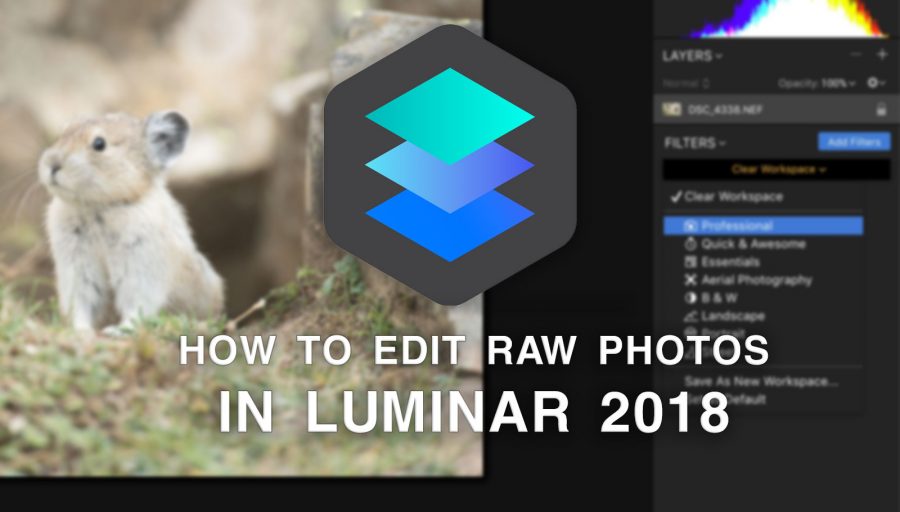
Setting Up the Workspace
The first thing you’ll notice is the apparent lack of options to conduct your raw file edits with. Don’t despair! They’re there waiting for you, but you need to set up your workspace first. It’s a very quick process, and it actually allows for proper customisation of how you use Luminar. Instead of being stuck with a layout that the developers forced upon you, you are able to set up your development window yourself. Ultimately, that makes for a more efficient workflow.
The separate panels you’ll expect to see in the sidebar are known as Filters in Luminar 2018. First, hit that big blue “Add Filters” button.
From here you can add all the different development panels you might want to play with. The first one you’ll want, and the one which we’re going to look at how to use today, is the “RAW Develop” filter. It’s found under the “Essentials” category. You can also use the search function to find suitable filters.
Note: If you can’t find the “RAW Develop” filter then you probably don’t have the original raw file’s layer selected. Luminar 2018 allows you to work in layers, like you would in Adobe Photoshop, so it’s important to click and highlight the original filename under the “Layers” tab (underneath the histogram) before you try and add the “RAW Develop” filter.

You can also go about this another way. If you click “Clear Workspace,” you can then choose from some preset filter arrangements. The “Professional” workspace is probably the one you’re going to want for editing standard raw photos in Luminar. However, pay attention to this tab as you can save your own arrangements of filters as a preset – this makes it much quicker to revert to your favourite workflow in the future. In fact, you can set a workspace as your default so that it opens up each time you import a photo.

If you’re like me and you don’t want to use presets, you’ll be happy to know that you can hide the presets bar in Luminar 2018. Just navigate to “View” and then “Hide Presets.” This gives you more space and a bigger window to view your image in. Perfect!

Cropping the Raw Photo
The first thing you’ll probably want to do is to crop the image. Once you’ve got the composition right it becomes a lot easier to perform the rest of your raw photo adjustments.
The crop tool is hiding away under “Tools” in the top bar of Luminar 2018, or you can just hit “C” on your keyboard.

If you’ve come from Adobe’s software, you might be used to holding shift and dragging the corners of your crop selection to retain the original aspect ratio of the photo. This doesn’t work in Luminar, however. Instead, select “Original” from the aspect dropdown box in the crop settings.

Now you can drag the corners without holding down shift, and the aspect ratio will be retained. You’ll notice there are plenty of other aspect ratios you can choose from, as well as presets specifically for social media use.
Clicking “Done” in the top-right corner, or hitting “Enter” on the keyboard, will confirm your selection.
Editing Raw Photos in Luminar 2018 with the RAW Develop Filter
Now everything is ready and waiting for your to start editing, you’ll probably have a window looking like this (minus the cute Canadian pika):

To help you edit your raw photos in Luminar 2018, I’ll run through each of the adjustments and what they will do for your photos. The first thing to note, however, is that the “Filters Amount” slider you see at the bottom of the RAW Develop panel works like an “Opacity” slider. This should remain at 100, fully to the right, to ensure you see 100% of the adjustments you’re making. You can use this to reduce the effect of your adjustments, but I don’t see why you’d want to do that in this particular case (it will be useful with other filters, no doubt).
Adjust
The “Adjust” tab of RAW Develop has your typical raw adjustments. This should be pretty familiar to you if you’ve edited raw photos before in other software, but here is a rundown of what they will do:
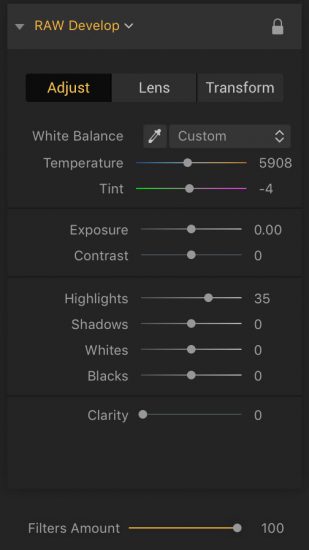
White Balance: The beauty of raw photos is that you can edit the white balance later. Pull along the “Temperature” slider to warm up your photo (to the right) or cool it down (to the left) so that everything looks “correct.” The aim here is to get your whites looking white and removing any unwanted colour casts from the photo. Clicking the eye-dropper tool allows you to mouse over the image and touch on what should be truly white to set the white balance automatically.
Tint: This allows you to add a strong colour cast to the photo in an effort to combat strong casts, in particular from physical filters used in landscape photography.
Exposure: This slider will let you adjust the original exposure of the photo. Here you can quickly brighten or darken the image, but beware you’ll likely introduce noise into the photo should you move this slider too far to the right.
Contrast: Here you can make the difference between the whites and blacks of the photo greater by sliding to the right (a positive value). This typically can add more “punch” to a photo. Be careful not to overdo it, though. Sliding to the left (negative value) will make things appear “flatter.”
Highlights & Shadows: These are often the first sliders you’ll reach for if you’re incorrectly exposed a photo. Raw files allow you to retain much more details in the highlights and shadows of a photo than a JPEG file (read more about why you should shoot in raw). The “Highlights” and “Shadows” sliders allow you to make use of this extra information, pulling back blown whites or dark blacks in the shot.
Note: There is currently a bug in Luminar 2018 meaning that highlights & shadows sliders in RAW Develop cause a global adjustment rather than an adjustment local to the white and black tones in the photo. To combat this, create an adjustment layer and use the sliders there instead. You’ll see localised adjustments as you would expect. This is a fix the developers are currently working on.
Whites & Blacks: Here you can adjust the strength of the whites and the strength of the blacks in your photo. You’ll see similar changes to what you’d achieve with the “Contrast” slider, but here you can effectively separate the contrast adjustments between the white and black areas of the image.
Clarity: This slider will adjust the differences between light and dark edges. If you move it to the right (giving a positive value), then things will become much more defined. This isn’t a slider you’ll use everyday, but it will enhance things in the photo and give a lot more punch. It’s typically a slider I’ll go to when editing starscape photos.
Top Tip: If you hold down the “Alt” key as you move the highlights/shadows or whites/blacks sliders, you’ll see the image convert to a heat map. This will show you the areas that are blowing out because of your adjustments.

Those familiar with other raw editors will probably be wondering where the Saturation and Vibrance sliders are in Luminar 2018. These come under their own filter, and you’ll need to look for it in the “Add Filters” sidebar.

Lens
In this tab you can adjust for distortion, chromatic aberration, and vignetting issues that come from certain lenses.
 Distortion: This is a single slider that will distort your photo with an outwards (left) or inwards (right) bevel. Unfortunately, there is no automatic lens correction in Luminar 2018 like you see in Lightroom. However, the good news is that Luminar is already working and testing this feature. In fact, auto lens correction is coming in March (apparently).
Chromatic Aberration Fix: Here you can move the Red/Cyan and Blue/Yellow sliders around to counteract any colour fringes that are appearing in your photos. This is typical when photographing an object with the sky as a backdrop. Depending on the colour, you’ll need to add in the right compensation.
Devignette: “Amount” controls the intensity of the adjustment and “Midpoint” effects the grey tone of the adjustment you’re making. These sliders are used to combat a darkened circle you may see around the outside of your photo.
Transform
The transform tab can be used to correct perspective issues in your photo. It’s effectively like the “Free Transform” tool in Adobe Photoshop, except you don’t use handles to make the tweaks and instead move individual sliders around. To be honest, it looks a little complex but it is something you are rarely ever going to use.

What Next?
Hopefully you now understand how to make proper raw adjustments to a raw photo in Luminar 2018. We’ll be publishing more tutorials soon which will show you how you can make further adjustments to your photos using this brand new editing software. If you’re a Luminar user and you want to learn from these tutorials, make sure to sign-up for the free Nature TTL newsletter and we’ll send you them as soon as they are published.
Here are some key tutorials that you can use right now for the next steps in your Luminar workflow:
Download Luminar 2018: You can get hold of your own copy of Luminar 2018 for a one-off fee of £64. If you use code NATURETTL at checkout, you’ll get £9 off your purchase. Luminar 2018 is available for both Windows and Mac users. Head over to the Skylum website for more information and to download.


