
5 Top Tips for Underwater Photography in Murky Water

‘Underwater photography in murky water’ probably isn’t our first thought when thinking about taking incredible underwater images.
Our first thoughts might be about taking jaw-dropping, wide-angle shots of the world’s largest animals, like whale sharks, against bright blue waters. Or perhaps we’ll visualize vibrant reefs or epic shipwrecks with divers the size of ants floating across the decks.

Unfortunately, in murky waters, these types of shots are near-impossible to reproduce, but that’s not to say you can’t get incredible images!
In this article, we will look at some top tips to help you make the most of your underwater photography in murky waters.
Where and when to expect poor visibility
Firstly, we need to talk about assessing visibility.
Judging the visibility of a dive can be so difficult. In diving hotspots like the Maldives, Egypt, and the Great Barrier Reef, visibility can generally be predictably good.
Obviously, like anything in nature, visibility can be variable due to elements like rainfall and the number of divers in the area, but for the most part, places like these are mostly seen as having decent visibility.
But when it comes to colder climates, like where I am in Scotland, there are so many factors that contribute to underwater conditions that you never know exactly what you’ll find (which I find part of the allure).

In Scotland, we tend to dive the sea lochs around our coasts. These are often surrounded by hills and mountains, which, when it rains (as it often does here in Bonnie Scotland), causes mud and peat to wash into the lochs, creating poor visibility.
The sea lochs, as the name suggests, open out into the sea, though, meaning they’re subject to tidal movements, which help to “wash out” murky water and leave… well, slightly less murky water.
Visibility isn’t just down to location, though. It’s common here to get into the water and find it hard to see your hand in front of your face for the first few meters, and then all of a sudden, find it completely open up as you descend deeper.
This generally occurs when there is a fresh layer of water runoff that’s just been washed in and has still to diffuse through the water column.
You should know as much as possible about the area you are diving in so that you can prepare for underwater photography in bad visibility. Bad visibility doesn’t have to mean a bad shoot! Let’s look at how you can prepare for these conditions.
Read more: Underwater Photography Tutorials – Essential Techniques
1. Set your safety protocols
The number one priority of any dive for any underwater photographer is safety. It may sound boring, but when diving anywhere, not least in low visibility, safety has to be at the forefront of any dive plan and must never be sacrificed to get that perfect shot.
Even in the best conditions, a camera can cause issues during a dive. It’s so easy to be distracted by what’s in front of you and forget to keep an eye on your gas, no-decompression limits (NDLs), on your computer, and on your dive buddies.
If there’s one course I always recommend to underwater photographers, it’s the Solo Diver/Self-Reliant Diver one.

Although not directly related to underwater photography, the skills and experience the courses give you mean you become more comfortable in the water and, should you get distracted and get separated from your buddy by your camera, ensure you have the skills to deal with the situation.
However, to avoid separation, the easiest solution is to have a clear dive plan before getting in the water. Ensure that everyone diving together has a clear understanding of things like:
- Agreed separation procedures. These are usually; look around for one minute, then if there’s no sign of your buddy, slowly surface. However, it can change depending on who you dive with.
- What exactly you are looking to spot and shoot.
- Hand signals. Again, these can change from diver to diver, so make sure you and your buddy are on the same page.
- Torch signals: Chances are if you are diving in a low visibility environment, a torch is an easier method of signaling your buddy than hand signals. Everyone should be clear on how to signal… and avoid randomly looking like you’re having a disco beneath the waves!
- Set maximum depths and times.
Read more: 8 Essential Skills and Techniques for Underwater Photographers
2. Master your buoyancy
As with any diving, irrespective of conditions or the type of seabed, one of the biggest factors a diver has to consider is their buoyancy.
There’s a phrase in diving: “Take only photos, leave only bubbles.” And, although exceptionally cheesy, it is very important. We can be easily distracted by what’s in front of us, to the point we forget about what’s behind or beneath.
I’ve turned around from taking a photo before and been met by a dense cloud of silt and sand billowing out from beneath my fins. This can, of course, disturb or harm the animals and “kicks up the vis,” which can make finding your dive buddy all the more difficult.

Learning to control your buoyancy and manage your fin kicks in a way that limits disturbance of the seabed well before picking up a camera is so important, no matter where you dive.
In dark, murky waters, even the slightest waft of a stray fin can lead to a reduction in the visibility, which could turn into a more serious situation.
There are specific diving techniques to use to cause a minimum disturbance to the seabed when you are diving close to it. Check in with your local dive school if needed to ensure you have these skills down before heading out on a low-visibility shoot!
Read more: How to Get Rid of Backscatter in Underwater Photography
3. Carefully choose your lighting
When it comes to underwater photography, but especially in dark and murky waters, the biggest consideration is lighting!
You can have the latest full-frame camera, with a gazillion-megapixel sensor, but at the end of the day, if there’s little to no light, then there aren’t going to be any pictures.
So, whenever anyone asks me for advice on which camera to buy for low-visibility conditions (most of us living in the UK), my first question is, have they budgeted for lighting, too?

Equipment for underwater photography is a real rabbit hole that is so easy to fall into. But, in terms of lighting, there are two main options, each having their own pros and cons.
Video lights
These provide a constant light on the subject and what you see in front of you. What you see on the back screen of the camera is generally what you’ll get from the final image.
In general, they’re simple and easy to use and just a matter of turning them on and leaving them.
Strobes
These are much more powerful than video lights. They’re essentially the same as a normal flash you’d use above water.
Strobes allow you to really “freeze” the subject; with their additional power, it means you can reduce ISO settings and increase the shutter speed.
With strobes, you can get quite creative with lighting to give a different feel to images, almost like you would if you were working in a studio with a model.
This can be done with video lights, but strobes offer more options like snoots, and, I find personally, they offer more flexibility with better results.

The major downside to strobes is that the flash won’t fire until you press the shutter button, so the first image is generally not going to be ‘the’ shot.
I generally find myself taking three or four before I get one I am happy with, meaning I am having to fiddle with either the settings on the strobe itself or settings within the camera itself.
Ultimately, with strobes, I find there is a much steeper learning curve, but once you’ve got the basics, they really do elevate your game.
Read more: An Introduction to Using Strobes in Underwater Photography
4. Use intentional strobe positioning
This is absolutely the key difference between a good shot and a great shot in murky water, and it’s perhaps one that can never be fully mastered! But there are certainly things you can do to improve your chances.
One of the biggest issues with using strobes is backscatter. In murky waters like here in Scotland, backscatter is an underwater photographer’s worst enemy.
Backscatter is the “snowy” or “starry” blotches that can appear on images, caused by the light of your strobe firing and reflecting off of particles in the water. There are a few ways to reduce backscatter, even in the murkiest of waters, but often it takes some trial and error.

My biggest mistake when I first started using strobes was pointing them directly at the subject. This is probably the worst thing you could do. Not only do you completely overexpose the animal, but it gives the worst backscatter possible.
It sounds counterproductive, but you actually want to angle the strobes away from the animal, so when they do fire, they are only being illuminated by the edges of the flash. This reduces the reflected backscatter on the image and leads to some really nice lighting effects on the subject.
Strobe positioning is so subjective, both in terms of the conditions you find yourself in and the outcome you want to achieve. But my default positioning is for them to be at the ten and two o’clock positions up and behind the camera lens.

Both point ever so slightly out of the way so when they fire, the cones are “meeting in the middle” in front of the lens.
Top tip: It’s important to get as close to the subject as possible, without disturbing it, or other animals around. This means there will naturally be fewer particles between you and your subject and also helps to fill the frame.
Read more: 5 Easy Ways to Avoid Backscatter in Underwater Photos
5. Focus on macro/portrait photography
Sadly, when it comes to shooting low visibility waters, I’ve personally found wide-angle photography has to be shelved in favour of macro.
With the visibility being generally reduced to 5 to 8 meters, sometimes less, it makes those “panoramic” shots really difficult to get.

I’ve been able to just about get away with shooting “mid-sized” animals like barrel and lion’s mane jellyfish, but anything much bigger tends to be a no-go.
But macro and portrait photography can be just as impressive and, if you get the right perspective, just as exciting.
For portrait-style images, lighting and perspective play a vital part in telling the story of the shot. From the right angle, the “look” on something like a crab’s face can give a real sense of character.
I’ve looked back on a shot before and could almost imagine from facial expressions the crab giving me a torrent of abuse for shining my bright lights on them!
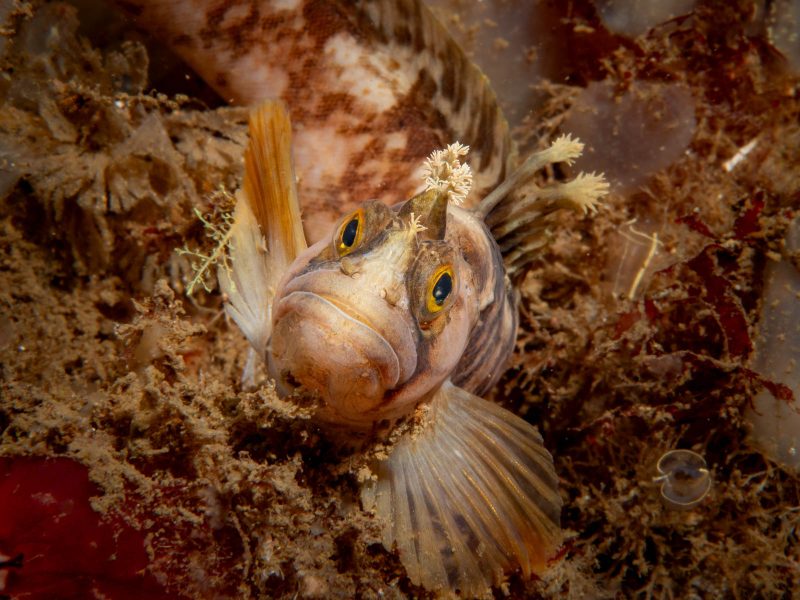
Macro photography can be rewarding too. Being forced to focus on the smaller creatures opens up a whole other world within an already magical one. You begin to notice small details which would normally be missed.
Read more: 8 Tips to Create Beautiful Underwater Animal Portraits
A note on managing colour
One of the frequently asked questions I get is about colour and the need for using filters when filming/taking photos underwater.
For bright, clear water, filters are a good idea, but only when you are using the ambient light from the surface. As you descend deeper, the light starts to change, and you begin to lose colours.
The first to disappear is red, hence why many of the filters you find online, especially for action cameras, are red; these are designed to ‘put the red’ back into photos.

When diving in dark/murky/low visibility waters, filters are pretty much redundant as most of the time you’ll be using video lights or strobes to illuminate the subject.
This means that the full spectrum of colours is returned to the image. And of course, you can enhance some of the color in post-production.
Read more: 4 Ways to Fix and Edit Underwater Photos
In conclusion
Diving in murky waters isn’t easy, and taking photos in low-visibility environments is even more frustrating. But, one of the things that keeps me coming back each and every time is the unknown.
When you get in the water and visibility is maybe only two or three meters in front of you, initially it can be disheartening.
But as you descend deeper and your torch begins to pick out small details emerging from the gloom, the sense of excitement kicks in, and it’s that buzz that pushes you on. Ensuring your confidence in the water and with your camera can only help enhance your images.
Master your buoyancy to limit further seabed disturbance, know your strobes inside and out, and focus on close shots and smaller details of your subjects in murky waters to make the most of underwater photography in these conditions.
Remember that you can still swim away with great images, even without those Bahama-blue waters!


