
Top Tips to Improve Your Underwater Macro Images

Some of the most fantastic creatures on earth are smaller than your fist. Charismatic underwater micro-fauna (NOT sharks, whales, dolphins, etc.) can, in my humble opinion, make for even better photographs than their bigger ocean brethren.
There is a nearly endless variety of underwater macro subjects and behaviours, and almost as many ways to photograph them.
Certain ‘rules’ for topside macro photography hold true for underwater macro as well: composition, lighting, perspectives, etc. Usually, what works well for topside macro will work well underwater. Of course there are ways to refine technique, and some pieces of equipment will help to make your macro images more compelling.
You will of course need an underwater housing, whether you are shooting DSLR, mirrorless, or compact cameras. You’ll need a macro lens. If you are on a DSLR or mirrorless, this will mean a dedicated macro like a 50, 60, 100, 105mm, etc.
I have shot a lot of systems, but currently use a Nikon D700 in a Nauticam housing with Retra flashes. The Nikon 60mm and 105mm macros are both go-to lenses for me, depending on what I am shooting.

On compact cameras, most have a macro mode but can benefit from an external wet diopter. This is an external macro lens that can be taken on and off underwater. It increases magnification greatly, or at least allows cameras to focus closer, so smaller subjects can become frame filling.
However, they do eliminate the ability to focus at any distance, so diopters shouldn’t be used for bigger (fist sized) subjects, unless you are photographing very small sections of their bodies. A couple of good diopter brands are the Kraken Sports line and the Nauticam line.
Then, of course, the most important piece of gear for shooting anything underwater, but especially macro: flashes.
Not only are flashes necessary because water sucks up light and colour, but because they open up almost limitless possibilities for creating interesting images. Flashes can also bring out details on subjects we would never see otherwise.
Other helpful accessories for macro shooting underwater include snoots, reduction rings, super-macro diopters, and focus lights.
It is difficult to explain every technique for every type of situation underwater in such a concise article, and I feel each subject deserves to be approached in its own specific way. However, I’ll discuss a few techniques that can be applied based on whatever situation arises. These are the four styles of image that most of my macro shooting focuses on.
Read more: What Equipment Do You Need for Underwater Photography?
1. Black backgrounds
Perhaps the most impactful and sought after style of underwater macro image is the classic black background. These shots show off the subject very well, especially if they are brightly coloured, and are actually very easy to achieve most of the time.
Fast shutter speeds (the fastest flash sync speed of your camera is a good starting point), a closed down aperture (perhaps f/10+), and as low an ISO as possible (whatever the base ISO of your camera is), are good settings to start with. These settings alone will get you halfway there.
Next, you’ll need a subject that you can either isolate against an open water background, or one you can light in such a way to eliminate the background from the image.
The former is much easier, as almost any strobe position you use with the above settings will give you a dark background. Even for subjects on the bottom, if you can get your camera low enough and isolate it against water, you can get a black background.
If your subject is more difficult to separate from the background, accessories like snoots, which dramatically restrict the beam angle of your flashes, or strobe positioning, like inward lighting or cross lighting, can make for more interesting images. You can really pull out contrast and details, but also eliminate the background.
Cross lighting involves pointing the strobes across the frame at each other, with the subject in between the flash heads. This is a fantastic way of bringing out contrast and texture on your subject, while helping eliminate backscatter and the background.
By crossing the light, rather than aiming it straight at your subject (producing very flat lighting), you’ll be able to bring out all of its contours and textures. This strobe position also allows less light to spill into the background, making it easier to isolate your subject from its surroundings and produce a black background.
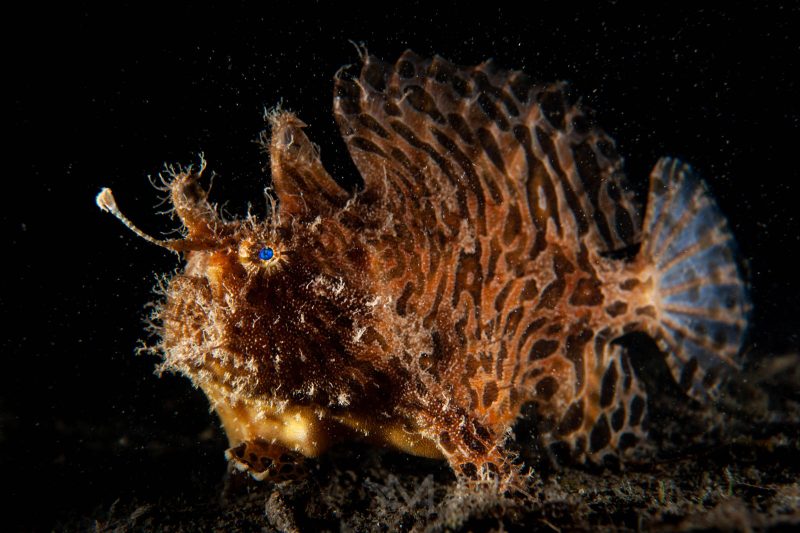
Snoots are a favourite tool of underwater photographers. They have been around in photography in general for a long time, and in the last decade or so have exploded in popularity underwater.
Snoots restrict light spread and allow a more focused beam. Often this is used for the spotlight effect, which can be powerful but is just one way a snoot can be utilised to create compelling underwater images. I regularly have a snoot on at least one strobe, on just about every macro dive. In fact, every picture in this article utilises a snoot in some way.
Although black background images can be striking and are generally my go-to, they are of course not the only style of macro image to be created.
Read more: How to Achieve a Black Background in your Underwater Photography
2. Slow shutter
The ocean is a chaotic place. Nothing is static.
With this being the case, introducing motion into underwater images can give a better idea of what the underwater world is like, and can also create some quite interesting and unique images.
Generally, slow shutter photography is much easier for wide-angle shooting, but it can be useful for macro as well. A beneficial side-effect of using slow shutter is that it can disguise backscatter (the bane of many underwater photographers’ lives).
Slower shutters allow many otherwise problematic bits of sand, silt, debris, etc., to disappear, or at least be turned into less noticeable streaks, instead of blotches or bright pinpricks.
One thing to keep in mind is that, for slow shutter images to work, you need to have ambient light of some sort. Whatever is lit with flash will be frozen, so ambient light is what allows motion to show.

In this case, ambient means either sunlight or constant light from a video light or flashlight. Depending on ambient light levels, slower shutter speeds may need to be used to bring out motion, as macro subjects may not move as much as larger animals. For example, the cowfish below was shot at a shutter speed of ⅙ of a second.
It must be noted that, often, macro subjects are static or nearly static, and do not provide enough movement on their own to create the motion effect. So, you need to use a longer exposure, and to create the motion yourself by moving the camera during the exposure.
I like to use rear curtain sync for this, so the flash fires at the end of the exposure. For macro with static subjects, using either front curtain or rear won’t make much difference. The only change will be the direction in which you move the camera.
3. Behaviour
Of course, arguably the most sought after of any wildlife image is the capture of behaviour. In part, this is because behaviour images are so difficult to capture and, considering the vastness of the ocean, finding a small animal doing an interesting behaviour, and managing to capture that moment, is all the more special.

Knowing your subject is key, as is a healthy dose of patience! Behaviour cannot always be predicted, but sometimes you can anticipate certain behaviours and put yourself in the right position, with your rig set up properly in order to capture it.
The longer you study a subject or the more time you spend with an individual animal, the more likely it is that you will witness an interesting behaviour, and the easier it becomes to pick up the patterns of the subject.

Frogfish (and anglerfish in general), for example, will nearly always ‘yawn’ after they make a feeding strike. The purpose of this is thought to be to reset the fish’s jaws. Knowing this behaviour ahead of time can make capturing it much easier. You know that if you see the frogfish strike, it will often follow this up a few seconds later with a much bigger, slower yawn.
4. Portraits
Many macro subjects have absolutely fantastic faces and shapes. Portraits are perhaps my favourite type of macro image, as they are all about bringing out the character of the subject. The weirdness and wackiness of macro critters makes them perfect for portraits.

Either standard or portrait orientation works well with these types of images, but the orientation will ultimately be dictated by what you are trying to achieve with your image, or what composition the animal allows for, based on its shape and location.
Usually, a compelling portrait includes great eye contact, it fills the frame, and it often has the subject facing the camera, although this isn’t always necessary.
Portraits can be made with nearly any lighting style, and any of the techniques above can be put to use when creating impactful portraits.
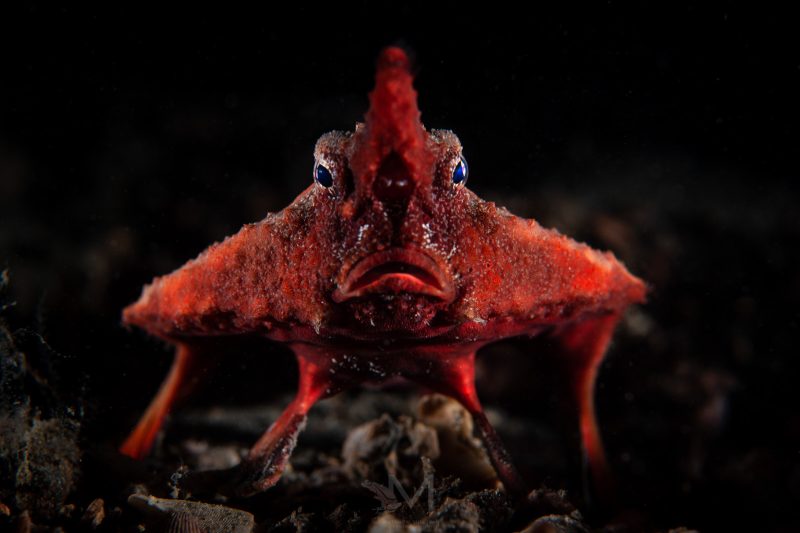
Getting close to your subject is extremely important in all aspects of underwater photography, because water sucks out light and colour. This holds especially true for portraits, as you’re doing your best to fill the frame.
*Please keep in mind that no picture is worth injuring or stressing an animal. So, if you notice any signs of distress, please let the animal be.
Read more: 8 Tips to Create Beautiful Underwater Animal Portraits
In conclusion
Ultimately, there are endless possibilities for underwater macro image creation, and far too many to include in one small article. But hopefully, some of the ideas here can help you begin to create interesting and compelling images of the fantastic tiny creatures that live beneath the waves.


