
How to Get Rid of Backscatter in Underwater Photography
In underwater photography, tiny particles known as backscatter can easily appear in our images, and sometimes even ruin them, however, we can get rid of this backscatter. The following tips will show you how.
The first rule of thumb is strobe placement
Currents, tides, storms, silt, marine life moulting, spawning, feeding, excrements…. even nearby divers finning too strongly can be some of the contributing factors to backscatter.
Not all backscatter is the same, but it can quickly ruin a great photographic moment underwater. It occurs in your images when your flash lights up the particles between the lens and the subject. Your job: don’t photograph it.

But how does one do this?
The first rule is strobe placement and being aware of where the sun is shining. For years I shot with my strobes at 10 o’clock – 2 o’clock on a diagonal to the subject zone, which was fine.
However, the key physical strobe placement should always be set back behind the plane of the outermost port, whether you are shooting macro or wide angle.

To further reduce backscatter, your strobes should face straight forward or even slightly outward.
Here are a few things to consider:
1. Avoid the “drooping strobe syndrome”
Your clamps that hold the strobe arms in place should be fresh and not worn out. There is nothing worse than seeing your strobe arms slowly drooping down and missing their mark.
You don’t want to be lighting the white underbelly of a shark or the sand instead of the red coral. The exterior O-rings should be spongy to hold a firm grip, but don’t crank them so tight that you can’t gently move them up or down as needed to properly light your subject.
Make sure you always wash these well after a dive, to protect the coating and springs from salt corrosion.
Read more: An Introduction to Using Strobes in Underwater Photography
2. Learn to visually “read” the water column
As far as lighting goes, you must learn to visually “read” the water column.
In some circumstances, it may be better to skip strobes altogether. If a lot of backscatter is visually prevalent, the rule is ‘less is more’.
Use less artificial light; this is especially helpful in shallow situations, like with manatees, alligators, or anything that hangs out in silty/muck dive bottoms with lots of finning folks nearby.
As a rule, I always shoot my strobes at medium power and believe it or not, I like to use diffusers all the time. Not everyone agrees with this philosophy.
Diffusers soften and balance the strobe light being cast upon your subject, help distribute the light more evenly, and reduce the probability of hot spots from reflective creatures like silvery fish.
Read more: 8 Tips for Creating Amazing Lighting in Underwater Photos
3. Keep the sun on your back and be wary of your camera angle.
You can shoot up, down, or level. Shooting up gives you a brighter blue background, down gives a darker background, and mid-level is a median tone overall.
The more backscatter you can visually see, the softer your strobe output should be. For example, shooting upward at high noon in a silty area, you probably want to turn the strobes off.
You can also move the strobes further back from the planar port horizon line and avoid shooting directly into the backscatter, or you can back up from your subject.
Yes, shooting diagonally is fine – but the key imperative is to keep the strobes behind the lens.
Read more: 5 Easy Ways to Avoid Backscatter in Underwater Photos
Post-processing tools in Lightroom and Photoshop
Despite doing our best to manage backscatter in the field, remember that we do also have post-processing tools in Lightroom and Photoshop at our disposal.

Read more: 4 Ways to Fix and Edit Underwater Photos
From Lightroom Develop mode, go to Photo → Edit → Edit in Photoshop
It’s important to keep in mind that all tools have their purpose and not all work for all circumstances.
Practice with the different tools will help you to strengthen your images and also guide you to taking better pictures initially.
Editing can be fun, relaxing, and sometimes illuminating by exploring artistic outputs, but it can also become a tedious waste of time.

So, this leads you to the obvious – choosing your battle.
You have to ask yourself if this picture is worth the time and effort to spend on editing it. Realize that if you find yourself making the same edits repetitively (image after image), going back to point A and rethinking your strobe positioning is a far better use of your time.
Without fail, you will see the backscatter more dominantly within black backgrounds. Of course, schools of fish with a blue background are often littered with fish droppings everywhere – it’s the ocean.
Not until you decide to go to a large print or big screen display might you discover the backscatter. You can opt to use the healing brush in Lightroom or Photoshop or both, but there are better ways to tackle this.
A simple tip is to start with a raw file in Lightroom. After your basic exposure and colour adjustments, take a minute to run the image through Photoshop.
They have some nice tools you can try, and then “save” will take those clean-ups back to your image in Lightroom for you to continue working on it.
Read more: All You Need to Know to Process a Raw File in Lightroom
From Lightroom go to Photo → Edit → Edit in Photoshop.
This image will open in Photoshop.
How to quickly erase white bits of backscatter
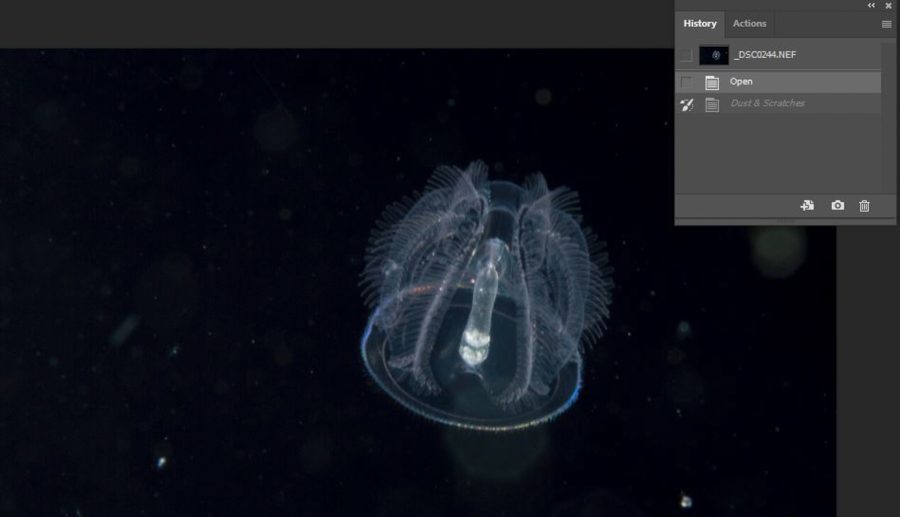
Now, the image of a larval acorn worm (above) taken on a Blackwater dive has 2 kinds of backscatter: sharp white bits, and soft puffy powdered backscatter. It doesn’t look too bad, but I want to remove as much of this as possible in Photoshop.
With a black background, my goal is to even it out so that I can punch up the Selective black background without losing detail on the edges of my subject before I take the image back to Lightroom.
In Photoshop, first, I check View → Proof Set up → Working Black Plate.

I love this because here, in black and white, you can see all the backscatter. A lot more becomes apparent in this mode. It is much easier to review here than the Visualize Spots available in the Healing Brush mode in Lightroom.
I am going to show you how to clean it up with a wave of the wand rather than tap, tap, tap.
Here you can Select → Subject (image below). This will normally find your subject and produce marching ants around it. If it doesn’t, you can use a magic wand to hone in on the subject, but you may realize that the background is too busy and then opt for a different image.

With the subject highlighted, since we want to just fiddle with the background, Select → Inverse. This then highlights the entire background and helps block your wand from accidentally erasing some of the subjects.

I like the “Select Subject” better in Photoshop than in Lightroom, because you can use the Quick Selection tool to expand or subtract more definitively than in Lightroom.
How to use Dust and Scratches in Photoshop
Now open the History Panel (from the WINDOW drop-down tool).
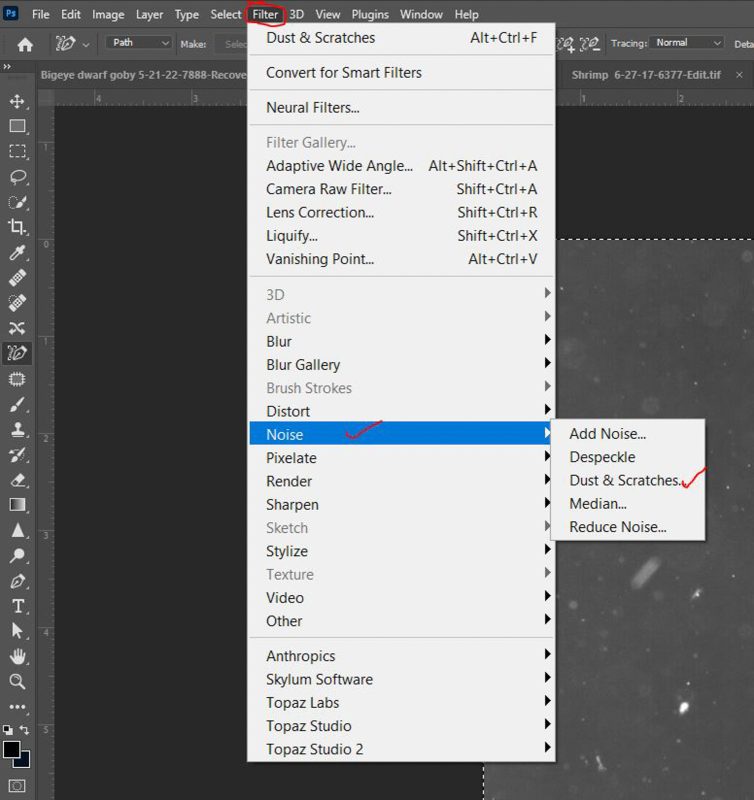
Then go to Filter → Dust and Scratches and set the mode in your toolbar to Darken with 100% opacity.


A panel opens up, and you will run your mouse over the brightest white that you want to remove.
You can move the image around within this Slider panel to be over the hottest white spot you see in your image, or you can reduce the magnification to see that selected brightest white spot.
Then, slide the radius slider to the right until your selected white spot disappears. It should be under 30.

Next, you’ll notice that your History panel now shows the last entry as Dust and Scratches. Check only the checkbox – not the layer.
You’ll notice your image now looks all blurry; have no fear, there’s another step. In the History panel, click on the last history move that you made (not the check box-just click the second to last layer) – voila – your image is back to the black and white version.

Next, select the History Brush tool (lower left corner of the image below). It’s the paintbrush that has a dotted arrow circling it.

You can enlarge or reduce this brush to suit your needs, but basically, you can remove all the white flecks in seconds.
Unlike the healing brush, it doesn’t pick up artefacts from nearby things. You can dial this in and move your wand right over white spots on an orange fish without affecting the orange at all. No halos and no smudge bursts like with the Healing brush.
However, notice on lighter backgrounds this tool is smudging out the spots. You may not want to “blur” some details – so simply reduce the size of the brush to the size of the dust you’re trying to eliminate.
Now you’ll notice that the background still looks blotchy or pocked. Here I will select the Healing Brush tool, take a sample from the cleanest point in the background and use that to brush the background to reduce the “puffed” backscatter.
A more even-toned background starts to develop. In my circumstance, I noticed a couple of big puffs of backscatter that covered part of the background and part of the subject. Those are tougher to clean up and you have a couple of choices for this.
You can try the patch tool in Photoshop or one of the Clone tools. Or you can try working with the unusual puffy blotch that is over the subject and the background but in Lightroom using the Masking tool.
For now in Photoshop, with the subject still selected in Inverse (meaning the background is still selected), let’s go back to View → Proof Set Up → and return it to Working CMYK.
Go to Image → Adjustments → Selective Colour, Choose Black, and move the slider up to 4. If the background still looks blotchy you may want to take the Eyedropper tool and take a sample of the darkest point, then select the Paintbrush tool, and paint the whole background.
This is not for use in contests, but when you want to print something, removing all the not-so-apparent blotches from an image is key to having a crisper image.
Printing processes are notorious for picking up odd shadows which are caused by uneven backscatter in the background, which can truly affect the final product.
Still in Photoshop, once you are satisfied, Go to File → SAVE (not “save as,” and not “save a copy”) and alternate over to your Lightroom screen, to watch the magic happen. The cleaned-up image now appears in Lightroom as a Tif no doubt.
But the excellence is, now when you use the Select Subject, it selects it and doesn’t give you the Oops screen (because previously it couldn’t distinguish the difference between the backscatter and the subject)!
Now you can proceed with your favourite Lightroom edits on the subject.
How to Erase Splotches in Lightroom
Now let’s try to erase a couple of poofs from the interior of the animal in Lightroom.

Click on the Develop Mode. From the Basic Panel, choose the last option which is the Masking tool.

If you have already used the Masking tool, you must add a New Mask.

Select Brush and increase or decrease the size of the brush as needed to indicate to Lightroom where you want to mask. By having the Show Overlay checked it will show you what you have selected.
Then use the Exposure or any of the tools available in the Basic panel to increase or decrease the puff.

You can change the exposure, colour, shadows, whites, and blacks. Whichever helps you to match the colour to what that area should be.
You can add multiple masks for each specific area you wish to adjust, as this mask may not be a universal fix for all splotches. Just experiment.
The beauty of Lightroom is that you are not destroying your original raw file. You can turn off or delete any mask that just isn’t working for you and start over until you get the hang of this.
In conclusion
You can use the Healing brush in Lightroom to start, but as soon as you feel like it is becoming a tedious workout you can edit in Photoshop using the Dust & Scratches mode.

Then, bring it back into Lightroom to use more subtle colour and highlight adjustments. I hope you enjoy these methods.
Once he tried out this method, my friend Raul exclaimed it was a ‘game changer’!


