
How to Photograph Urban Snails
Did you know that in the UK there are around 100 snail species? Many of them can be found in urban environments if you’re willing to look for them. So, if you’re stuck in the city, photographing snails can be a great way to practice your macro skills.
Snails come in various colours, shapes, and sizes, although none are as large as the giant African land snail (Lissachatina fulica) which can grow to be up to 20cm!


Often overlooked, sometimes stood on, and regularly considered a nuisance by some people, urban snails are a surprisingly exciting subject to tackle.
They have fantastic expressions, and their famously recognizable body shape combined with colourful city lighting can allow for intriguing silhouette shots.

Creating engaging and creative urban images of these creatures can help generate interest in a subject that often doesn’t get the love it deserves.
As they are extremely slow-moving (we’re talking maximum speeds of 0.048 kilometres an hour), you have a little extra time to get creative when photographing them!
How to find urban snails
First things first, you need to be able to find these beautiful, shelled gastropods in a bustling urban environment.
I have found damp evenings are the best times to head out on the ‘snail hunt.’ Snails are most active after dark or in damp weather, and the tell-tale slime trails they leave across surfaces can lead you straight to them.
Look for those glittering trails, reflecting in the city lights.

Snails also eat a wide range of vegetables and plants, so if there’s any vegetation in your city, that’s a good place to start.
Have a look along some walls with shelter and nearby plants. They are excellent climbers, easily making their way to the top of plants, so be sure to check the surfaces of vegetation, even if it’s high up.
You might get lucky and come across a ‘snail hotspot’ where large numbers of snails seem to group in clumps. I have seen up to 30 snails in these clumps!
This is surprisingly common and gives great opportunities for images. Remember, it’s best to leave snails in the location you found them as it is often a place where they bed down for safety or near a food source.
Below are my 5 favourite snail images and how I took these pictures, as well as tips for getting similar style images.
Read more: 5 Tips for Shooting Insect Macro Photos with Personality
1. Snail Highway
During the main Covid lockdown, we had scaffolding on our house. I noticed one evening a large snail was making its way down one of the poles, so I grabbed my 15mm wide-angle macro lens.
This is a great option when you want to create an image which showcases not only the snail but also its environment, which is often an important part of urban wildlife photography.
The area I was shooting in was a little dark, so I used the light on my mobile phone to illuminate the subject. This is a great hack to use for your urban snail shots – you don’t need to invest in any fancy lighting setups, because your subject is so small!
The light from your torch will suffice.

I keep the light on the mobile phone quite far away from the subject, as the softer effect makes the image look more natural.
Snail ‘skin’ is often slightly translucent, so if you put the light too close, the snail will be too bright, and the images will look overexposed.
Try different angles with the torch, as each angle will give a distinctive look and feel. Side lighting is one of my favourite techniques and can make for intriguing, creative images.
My ISO here was set to 1000 and I had a slightly longer shutter speed to illuminate the scene, so I had to use my tripod to keep the camera still. You have to be careful not to have the shutter speed too slow, or the slow-moving snail will be slightly blurred.
A tripod helps massively to keep the subject pin sharp. You will often shoot urban snails at night, so you’ll need a slower shutter speed (the sensor is open for longer to let in more light).
Using a tripod can also make it easier to play around with the settings and check your images quickly!
I will often shoot my first image in automatic mode. This can be a good way to see all the settings and what you like or don’t like, which can help inform your decision to make the image darker or lighter.
The quickest way to do this is usually with ISO. The higher the number, the brighter the image, but remember that high ISO can produce grainy images.
Top tip: Keeping a bit of light blue light in the sky in a wide-angle shot with a snail can look great, so don’t wait for to it be too dark for that style of image. The more you experiment, the more you find your style.
Read more: How to Harness Artificial Light for Stand Out Urban Wildlife Photos
2. Streets of gold
Here is an example of looking at your environment and how it can affect your image.
Lighting in urban settings can be very unusual and create great effects in your images. For example, here you can see how street lighting at night can turn a dull scene into one with lovely warm and golden light!
Again, although I am using the ambient light from the urban environment, I am also using my mobile phone to illuminate the snail.
I am a strong believer that the foreground and background are as important as the subject. If you look at this image, the foreground and background are slightly out of focus which helps draw your eye towards the snail in the centre of the frame.
The colours, tones, and shapes are blurred to add a creative aspect to the picture. I would encourage you to always look at how you might use foreground and background to improve your snail images.

There will be no lack of choices in a bright urban environment!
I used my macro lens for this picture, which is a 105mm f/2.8 – perfect for working in low light. An f/2.8 lens will also pick out certain parts of the image to be in focus and keep others blurred.
So, if you’re looking to photograph insects and other small animals, it’s a great choice. This lens length (105mm) allows you to photograph the subject without getting too close, so you are less likely to spook and scare them away.
Another great tip when photographing urban snails, though this applies to most nature photography, is to get down low, onto the same level as your subject.
This will help the viewer to connect with the featured creature and help incorporate the floor and background as an important part of the image.
Read more: How to Use Foregrounds & Backgrounds in Macro Photography
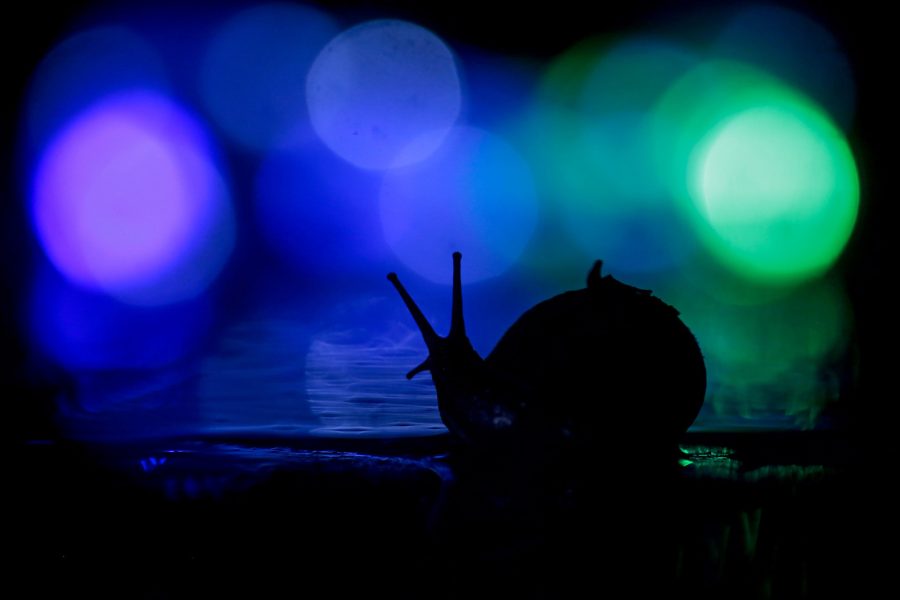
3. Bright lights, big city
Using the weather to your advantage is a key part of creative urban photography.
Rain offers many such opportunities. In particular, a reflective surface after a downpour with urban lights in the background can really make an exciting image.
After a downpour, there are often puddles in which the urban lights can create beautiful neon reflections. Longer exposure shots in the rain with a flash can produce streaks in the picture, with a similar effect to lasers.

If the flash is turned off, they will create blurred lines across the image – just as cool, but with a different look!
In this instance, I chose not to use my phone to illuminate the snail. This instead creates a silhouette-style image, which can add mood and mystery to your shots.
I most often like using the ‘natural light’ found in urban settings. Technically this is from artificial light sources, such as street lighting, or the headlights of vehicles driving past.
Using these lights can help give your images that urban feel. I would encourage you to play with both styles of lighting in your urban snail images.
Read more: Depth of Field for Beginners – Bokeh, Focus, and more
4. Eye see you
Snails have incredible eyes, so I wanted to capture a detailed image of the eye in this portrait. It was a tricky shot to get!
When you are using a macro lens and you are close to something so tiny (like a snail’s eye), if there is any small movement, the subject easily goes out of frame.
To combat this, I used a small travel tripod which enabled me to position it in smaller areas. This can be very handy in the nooks and crannies of a city environment, particularly when working with a minuscule subject.
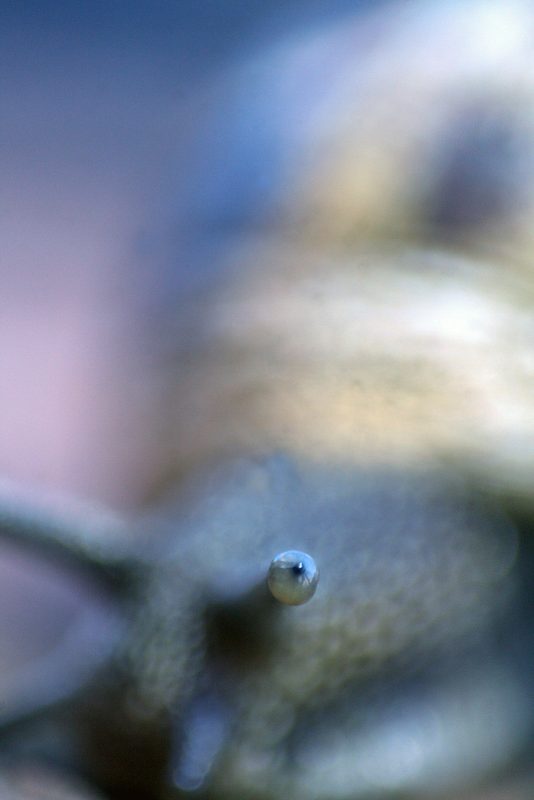
I would recommend using an aperture of f/2.8 for a shot like this, as it will keep a small part of the image focused and the remaining image blurred. If, for example, you used an aperture of f/9, the whole image would be mostly in focus and look and feel quite flat.
I used the inbuilt flash in my camera to illuminate the subject. Some photographers use a diffuser, but I often use natural light, torches, or my mobile phone. It’s all down to preference!
5. Churchyard snail
Churchyards can be a great place to capture lots of different types of urban wildlife images, and urban snails are no exception. As soon as it’s damp, snails will often appear here.
Equipment-wise, I tend to mix up my lenses on different shoots depending on the type of story I am trying to tell.

To capture this particular image, I used my 15mm wide angle macro lens – it can get close to the subject but also show the environment. A slightly longer shutter speed and high iso were necessary to bring out some of the lovely blue tones in the sky.
It’s worth remembering that there may not be much in the way of ambient or artificial light in a churchyard, so you may need to create your own lighting. I didn’t use a tripod for this image – just rested the camera on the floor.
Top Tip: Bring a plastic takeaway lid and use that to rest the camera on. It protects it from water and will make your shots surface-level. Remember that you can use any hard surface in place of a tripod – particularly when your subject is so slow-moving!
In conclusion
The next time there’s been rain or it’s dull and damp outside, grab your camera and look for some snails!
Urban areas can be easier to spot snails in anyways, as the concrete and bright urban lighting will often illuminate them.
Don’t be afraid to get down on the ground, even when it’s wet out. Getting low is vital as it puts you in the snail’s world and makes the image more engaging.
Play around with some different lighting, and if you have your phone handy or a small hand-held/head torch, use the light to spotlight the subject.
You may be surprised by how cool the image will look. You might even want to try light painting for some super creative snail shots!
I urge you to head out in search of urban snails and try your hand at capturing these beautiful animals.


