
10 Ways to Photograph Water

The world is a big place to photograph. You may or may not know it, but this planet that we live on is covered in nearly 71% water. Including oceans, lakes, rivers, waterfalls, and more, there is plenty of water to photograph.
Don’t forget the water that falls from our skies as well! So, how exactly do you photograph water? Well, here are ten of my favourite tips and tricks for photographing water, whether it be at your feet, right in front of you, or falling above your head.


Let’s dive in!
1. Get creative with shutter speeds
One of my favourite ways to photograph water is by playing with variable shutter speeds and exposure times. Utilising a slower shutter speed can create a sense of motion and help show a calmer scene than what may have been in front of your lens.
Shooting at faster shutter speeds allows you to capture the power that water can possess. For example, when I’m shooting King Tide in the Pacific Northwest, I typically utilise faster shutter speeds (1/1000th of a second) to freeze the water of the waves as they explode along the shorelines.

When I’m in Iceland photographing beautiful waterfalls carving their paths through mossy valleys, I typically utilise shutter speeds around 1/3 of a second or lower to create a peaceful scene.
Next time you’re shooting moving water, try various speeds to see what fits your style and the scene that you want to create.
2. Think little and embrace macro
One single drop of water can go a long way. Not all water scenes need to be shot wide or from afar. Try throwing on a macro lens and looking for small drops of water with which to create macro scenes.

I particularly enjoy going out in the garden during dewy mornings with my Nikon 105mm lens and looking for tiny little scenes where the water has beaded up on interesting subjects such as flowers, bugs, etc.
Read more: How to Take Abstract Macro Photos
3. Take a moment to reflect
Reflections can be a fantastic way to utilise water in a creative manner.

On windless days, I thoroughly enjoy taking advantage of a perfectly mirrored reflection. If I’m nowhere near a lake or pond, little puddles of water in the road or landscape can be helpful for creating a reflection image.
Sometimes I don’t even mind sacrificing the water in my canteen to create a small reflecting puddle.
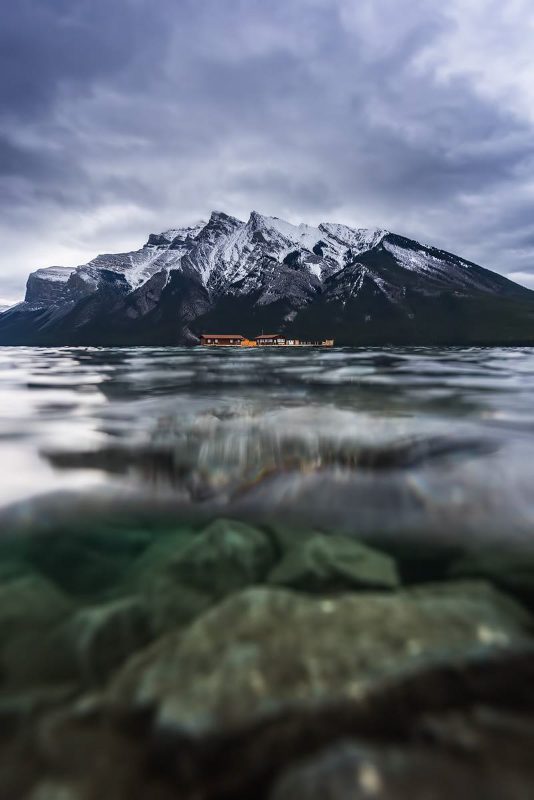
4. Look under the water
Under-over shots are some of my favourite when I’m really trying to spice up a landscape scene.
I try to find an interesting compositional element or subject under the water (e.g., a fallen tree, rock, seaweed, etc.) to tie in with the landscape above.
There are three things that you’ll need in order to make an under-over shot happen.
Firstly, you will need an underwater housing or a fishbowl – yes, a fishbowl! Basically, something that will safely protect your camera as you dip it below the surface of the water.
You will also need water that has good visibility so your audience can see the subject.
Lastly, you will need to shoot on a calm day. Shooting underwater on days that have a chop to the water is almost impossible, so save the energy for a better day.
Read more: Underwater Split-Shots – Top Tips for Over-Under Photos
5. Use water as a supporting element
Just because you might have a huge scene in front of you with a lot of water, that doesn’t mean you need to make the water your focus.
Pay attention to the smaller details that the water may be interacting with, and use the two subjects together to make one scene.

For example, in ocean scenes I typically look for areas where the water may be closely interacting with the coastline, perhaps where the water makes a certain shape as the waves crash, or where a distinct colour of blue is revealed in shallower areas of the water.
It takes some time to scout and to watch the water, but it is worth it when it comes to creating your composition.
Also, take note that some water scenes are influenced by the tide level. Be sure to study tide charts to give yourself an advantage when looking for compositions.
Read more: How to Use Water in Your Landscape Photos
6. Face the cold temperatures and shoot ice
Venturing out in the winter months may not be for the faint of heart, but when you come across areas of ice, the textures, shapes, and colours available can be extremely exciting.
Some of my favorite ice images that I’ve captured have come from within the Canadian Rockies during the heart of winter. During the middle of the day, I take time to scout frozen lakes in search of unique shapes and patterns.

Ice can create some dazzling foreground if you take the time to search for it and think on a smaller scale.
Read more: How to Use Cameras in Extremely Cold Temperatures
7. Use backlight to create drama
Watch the rain, and watch the light. Every time it rains, I try to see if I can spot the sun peeking out. If I see this, I know it is time to get ready for a rainbow scene.

When shooting rainbows, try to utilise a circular polarising filter. This filter will enhance the vibrancy of the colours within the rainbow as you turn it.
Read more: How to Use Backlighting in Landscape Photography
8. Refraction can equal creativity
The ways in which water can bend and manipulate light are truly spectacular. The tiniest drops of water can contain massive subjects within them if displayed properly.

Sometimes while photographing storms, it’s too unsafe or raining too hard to shoot outside my vehicle or house. So, I’ll opt to shoot through the windows instead.
This isn’t ideal because obviously the glass will be covered in raindrops but, with a bit of luck, I’ll get a strike of lightning outside the window. Those tiny, annoying raindrops now become powerful compositional elements, refracting the strike throughout the frame.
9. Utilise water for leading lines
In water scenes where I utilise slower shutter speeds, I thoroughly enjoy incorporating motion in water to create leading lines.
For example, when photographing the famous Diamond Ice Beach in Iceland, I wait for the waves to come in. As they pull back out, they foam up and create beautiful lines as the water retreats. This is when I shoot.

Similar scenes can be created with waves coming ashore, creeks flowing away from waterfalls, and more.
Take a moment before you start shooting to assess how the water is moving and where any foam may form on the water. This is what will help create your lines.
Read more: Composition Tips – Leading Lines and Vanishing Points
10. Get in the water
I have a saying: if you’re not wet, dirty, or uncomfortable, you’re not doing it right! Some of my favourite shots of water have involved me getting absolutely soaked.
Whether you’re out shooting in the rain, getting into a creek, or playing in the waves, the closer you get to the water, the more emotion you will capture within it.

I recommend always packing a camera rain cover in your bag and a pair of waders in the car. They can be life savers when trying to push the limits of creative compositions.
In conclusion
Photographing water can be extremely fun and can allow you to take your images and compositions to a new level of creativity.
Remember to think outside the box, look at the small details, but don’t forget the bigger picture. And finally, if your feet aren’t wet, you aren’t doing it right! Now get out there and shoot!


