
Macro Photography: How to Take Handheld Photos of Insects

I won’t pull the wool over your eyes – taking good insect photographs is not particularly easy. If you’ve ever attempted to photograph a butterfly, dragonfly or bee, you will already know that macro photography can be a fiddly and frustrating process.
Just locating and getting close enough to insects can be challenging; even if you get within picture-taking distance, subjects have a nasty habit of flying or scurrying away before you’ve had chance to trigger the shutter.


Insects are typically timid, secretive things, hiding away amongst vegetation or resting in places where it is difficult to get a clean shot, while they are also most active during the middle of the day when the light it typically harsh. Working at high levels of magnification results in any motion (subject or photographer) appearing greatly exaggerated, while depth-of-field is wafer thin.
Obviously, using a tripod makes life far easier – camera motion is eliminated, and you are able to frame shots precisely and focus with pinpoint accuracy via LiveView. However, in reality, mini-beasts will rarely hang around long enough for you to set up your three-legged friend and instead you will need to rely on shooting your macro photos handheld.

Although taking handheld photographs of insects might not be easy, great results are still possible with the right combination of good technique, patience, and persistence. If you have watched my video for Nature TTL’s YouTube channel How to Photograph Butterflies and Insects, then you will know I favour shooting insects early or late in the day when subjects are naturally cooler and less active, and light is more atmospheric.
When insects are cold or dewy, they are unlikely to fly away and it is possible to set up a tripod and control the lighting and background. However, subjects are hard to find when they are roosting and not everyone wants to get up at crazy o’clock in the morning, or stay out unsociably late. Also, subjects are inanimate at either end of the day and so if you want to capture elements of behaviour – such as flight, courtship, and predation – you will want to take photographs during the heat of the day when insects are active. That’s when the speed, spontaneity, and freedom of shooting handheld is the best choice.
Camera settings for handheld macro photography
Unfortunately, there is no magic formula or set-up that will work for every subject. You will need to vary and tweak your camera settings depending on the subject, the level of magnification, its surroundings, and the result you wish to achieve.
However, it is essential that you are in control of the depth of field, so I would recommend selecting Aperture Priority mode – or Manual if you prefer. I will typically select the largest practical aperture that still allows me to keep my subject acceptably sharp – typically my starting point is f/5.6 or f/8.
Whilst smaller f-stops will provide a larger zone of focus, the corresponding shutter speed will be slower and the subject’s surroundings will be less diffused and more distracting. Therefore, I often find a larger aperture is more viable when working without a tripod and I only select a small f-stop if there is sufficient light (or when I wish to achieve a more environmental feel to my close-ups).

Having set my aperture, I will go on to check that the corresponding shutter speed is fast enough for handheld shooting. Ideally, I don’t shoot at speeds below 1/250th second, although if you are using a lens with image stabilising, you might get away with slower speeds. Even the tiniest movement feels vastly exaggerated when shooting at higher magnifications, so the faster the better in an ideal world.
When my shutter speed is too slow because of the available light, I favour increasing the ISO speed rather than resorting to flash. The latest generation of cameras boast impressive high ISO performance. I regularly shoot at ISO 3200 using my Nikon D850, but do ISO tests using your own camera to see how far you can push things (remember high ISO speeds will look worse in low light conditions than when it’s bright). Personally, I like to set ISO manually (increasing it incrementally until I achieve the speed required), rather than using Auto ISO.
When shooting handheld, your ratio of success will normally be quite low. For every 4 or 5 shots you take, you might find that you capture just one sharp image. This is normal – do not worry.

Be prepared to take a large handful of shots to ensure you get at least one good one. Therefore, it is worthwhile shooting in continuous burst mode. When shooting handheld, I will often switch from Single (S) shooting mode to a Continuous Low (CL), where I can capture a short burst of several frames per second.
Being a raw shooter, I will often rely on Auto White Balance and I find that my camera’s multi-segment metering (or Matrix or Evaluative mode) to be the most reliable in the majority of shooting situations. However, remember to check your histogram (and also image sharpness) between shots when you have the opportunity.
Approaching macro subjects
With your camera all set up and ready, it is time to begin taking photos. Having identified an insect rich habitat to visit – wetlands, heathland, woodland, and wild flower meadows are particularly good places to go – have your camera at the ready and scan hedgerows, flowers, long grasses and the fringes of ponds for potential subjects.
Walk slowly and be eagle eyed. Slip your camera bag off so you don’t have the weight of it on your back (making you less stable) when actually taking photos. Ideally, you want to spot your subject before it sees you, but during the day it is more likely that you will disturb insects as you walk by.
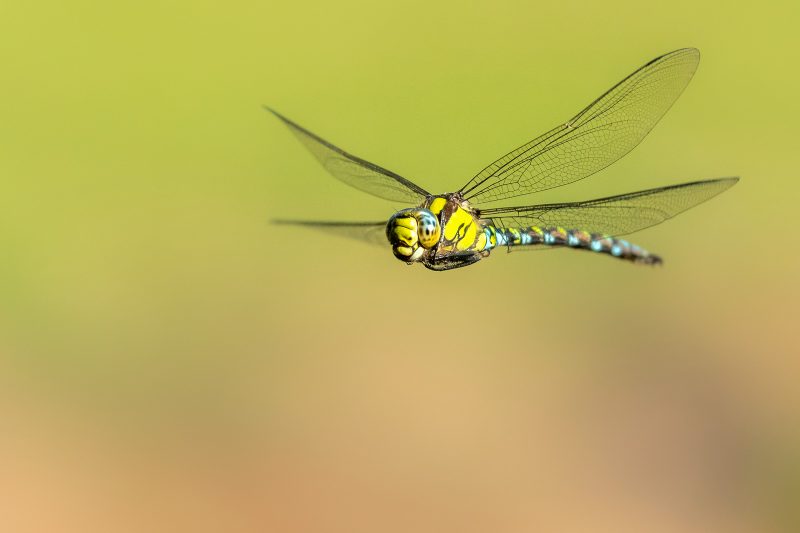
If you do so, watch and see if it settles again nearby; if it does, you can then move into position. Some insects (particularly dragonflies) are quite territorial, and if you take the time to stop and watch you will notice some return to favoured perches again and again. This can be really beneficial. Once you have identified a regular perch, stand a few meters away and wait for your subject to return. You can then carefully move into a photo-taking position.

You can maximise your chances of getting close to your subject by keeping your movements slow and deliberate and, when possible, using longer focal lengths to create a larger camera-to-subject distance. Avoid your shadow falling over the subject and be careful that you don’t disturb adjoining vegetation.
Insects are likely to react to sudden movement or vibrations, so if you move your hand to the lens barrel to adjust focus, do so slowly. If your subject begins moving, stay still and wait for it to settle again before resuming your approach. Even if you don’t disturb your subject, they might fly away due to being disturbed by another insect, or simply because they’ve finished feeding or basking.

Insects may remain motionless and relatively easy to photograph for several minutes, or only pause for a few brief moments before taking off again. More often than not you won’t get a shot, but if you persist you will ultimately capture good shots. It is surprising just how amenable some insects can be.
Opinion: Photography Ethics – Freezing Insects for Macro
Focusing in macro photography
Having got within picture taking distance, you need to efficiently achieve sharp focus. As mentioned previously, depth of field is incredibly shallow when working at magnifications close to 1:1 life-size (which is not uncommon when photographing smaller creatures).
Quite simply, there is no leeway for error when focusing. Whether you decide to focus manually, or use autofocus, it’s very much down to the individual and the situation.
With larger subjects, like dragonflies, autofocus should have no problem locking onto the subject. I prefer using a single AF point and moving it to my desired focal point – typically the subject’s eyes. However, AF can struggle at higher magnifications (or in low light), failing to lock-on to your subject and ‘hunting’ for focus.
Learn more: How to Photograph Damselflies and Dragonflies
When using AF, it is worthwhile employing your lens’ limiter switch (if it has one) to help prevent the lens inadvertently cycling through its full range. If your AF is consistently struggling, switch to Manual Focus instead. Manually focusing is slower, but can potentially be more reliable.
When I switch to manual, I will effectively pre-focus my lens at roughly the level of magnification I desire and then slowly move forward into position until my subject meets the focal plane and is in sharp focus. I will then take a couple of images and proceed to gently rock back and forth, taking photos each time the subject appears sharp in the viewfinder.
This approach can be more effective than continually adjusting the focusing ring, and doing so also reduces hand movements close to the subject. Some close-up photographers rely on this technique, while others dislike it. Try it yourself and see how you get on.

However you decide to focus – automatic, manual or by pre-focusing – it is important to be aware that a lens only has one geometric plane of complete sharpness. You will normally want to place as much of the subject within this plane in order to record it sharp throughout. Therefore, try to position your camera parallel to the subject.
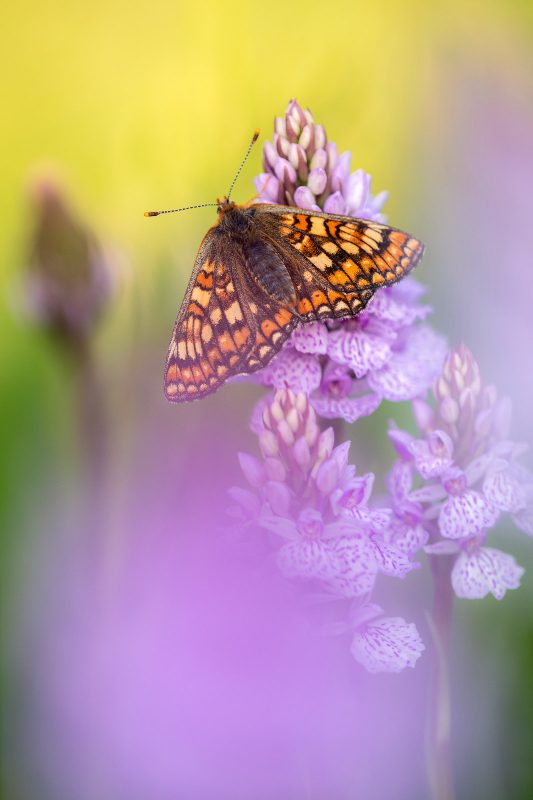
In other words, when photographing a butterfly with wings held flat open, place your camera directly overhead so that the insect, from one wing tip to the other, will all fall within this narrow plane of focus. By positioning your camera carefully and correctly, you will achieve sharper results overall.
Lighting and aesthetics
Arguably the biggest disadvantage of shooting insects when they are active is the lack of control you have over the lighting and background choice. During the day, when the sun is overhead, the light can be quite harsh. When stalking subjects, there is rarely opportunity to use a reflector, diffuser or LED in order to alter and enhance the lighting.
To some degree you just have to work with what you have, and contrast can be reduced in post production by adjusting shadows and highlights.
Warm, overcast days are often best for insect macro photography, as they will remain active but the light is more diffused and pleasing. On the subject of weather, avoid shooting on windy days, as it can be near impossible to achieve sharp, well-composed shots when subjects are windswept.

You ideally want to keep compositions simple and avoid lots of distracting background clutter. A relatively large aperture will help throw background detail out of focus and isolate your subject. Selecting subjects in suitable positions is key to producing aesthetically pleasing results.
Only photograph insects that are perched in a photogenic position – maybe a butterfly resting on a colourful flower or a dragonfly on a reed with water forming a striking blue backdrop. Don’t waste your time photographing insects hidden away in vegetation, or partially concealed in the undergrowth, unless you can capture a striking environmental shot or something a bit quirky.
Instead, wait until subjects rest in photogenic positions. I often look for insects resting where there is distance between them and their background. By doing so, I can achieve clean, flattering backgrounds that don’t compete with the subject for the viewer’s attention.
 Read more: How to Photograph Butterflies
Don’t feel you have to fill the frame with your subject just because you are shooting close-ups. Sometimes a close approach is best, particularly if you are trying to exclude messy vegetation from the frame. However, a degree of negative space can enhance the composition, and including space in front of insects will help to absorb their gaze. If in doubt, always opt for more space than too little; you can always crop later if you have too much space, but if you go too tight then you are stuck with it.
The rule of thirds is often reliable, and placing your subject on an intersecting third will normally produce pleasing results. Don’t be scared to be bold, though – a daring composition or unconventional perspective can help your shots standout.

The bottom line is that great insect images are possible with or without a tripod. Be patient, respectful of your subject, and have fun with your photography this summer.


