
How to Remove Haze From Your Photos in Lightroom
Wildlife photographers have many different situations and weather conditions thrown at them. You can deal with most of them, such as creating rain streaks in a downpour, or using strong lighting to create a backlit effect. But foggy, misty or hazy conditions are hard to make the best of. You could go for something wide-angle and atmospheric, but that isn’t always the aim of your shoot.
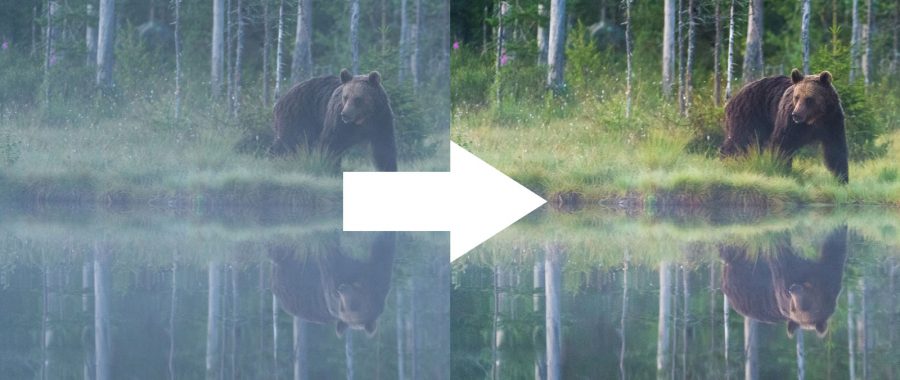
If you’ve taken a shot down your telephoto lens in haze, chances are it’s totally washed out and lacking any punch at all. Depending on how hazy your shot actually is, and whether or not you’ve managed to focus it properly, you can go some way to rescuing it. Let’s take this very hazy image of a brown bear as an example.


The conditions on this day weren’t great. Mist had rolled in, and I think it was about 2am when this image was taken. As a result, there was very low light and so I didn’t have much room to improve the shot. Still, it was my first time seeing brown bears and I couldn’t help but click the shutter! This is an extreme example, and you may find that the adjustments you need to make on your own photo are less drastic, and the final image may be of even better quality.
Before we get going, it is worth saying that you should really be shooting in raw format. It allows for much greater adjustments, and if your photo is a JPEG you will probably have less success here. Still, give it a shot and see what happens! Oh, and make sure your screen is calibrated too!
Further Reading: “How to Calibrate Your Monitor“
Step 1: Adjust the White Balance
Looking at the image, there is a definite blue cast to the photo. This is because my white balance is wrong for all the mist, but luckily I have shot this in raw and can make this adjustment without issue during post processing. The current Kelvin value is 5,250K… brrrr. Increasing this value warms up the photo. I’ve settled on the 6,900K mark for this (yes, that’s pretty high).

Adjust the slider in the Develop module (under the Basic section) with your own photo and settle on what looks natural. Be sure not to overly warm the image so it gets an orange, or red, cast.
Step 2: Add Contrast
Contrast is the one that will make the biggest difference to your shot. If you only have a light dusting of haze, then this will probably be the only adjustment you need to rescue your image. Haze removes most of the contrast from your photo, and that’s what gives it the flat, washed out look.

Try not to pull the slider all the way to 100 on the contrast. It’ll obliterate any highlights or shadows you may have. It’s tempting though, especially when you see the drastic difference it makes. More is better, right? Wrong!
I’ll say it again, but this image is really hazy. The contrast adjustment has made a noticeable difference but it’s far from perfect. Let’s keep going…
Step 3: Adjusting the Blacks and Whites
This is a bit of a free for all. You’ll need to slide them about yourself to see what changes give you the best results for your situation. Start with the blacks. With no contrast, you have no real blacks or whites in the shot. You can accentuate them by playing with the black and white sliders respectively.

Now you’re starting to see a difference, right? Looking at the image above, you can see the adjustments I’ve made. +26 on the whites, and -60 on the blacks, has worked for me here. I also tweaked the highlights and shadows to help me out. Usually, you would find yourself pulling them in the other directions to recover lost detail in an image. But in this case neither the whites nor blacks are pronounced, so I’ve used the sliders to bring them out instead. It made very little difference, but enough to be worthwhile.
Step 4: Bring Back the Colour
When you’re introducing the contrast back into your photo, like in the previous steps, remember that you aren’t fighting to regain all the colour saturation. We have other sliders for that!
First, adjust the vibrance slider. This pulls out the base level of colour that is already there in the photo. Pay attention to all the areas of the image when you do this, and be careful not to ‘burn’ any colours into unnatural appearances. I’ve gone for +39, but I still feel like something is missing – here’s the progress so far:

Now for saturation – let’s give it a little boost. This is like dumping a bucket of paint over your image, so be careful. Pulling the saturation slider up slowly, I have settled on +11. The difference is subtle, but it’s there.

Step 5: Clarity
Clarity adjusts the contrast in the mid-tones of the photo. It leaves the blacks and whites alone. When you were sliding around the black and white sliders, you probably felt like you wanted to keep going, but the blacks and whites were getting too strong. This is the answer.

Step 6: Sharpening and Noise Reduction
Now I’m happy with how the image looks, I’m going to make some small noise reductions and add some sharpening. You’ll probably find shots with haze are a little soft, and have gotten noisy during your edit.
I won’t go through how to make these adjustments in this tutorial. Instead, have a read of our tutorials on how to sharpen and how to apply noise reduction to your photos in Lightroom.
The Final Result
With all adjustments now made, this is the final result:


Clearly the adjustments have worked. As I’ve said before, this is an extreme example. Photos with less haze will come out the other end even better than this one, and hopefully a little sharper too! Mist can be a killer for a tack-sharp shot, so that is likely something you will have to settle for.
There is also a ‘dehaze’ option under Effects in the Develop module. I found the results with this slider to be not great at all. It may solve the issue for slight haze, but the method outlined in this tutorial gives a much more controlled way of processing your image, rather than a blanket adjustment like dehaze.
Has this tutorial helped you? Post your before and after shots in the comments below!


