
Lofoten Landscape Photography Guide

The Lofoten Islands are blessed with hundreds of highly photogenic locations, endless shorelines with interesting foregrounds, and awe-inspiring, unusually shaped mountain backdrops, making for incredible landscape photography locations.
The rugged peaks are accessible by trails, and winding icy roads lead to picturesque fishing villages surrounded by Arctic scenery.


Luckily, many of the most popular and striking locations are easily accessible, predominantly roadside. They also mostly double up as excellent northern light locations from mid-September to mid-April.
This article focuses on the popular southeast tip and provides information on locations that allow easy access within the winter months.
1. Hamnøy & Olenilsøya
For iconic images of red and yellow huts set against dramatic mountain backdrops, head to Hamnøy & Olenilsøya.
Hamnøy
This is the location that often springs to mind instantly for anyone who has had the pleasure of visiting Lofoten. However, pictures from this iconic location are often confused and identified as having been taken in Reine.

This is because Hamnøy, along with the tiny island settlements of Sakrisøya and Olenilsøya, adjoins Reine via a single road and several bridges. Although each area boasts their own scenic viewpoints.
Hamnøy is the place to go to get the quintessential Lofoten Archipelago photograph consisting of the traditional red Rorbu cabins clustered on the side of a fjord (Reinefjorden) with a mountain backdrop.
There are hundreds of similar scenes, but none quite like what you’ll capture in Hamnøy.

Here, a wide-angle lens is recommended, and the most popular time to photograph is sunrise.
Look out for the small platoon of photographers gathered along the road bridge leading to Olenilsøya, as this position provides the perfect place to shoot this iconic view.
Get there early to gain the best position, and you can park at the start of the bridge on the opposite side of the road.
Read more: How to Use a Wide-angle Lens for Landscape Photography
Olenilsøya
Head along the E10 road towards Reine and pitstop at the little settlement of Olenilsøya to climb a small hill with classic views over Reine, Hamnøy, Olenilsøya, Sakrisøya, alongside Reinefjorden, and a 180-degree panorama over several majestic peaks.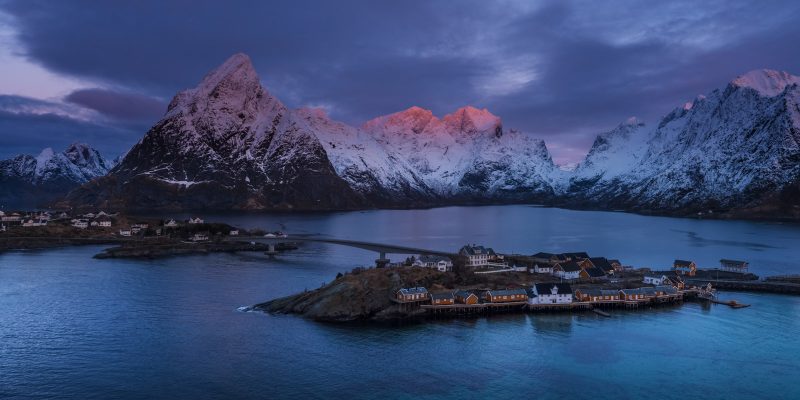
It is also an ideal spot for homing in on the small island of Sakrisøya with its iconic yellow cabins.

Use a 50mm lens upward for interesting perspective shots, framing singular cabins with immense mountain backgrounds.
Read more: The Use of Perspective in Landscape Photography
2. Reine
When you reach it, Reine feels like the end of the road as it is situated at the far southwestern end of the islands along the E10 road. Although there are several villages accessible further along the E10, the actual ‘end of the line’ is a village called Å.

However, Reine steals the show with a viewing area facing north over the Reinevagen Fjord with red cabins and traditional houses nestled along the water’s edge, and a stunning backdrop of triangular peaks.

It’s also from this area that the Reinebringen trail and peak are accessible, with the peak granting spectacular views over the entire area.
The viewpoint as soon as you turn off the E10 to Reine is the classic spot, and there will always be people there admiring the view.
However, I would argue that this spot works best at sunrise. There will be multiple small details that can be picked out with longer focal lengths i.e., 70-200mm at this location.

Though using a wide-angle to start with will enable you to capture the whole scene with cabins, fjord, and mountains bathed in the morning light, and is usually a great starting point.
Read more: How to Use Water in Your Landscape Photos
3. Fredvangskrysset
Going back to the northeast on the E10 road towards Ramberg and Leknes from Reine, you come to a parking area with a view over two bridges. This is Fredvangskrysset.
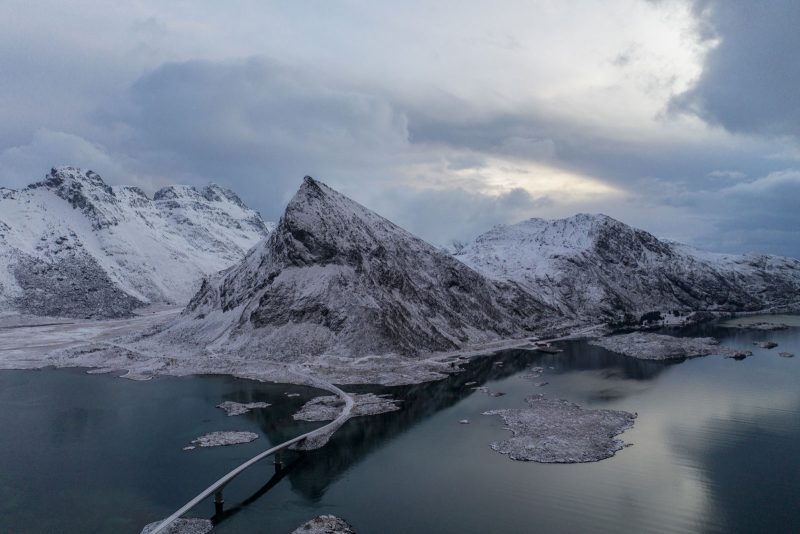
The area has multiple viewpoints from the shores of the small islets out to the fjord and distant peaks. There are also various photographic viewpoints of the bridges that will help lead you into the scene and back to Volandstind Mountain.
This area lends itself well to longer focal lengths to come in closer to details and exploit the natural curvature of the bridges.
However, the shores of the small islets between the bridges also work with wide-angle lenses, as detailed patterns can be obtained in the winter amongst the breaking ice on the shoreline to provide excellent foreground interest.

Drone photography is also popular here as video footage flying over the arched bridges can look spectacular in any light. Be sure to read the most up-to-date local laws, however, as they do change regularly.
Read more: Landscape Drone Photography – Features to Use for Better Aerials
4. Skagsanden Beach
This is a classic Lofoten location, and very popular with Arctic surfers, general tourists, photographers, and locals alike. There are often amazing patterns left behind in the sand from the tide and the small streams running onto the beach.
The beach forms a smooth curve that is pleasing to the eye and enhanced with the incoming or receding waves within imagery, perfectly framing Hustinden Mountain across the water.
This beach is also probably one of the most popular spots for photographers hoping to capture the aurora borealis, mainly due to ease of access with a car park at its western end.

Wide-angle shots are recommended here day or night.
In the day, using a wide-angle will help obtain details in the immediate foreground whilst keeping the scene balanced. Try using the Hustinden mountain to help with the rule of thirds for sweeping seascapes.
At night, a wide-angle lens will also help capture the magical ‘green lady’ as she dances and swirls, whilst allowing plenty of foreground to be obtained for some truly intriguing night seascapes.
Read more: How to Photograph the Northern Lights (Aurora Borealis)
5. The road to Storsandnes Beach (Fv805)
The coastline alongside the road consists of rock formations that provide excellent seascape foreground interest, stretching a few kilometres beside fish drying racks that many aurora hunters use as a foreground subject under the northern lights.

The waves lap against the rocks in this area creating swirling runoffs that can lead to stunning seascapes.
For daytime seascapes, several ND filters of different grades are recommended here, along with a wide-angle lens. Having a selection of NDs is essential depending on the section of coast you choose, and also how the sea is behaving.
These factors will determine the type of long-exposure seascape you wish to try and obtain.
Some days you may want to completely wash it out with filters such as a 10 stop, but often using a lower density such as a 0.9 or 1.2 will allow part motion and part detail to be captured, creating water swirls off the rocks.

This beach is fast becoming a classic aurora haunt, though not as popular as Skagsanden. It provides a gentle shelving bay that faces northeast and sweeping views along it to the northwest and Offersøykammen.
As this location has northerly views, even a weak aurora display will allow for the capture of an auroral arc.
Read more: How to Photograph Seascapes
6. Uttakleiv Beach
Uttakleiv beach is another very popular destination further along the same road as Haukland, through a tunnel to the north.
There are boulders strewn along the sweeping bay creating interesting subject matter, though the main attraction is what is now known as the ‘The Dragon’s Eye’.
‘The Dragon’s Eye’ is a rock pool that has coloured stones embedded in it all forming the shape of, you guessed it, a dragon’s eye! It is impressive and can be an excellent photographic subject if the weather is on your side.
Human traffic needs to be on your side too though, as there can be a queue of people waiting to achieve their image.
This isn’t always the case though and sometimes the beach can be deserted – particularly if the weather conditions aren’t looking so favourable!

There is a toll to pay for parking here, and it’s good to be aware that this beach can often be prone to high winds, as well as other hazards; it’s unsheltered and the tide can come in fast and hard.
Big waves, out of character with the 10 or 20 you see prior, can suddenly engulf the boulders on the beach and rock shelf where the Dragon’s Eye is situated.
The area around the Dragon’s Eye is also extremely slippery as it sits below the high tide line, so take extra care when photographing this area.
If you are aiming to obtain a ‘Dragon’s Eye’ image framed with sky and ocean, a wide-angle is an absolute must in order to obtain the entire eye and retain details further afield.
However, if using the boulders on the beach, 14 – 50mm is a good focal length range as it is possible to isolate boulders and water runoff to create abstract seascape imagery.
Read more: Creative Visions – How to Photograph Abstracts in Nature
In conclusion
Lofoten is spectacular no matter when you visit, but naturally mid-autumn to mid-spring provides aurora opportunities.
In the winter, the weather is unpredictable. Blue winter skies and snow-covered red cabin roofs lead the way to those quintessential Norwegian cabins and mountain shots, as well as providing postcard-ready sunset and sunrise images.
Winter storms can get you those moody isolated cabin shots that look as if they are lone outposts cut off from the world by the weather. The bonus with the colder months is on the clear nights, you usually get to see an aurora display which can be immense given the latitude.
The summer months will allow you to hike the mountain trails, and whatever your hiking/scrambling skill level, you will be able to find a trail that suits you.
The peaks provide a platform to see over multiple other mountains and offer vistas to obtain incredible sunset and sunrise images.
The light from 10 pm – 2 am stays at a permanent sunset state during the peak summer months, as the sun does not set and golden hour lingers – truly a landscape photographer’s dream!


