
How to Photograph Seascapes
The coast is a unique environment; one that is capable of offering huge variety. Its character can change dramatically within a very short distance, and even the same spot can look markedly different at different times – depending on the weather and tides.
Seascapes are incredibly popular with nature photographers, partly for this reason but also because the sea can add movement and drama to compositions. Many locations also have a natural sense of order, which makes framing a shot just a little more straightforward than, say, shooting in woodland.


1. Planning your shoot
As with all landscape photography, planning is important – perhaps even more so than some, as your safety could depend on it. A lot of research can be done online prior to visiting a location, using resources such as Google Maps.
Looking at images on stock library websites can work as a source of inspiration for viewpoints and compositions. However, there is no substitute for actually visiting a location and checking it out for yourself. Recce it in the middle of the day and work out what tide height is likely to suit it best, and from what direction the light should ideally be coming.
You can then use apps such as The Photographer’s Ephemeris to find out when the best time to shoot is.
You should also consult tide tables so that you know when the ideal tide height will be and if there is any danger of getting cut off at any point. There are free predictions available online for up to seven days in advance, but if you want to plan further ahead you will probably have to pay.
Personally, I use a smart phone app called Tides Planner, which allows you to purchase a year’s worth of tides for various countries and which has a good selection of locations on which to base your planning. AyeTides is another very popular choice.

Read more: 10 Best Landscape Photography Locations in Cornwall, UK
When it comes to the weather, there is no one set of ideal conditions for seascape photography. Overcast conditions can be perfect for long exposures; stormy weather can produce dramatic light, and colourful sunrises and sunsets look especially good at coastal locations.
If you’ve set aside a day or two for coastal photography, the trick is to have a number of possible locations in mind which will suit different conditions and then make a choice based on the weather forecast.
A key factor to consider when studying the forecast is the wind speed and direction, which can be an issue for both shoreline and cliff top shoots. When shooting on the shoreline, if the wind is blowing in from the sea at speeds of 15mph or more, there is likely to be sea spray coating your lens or filters.
As well as being potentially harmful to your equipment, it will have a negative impact on image quality. If spray looks likely, make sure you pack a selection of lens cloths and some cleaning fluid, as well as a chamois leather for wiping kit down and possibly a rain cover to protect your camera.
Wind can cause problems on cliff top shoots also, as it can cause foliage to blow around and blur in your photographs. If there are severe gusts forecast, keep away from cliff edges as there is a potential risk to both you and your equipment.

2. Taking the shot
Composition
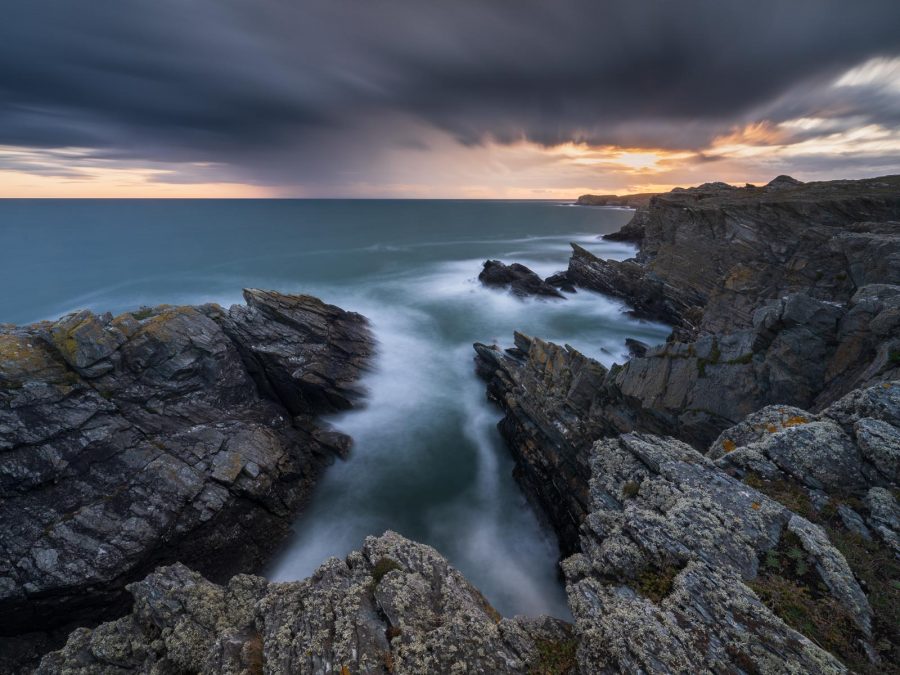
Cliff top viewpoints are often neglected as the temptation to get close to the action – on the shore – is very strong. However, cliff top views can be spectacular, with far reaching views along the coast and a real sense of drama.
Looking down over a drop using a wide-angle lens can exaggerate the height of the cliff with dramatic effect, and wide-angles can also be used to exploit foreground interest such as rocks, paths, and wild flowers. Telephoto lenses can be used to create layered compositions using distant headlands, or to focus attention on waves crashing over rocks on stormy days.
Read more: Why You Should Use a Telephoto Lens for Landscape Photos
However, when most of us think of seascapes, we think of shooting from the shoreline – getting close to the action with waves crashing over rocks or washing up over a rocky foreshore.
Shoreline locations usually offer plenty of foreground interest: rocks pools, tidal pools, smooth sand with wave patterns, reflections in wet sand, rocky ledges… and so on. Getting in close with a wide-angle lens is an obvious approach but to really make it work well, you should try to relate foreground and background.
When composing a shot, try starting with the background: choose a suitable focal point in the distance and then see if there are features which tie the foreground and background together. Look for lines and shapes which guide the eye into the frame and help to highlight the background focal point. Water movement can help here: if you shoot waves as they draw back towards the sea, these will create natural leading lines that make for a dynamic composition.

Focusing
Depth of field is crucial if you are including foreground interest in compositions. Ideally, you will want to keep everything sharp from the immediate foreground through to the background. An increasingly popular technique for helping you achieve this is ‘double distance focusing’.
To do this, decide which is the nearest object in the frame which you want to be sharp, estimate its distance from the camera and then focus at double that distance. Choose an aperture in the mid to small range (f/11 – f/16) and, unless you have particularly close foreground interest, this should keep everything sharp from foreground to background.
Read more: Where to Focus in Landscape Photography
Tide height is important if you’re shooting on the beach. This is a very general rule, but sandy beaches tend to look their best at low tide and lend themselves to simplicity with compositions based around just one or two key elements. Try to arrive while the tide is still falling, as the receding water will leave the sand clean and free of footprints.
Rocky beaches, on the other hand, can appear cluttered and so the trick is to shoot them with a tide height which hides the clutter but still reveals some interesting detail. Research and scouting locations in advance will help you decide when it is best to arrive.

3. Filters
Combating sea spray
Sea spray can be a real issue when shooting close to the sea. To prevent image quality from being compromised, you need to keep lenses and filters as clean as possible. When setting up, consider using a ‘sacrificial filter’. This is an old filter which you have replaced and don’t mind if it gets a little beaten up.
Keep this filter in front of your lens while you set up and frame your composition. When you’ve settled on your composition, focused, set your exposure and so on, quickly replace this filter with the ones you actually want to use and then take the shot as quickly as possible.
In between shots, wipe your filters down – ideally using a suitable cleaning fluid, and keep a cloth draped over them when not shooting. Only remove the cloth at the very last minute before you press the shutter.
Choosing your filters
While it’s possible to recreate the effects of some filters in post-production, they remain an essential part of a landscape photographer’s kit.
Graduated filters can be useful for darkening down a bright sky so that the range of tones in a scene can be captured by the camera’s sensor. For seascapes, grads with a ‘hard’ transition from the dark to the clear part are more useful, as most of the time you will be dealing with a mostly unbroken horizon.
It’s possible to blend bracketed shots rather than use grads, but if you’re shooting longer exposures remember that the light can change from one frame to another, potentially making the blend difficult.

Read more: The Essential Filters for Landscape Photographers
ND filters reduce the amount of light travelling through the lens to the sensor, meaning that longer shutter speeds are needed to achieve correct exposure; they therefore allow you to use artificially long exposures for creative effect. It is difficult to achieve this effect without filtration.
Polarisers reduce surface sheen and reflections and their effect is impossible to replicate in post-production. They are an extremely useful tool in seascape photography, as they can be used remove glare from wet rocks and sand and to increase colour saturation on sandy beaches. Plus, they allow you to see below the surface of the water.
4. Exposure times
Exposure times for seascapes are a matter of continued debate: what is the ‘right’ way to shoot water – blur the movement or freeze it?
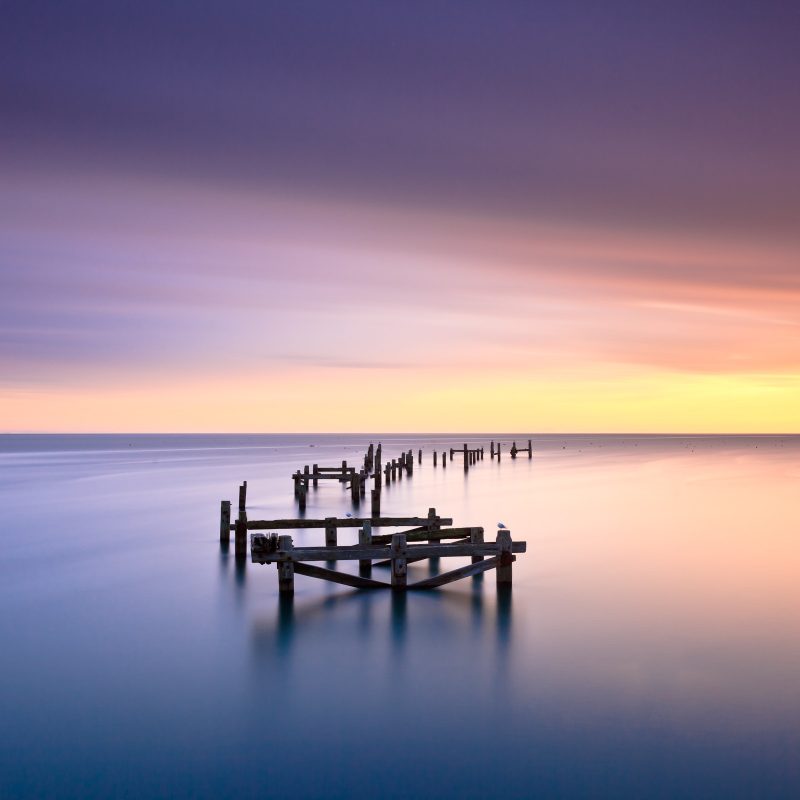
Since the advent of ‘extreme’ neutral density filters such as the Lee Big Stopper, the tendency for many photographers has been to shoot with ultra-long shutter speeds and completely smooth out the water, so that it takes on a glassy surface and any wave movement is recorded as an ethereal mist.
While this can be an effective technique, it’s best suited to certain types of scene. For example, minimalist compositions benefit from the removal of surface texture on the water and this approach will also complement the soft, pastel colours of a subtle dawn or dusk by enhancing the naturally tranquil mood.
Faster shutter speeds can create dramatic results. For example, waves crashing over a harbour wall. But this can also result in a rather ‘messy’ composition, with complex texture and too much going on in the frame.

Where there is wave movement, the best approach can be to use a ‘shorter’ long exposure – perhaps between 2 and 5 seconds. This will smooth the surface of the water enough that the scene is simplified but not so much that the waves lose their texture.
The exact shutter speed you want will depend on various factors, including the size and power of the waves and how close you are, so experiment a little to see what gives the best result. To help you get the desired shutter speed, you’ll need to try different strength neutral density filters and possibly adjust the ISO speed as well.
5. Coastal architecture
The coast has its own unique architecture: lighthouses, piers, harbour walls, breakwaters, groynes, and so on. These make very effective lead-ins and focal points for wider compositions, or excellent subjects in their own right.
If bold, graphic compositions and more structured images are your bag, then head for locations where you can find these features.

There is also great potential for juxtaposing man-made and natural elements as well as demonstrating the power of nature; huge waves crashing down on piers or lighthouses make classic compositions.
Coastal architecture is also a good option on dull, overcast days as piers, lighthouses and the like make superb subjects for minimalist long exposures.
In conclusion
Most photographers are naturally drawn to water, especially the sea. If you live on island like the UK, count yourself lucky, as it’s never very far away.
If you live further away, it’s still worth making the effort to visit as its ever-changing nature provides almost infinite photographic potential.


