
How to Shoot a Star Time-lapse

Time-lapse photography is an amazing way to capture night-time scenes. Showcasing billions of stars shining overhead never gets boring but, by adding in the motion of them travelling across the sky while the earth rotates on its axis, the scene comes alive.
Not to mention adding moving elements in the rest of the frame too, such as tides and clouds- then it’s a sure-fire recipe for an action-packed sequence. Every night shoot is unique, so you will need to learn and adapt to the conditions. This will come with experience and creativity, but I hope this article gets you on your way to dipping your toes into the world of time-lapse photography.
These days, the software in camera bodies is getting more advanced. Cameras have built in time-lapse functions that, after punching in a few settings, will shoot, process, and supply you with a time-lapse video file. While these are useful to see what’s possible, and are easy to make, they are limited in their output resolution and quality.
The best way to create time-lapses with maximum flexibility and quality is to take a series of images, batch edit them, export the processed images, drop them into video editing software as a sequence, before exporting a very high-resolution video.
Yes, there’s more work involved, but ultimately a better outcome. Fundamentally, making a simple time-lapse of stars moving across the sky is a very similar method to photographing conventional star trails so, if you’ve done that already, you’re halfway there!
Either way, we’ll work through the thoughts behind it, equipment, settings, and technique.
Equipment for a star time-lapse
Firstly, let’s consider the equipment needed. There are a few fundamental requirements in order to shoot time-lapse sequences, but overall, it’s possible to do with most cameras and the contents of a normal camera bag.
1. Camera
A digital camera with good high ISO performance is preferred for night imaging. Using a high ISO will allow you to capture more information in low light situations.
2. Lens
Wide-angle lenses work best, as they let you fit more sky into your shots. Furthermore, I recommend the faster the better when it comes to lenses: a lens with a maximum aperture of f/2.8 or faster will really help you gather light at night.
3. Intervalometer
The most important part of time-lapse photography involves letting something else do all the work! I’m joking, of course, but the intervalometer plays a very useful role.
This is a small device that connects via the remote cable release port. It will allow you to dial in your chosen delay, duration, interval, and the total number of images you want to take. You can set it running and then come back when it’s finished.
 Remote intervalometers usually have the following options you can dial in:
- DELAY/SELF – tells the intervalometer to start shooting pictures after a set delay.
- INT. – interval between two shots (include your LONG time in this too).
- LONG – your chosen shutter speed.
The above are user set as hours : minutes : seconds, as required. - N/FRAMES – the total number of images you require.
There will also be a START/STOP button to commence or end the action. When using the above remote intervalometer, you’ll need to put your camera in BULB mode so the remote can control the shutter speed length.
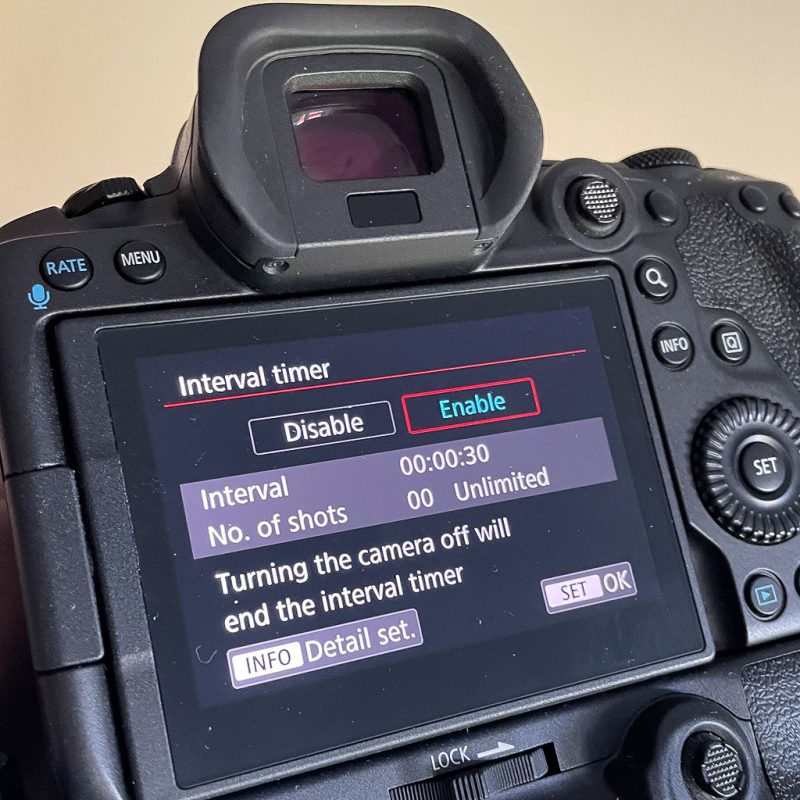
These days, many camera bodies have built-in intervalometer functions, which are a great addition and save you dealing with dangling cables swinging in the wind, clonking against the tripod, etc. These modes can usually be found through the menu system.
Some of the in-built intervalometers only have a maximum number of 99 set images, or you can choose unlimited. I always opt for unlimited in this instance, and just keep an eye on the time elapsed and/or review how many images the camera has taken on location. I end the time-lapse at the desired time by simply switching the camera off.
4. Sturdy tripod
With night sky time-lapses, each frame will almost certainly be a long exposure.
Plus, you’ll want your camera in the same position for a good hour or more, so a sturdy tripod is essential when it comes to obtaining blur-free images that don’t change composition throughout the sequence.
Read more: How to Choose the Right Tripod
5. Batteries
You’ll be surprised at the extent to which battery life is compromised at night out in the cold. Also, as you’ll be photographing many images in succession, it’s very intensive on battery power. So, always make sure you start a sequence with a full battery, and one that has enough power to complete the sequence.
The last thing you want to happen is having the battery run out while photographing a time-lapse. Make sure your intervalometer has enough battery power too. You don’t want that failing either.
6. Memory
This is probably not so much of a worry these days, as memory cards are bigger and cheaper than they used to be. However, it’s worth noting that you should format the card before shooting a sequence, and check there’s enough storage on that card to contain the set number of images you’ll be taking (e.g., 500 images).

Read more: The Best Equipment for Star Photography
Other factors to consider
1. Focusing in the dark
To focus in the dark, I recommend turning on LiveView and focusing on a bright star or a distant strong light.
Do this by turning your camera/lens to manual focus and, in LiveView, magnifying the scene on the area of the light in order to fine-tune your focus.
In this way, you can be certain that the stars will come out pin-sharp in your final shots.
Read more: How to Get Sharp and In Focus Stars in Starscape Photos
2. Light pollution
Night time-lapses can be created anywhere but, for the darkest skies, head away from city lights or any light pollution that might affect your images.
Keep an eye on the moon phase as well; you can shoot the moon travelling across the sky as a time-lapse too but, for just a star-filled sky, you’ll want to time your photography around a new moon.
3. Lens fog
If you’re shooting a night time-lapse, it’s recommended that you use a dew heater around the lens. When air temperature approaches the dew point (the temperature at which dew forms), the camera and lens can attract condensation, covering all surfaces in moisture. This eventually fogs up the front element of your lens, ultimately ruining the images.
It’s a common problem for night photography in humid environments. You can purchase a dedicated dew heater, or even a hand warmer, held on with a rubber band around the lens, can suffice.

Choosing the interval and duration
Before you start to photograph a sequence destined for time-lapse treatment, it’s a good idea to work out what you’re shooting:
- the shutter speed required for each frame,
- the interval needed between shots,
- the total duration.
It’s also worth thinking about the playback speed. Video footage is typically played at one of three “base rates,” measured in frames per second (fps for short). In the UK, the standard is 25 fps. In the USA 30 fps is the standard, and for cinema it’s 23.98 fps.

When creating a time-lapse sequence, you want to aim to replicate this frame rate in your final video. However, the difference with time-lapse versus video recording is that you’re shooting the frames separately, and controlling the interval between frames too!
For example, you could be capturing one image per hour, one every five minutes, or one every five seconds; it’s entirely up to you to choose and what the sequence demands. Then, once you have taken all your frames (images), you play these back at 25 frames per second, creating a video that showcases the accelerated passing of time.
Roughly speaking, when the space between each frame (image) is taken at a larger interval, it means that visually the time-lapse movement captured will appear faster on playback. So, to make the final sequence look as smooth and natural as possible on playback, I tend to have minimal interval between frames.
What is a good interval duration for a star time-lapse?
Before heading out, or even contemplating locations, it’s worth working out how long the video clip you’ll be creating is going to last, or how long you need it to last, especially if that clip is part of a bigger film.
Generally, I’ll aim for 15-20 second final video output (for playback at 25fps) per sequence, as this allows for a good range of real time movement captured. It also helps to have lots of footage to choose from to find the best parts, or, for creative/advanced fun, implementing speed ramping (accelerating the playback of the sequence).
Fundamentally, night-time photography does depend on your shutter speed, so a good rule of thumb is to think that you would usually need a 20-30 second shutter speed on any given night image, in most cases.
Another factor is the motion are you capturing. The Earth rotates quite slowly, so you’ll need a good hour or so to capture some decent movement in the stars as they traverse across the sky. The interval between your shots determines how fast the sky will appear to move through the frame.
An example calculation
So, let’s say you’ll be shooting your images using a 20 second shutter speed, and you leave a 30 second interval in between frames (starting). This means you’ll take 2 images per minute.
If you want a 20 second video clip as your final output, it means 20 seconds x 25 fps (frames per second) to gather the number of frames (images) needed = 500 images.
500 images divided by 2 images per minute = 250 minutes, or just over 4 hours of actual shooting time.
Performing these calculations prior to planning a shoot is vital, as you can calculate if you have the time in your schedule to do it, or whether there’s enough darkness. If needed, you can change your plan to be out for a shorter timeframe by adjusting the number of images required, and/ or camera settings.
Luckily, there are apps that will do these calculations for you – such as PhotoPills. But a good formula to remember is:
Interval x 25fps x final video clip duration = total recording time
30 x 25 x 20 = 15,000 seconds, which equates to to 250 minutes, or 4hrs 10mins.
Once you’re happy with the shutter speed, interval time, and number of images, you can program all of this into your intervalometer and sit back and let the camera do the work.
The best part of doing time-lapses at night is that, generally, the lighting conditions won’t change throughout the sequence (unless the moon rises/ shooting at half-light, etc). Therefore, you can keep the camera on manual mode using the settings you determined at the start of the sequence.
Tip: When calculating your interval, allow time for the camera to buffer in-between shots, for the image to finish writing to the memory card before being ready to take the next image. You don’t want a buffer clashing. Usually add a few seconds to be safe.
Read more: How to Make a Day to Night Time-lapse Video
Composition of star photos
I’d suggest to compose your scenes as you would normally any landscape image. However, it’s worth noting that, as the final output will be a video, and video formats are generally 16:9 in aspect ratio. So, it’s good practice to compose your scenes with this in mind.
What I mean is, don’t include any important elements at the very top or bottom of your conventional (3:2) frame size, as these will be chopped off when cropping to 16:9. The best method is to use the built-in aspect ratio options in your camera to help visualise and frame your shots.

One workaround for this is to shoot a little wider than normal too. Most digital cameras these days will shoot in equivalent to 5K or more, so this leaves plenty of scope and flexibility for cropping, when it comes to the video output resolution.
For instance, HD covers around 50% of an average camera sensor, so you can see there’s plenty of scope for cropping or adding in post-production movements.
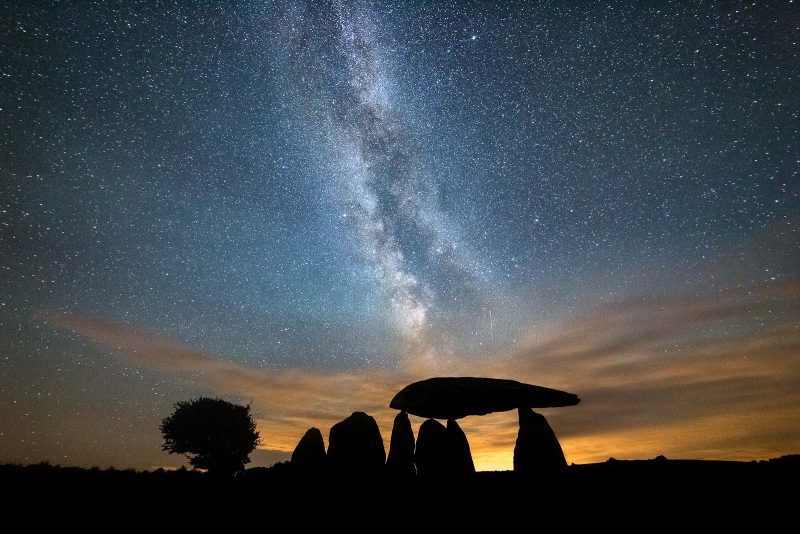
Your final consideration is the creative side of things. This includes where to point your lens and whether to include different subjects, so experiment. A nice suggestion might be to photograph iconic landscapes or landmarks with a star-filled sky above.
Camera settings
Always shoot in raw format, as this will give you the most flexibility when it comes to editing your sequence of images. This is especially useful when editing a time-lapse, as ambient exposures can change throughout the sequence.
Shoot in manual mode or, if using an intervalometer, use Bulb mode to allow the intervalometer to control exposure times. To calculate the optimum camera settings for night photography, use the 500 Rule.
The 500 Rule
As the Earth rotates on its axis, any long exposure image at night is going to capture motion, or in this case, the visible trailing of stars. For star trail photography this is perfect, as it is the main aim, but in a star time-lapse video you want the stars to be rendered as sharp dots of light and not lines.
This is where the 500 Rule comes in. To apply the 500 Rule, divide 500 by the focal length you are using. This will give you a ballpark shutter speed that you can use to combat any star trailing.
For example, if you are using a 16mm focal length on a full-frame camera, a shutter speed in the region of 31.25 seconds (500/16=31.25) would be appropriate. As most cameras give the shutter speed in whole numbers, you would round this down to 30 seconds. 30 seconds would then become your “LONG” time, if using the intervalometer.
With a 50mm focal length on the same camera, the shutter speed would be around 10 seconds. Remember to adjust this value if you are using a crop sensor camera, by multiplying the focal length by your crop factor before calculating.
Again, apps like PhotoPills will help you to calculate the settings needed to retain pin-sized stars.
Choosing your ISO
Once you have worked out the shutter speed based on your focal length, set the aperture at its widest setting, and choose an ISO. With night photography, always opt for increased sensitivity rather than worrying about visible noise, especially on a time-lapse that is potentially going to be downscaled to HD anyway.
The visible difference in terms of noise at higher values can be marginal, and there is great noise reduction software available that can help you smooth out any grain.
Start at around ISO 1600, take a shot, and check the image on the LCD screen. If it looks a little underexposed, increase the ISO to 3200, and keep increasing the ISO until you are happy with the outcome. In most cases I’ll use ISO 3200, but I’ve had good results at ISO 6400 and beyond too.
Read more: How to Use a Histogram for Better Star Photos
Remember that all camera sensors are different in how they handle high ISO values and noise, so choose the right setting to suit your camera.
Editing a star time-lapse video
With all the above considered, let’s say you’ve been out and shot a sequence of lovely night images, ready for time-lapse processing. My favoured choice of editing programme is Lightroom. You can check out all my other Lightroom editing articles on Nature TTL for more information.

Once you have imported your folder of images, the easiest thing to do is to batch edit. This way, on playback there will be no nasty changes in exposure and colour, creating a pleasing video to watch.
Make your changes to the first image in the sequence, including contrast, white balance, levels, cropping to 16×9, etc., and then synchronise these same settings to all the other files in the sequence. You’ll then end up with your whole image sequence edited, ready to export as JPG.
Then, using your video editing software of choice (I use Adobe Premiere Pro), create a new sequence, dictating your frame rate and resolution, HD at 25fps for instance, and import your series of images by clicking “Import”, choosing the first image, and then clicking “Image Sequence”.

This way, Premiere Pro will detect that all the images are to be placed in the timeline as a time-lapse. From here you export out your video, and there you have it!
For much more advanced editing techniques of time-lapses (such as a day to night time-lapse), I use a programme called LRTimelapse which works together with Lightroom and allows all sorts of customisation in editing for professional use.
In conclusion
Creating time-lapses is incredibly exciting, and not knowing how they will turn out adds to the enjoyment of creating them. Add in the majesty of the night sky, and these time-lapses will really reveal unique perspectives of everyday views.
As you will now realise, they do take a lot of pre-planning, without even considering weather conditions, creativity, and success rates. However, with enough perseverance and lots of practice, I’m sure you’ll be on your way to creating some captivating time-lapse sequences of the night skies. Good luck!


