
Using a 10-Stop Filter and Bulb Mode for Long Exposures

Have you ever wanted to photograph a scene where a large amount of time is captured in one exposure? Well, in this article I’m going to go through shooting exposures longer than 30 seconds using Bulb Mode and a 10 stop filter (aka. big stopper).

Equipment Needed
Firstly, here are few pieces of equipment I feel you need when capturing long exposures:


- Tripod – There is no way you can handhold exposures longer than 30 seconds so a tripod is a must.
- Shutter remote or intervalometer – This tool is just as important as the tripod. The shutter remote will allow locking the shutter open until you release it.
- 10 Stop Filter – This is what will allow you get a long exposure during the day. You can these with a circular thread or square type that to be used with a filter holder.
Further Reading: “The Ultimate Guide to Filters for Landscape Photographers“
Bulb Mode
Every DSLR camera has a special setting where the camera’s shutter is open for as long as you want it to be. This setting allows you to shoot exposures longer than 30 seconds, which is usually the longest exposure a camera can do automatically. By scrolling past 30 seconds you then enter the world of Bulb Mode. I use the Bulb mode when shooting with my 10-stop ND filter as it enables me to create exposures as long as I like. To do this I simply lock down the shutter-release button, which can only be done with an intervalometer or remote release. I prefer using an intervalometer as it shows on the screen how long the shutter has been open; this can be useful if the shot may take multiple minutes to create.

10 Stop Filters
10-stop ND filters are a God-send for landscape photographers. They bring a new element to your photography and help push your creativity to a whole new level. As you can’t see through the viewfinder when they are attached, due to the lack of light entering the camera, they can be awkward to use at first. But don’t let that put you off, as they help you to be more calculated and concentrate on the shot in hand. As most of the photos you take with this filter will be longer than 30 seconds, a remote shutter or intervalometer is required so you can use the camera in the Bulb mode.
You will have to calculate the shutter speed required by taking a reading without the filter on, and then work out what the equivalent exposure will be with the filter. You can do this with either a cheat sheet or an app on your phone or tablet (see below).
Helpful Apps
When calculating long exposures I always use an app on my iPhone as it’s quick, easy and saves me the hassle of working out the calculations in my head. The best two apps that I’ve used are NDTimer and LongTime Exposure Calculator (this one is free). There aren’t as many apps available for Android users, but an option similar to the iPhone apps is Exposure Calculator.

Setting Up The Shot
- Place your camera on the tripod; set your camera to Manual mode; set your lens to manual and connect the remote shutter.
- Set up the camera and compose the image without the filter. When you’re happy with the composition take a test shot – you want an even exposure, and this will be your ‘base’ exposure.
- For the best chances of getting a long exposure set the aperture between f11 and f22, and also set the ISO to its lowest value – ideally this will be around 100.
- Using a cheat sheet or one of the apps, work out what your exposure will be when using a 10-stop filter.
- Place the filter on the lens and set the camera to Bulb mode.
- Your aperture and ISO should stay exactly the same as the test exposure.
- Using a stopwatch or the app you can time the exposure length so that you get a properly exposed picture.

Tips
- Shoot in raw for optimal quality.
- For better control over your shutter speed, shoot in Manual mode.
- When setting up your tripod make sure to push it down so it gets a firm grip on the ground. This will help to keep your shots sharp.
- Shoot with the camera set at its lowest ISO value – preferably around ISO 100 – to reduce the chances of noise in your images. It also helps to lengthen your shutter speeds.
- Try to cover the viewfinder as light can leak in and ruin the shot. I usually place a piece of tape over the viewfinder, although some viewfinders have their own built-in blind. You may even have a small blind attached to your camera strap designed for this purpose.
- Some filters can create a slight colour cast on the final image, particularly when you stack multiple filters. Shooting in raw is particularly useful here as your images will be easily editable.
- When composing your images, use Live View. Even when it’s too dark to look through the viewfinder, you will be able to see things clearer in the Live View mode. It’s also useful when manually focusing the scene as you can zoom into the image 5, or even 10, times to make sure it’s perfectly sharp.
- Use the camera’s internal spirit level if it has one, or attach one to the top of your camera to keep those horizons nice and straight.
What Works Well
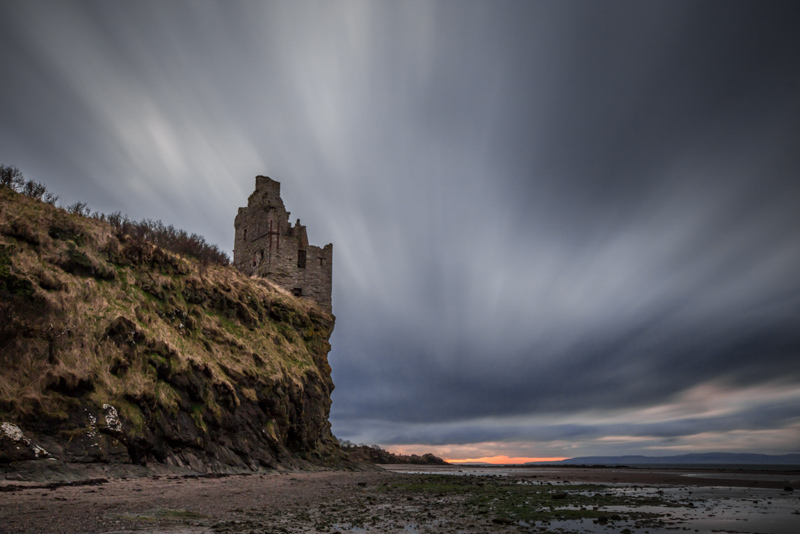
- Clouds – Showing the slow movement of clouds across the sky works really well.
- Water – Using a long exposure can turn any rough water into a silky smooth landscape.
- Light trails – This can be the lights of cars, burning steel wool, or showing the movement of stars at night.

Conclusion
Using 10-stop filters will be tricky at first as you really need to think everything through before you press the shutter, and if you forget one thing it could completely ruin the shot. When taking this style of shot, take your time and relax. Stressing about getting the perfect picture will result in wasted time; there’s nothing worse than waiting 15 minutes for a shot then finding it’s out of focus because you forgot to check it initially.
Once you get used to the routine of using a 10-stop filter you will be addicted – I know I was, and to be honest it’s the only filter I really use at the moment as I love the look it gives my images. Be patient and you will be rewarded with some stunning images that will stand out from the crowd.


