
The Best Equipment for Star Photography

When I began my foray into the world of landscape photography over a decade ago, I found the most satisfying part of the experience was being immersed in the enormous natural beauty that can be found in the world around us. I’ve watched the aurora borealis dance across the sky, shielded my face from the liquifying heat of volcanos, and gasped at the solar eclipse.
Whilst these experiences are definitely poignant moments in my life, you don’t have to see such a rare event to experience the pure joy of being a nature photographer. Just find a dark area and a clear sky at night, and prepare to feel very small.

The process of star photography can seem complicated and daunting to the fledgling shooter, but with a little education and some practice, you will quickly learn to stretch the limits of both your camera and your creativity.
If you’ve “talked shop” about photography for any length of time, you undoubtedly have heard the axiom that equipment doesn’t matter: a good photographer can make a good image regardless of what he/she is shooting with. Whilst there is definitely some validity to that argument, star photography is one of the few genres that will expose the deficiencies in your gear.
With that in mind, let’s take a look at the best equipment for star photography.
Applications for shoot planning
The making of a good star photo begins long before leaving the house. Meticulous planning can be the difference between a passable image and a spectacular one.
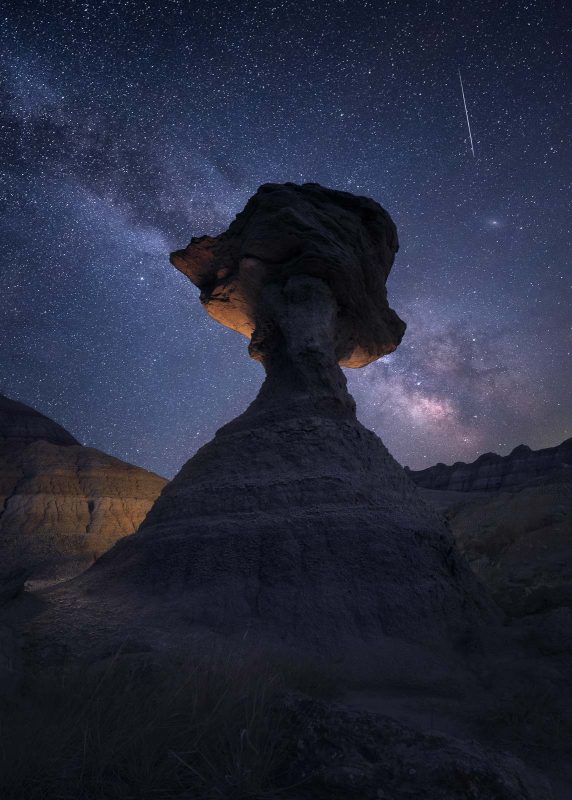
We start with the broad brush of light pollution. The darker the sky, the better the quality of the stars in your image. Try shooting the Milky Way from downtown, and you will see that ugly orange glow blocking out the details.
So how far out of town do you need to wander to find acceptably dark skies? The website Lightpollutionmap.info is an excellent resource for figuring out where you should go for the best night photography experience.

Thinking back to the best starry night images you’ve seen, what’s the one constant? The sky isn’t the entire show. The stars MUST have a symbiotic relationship with the landscape below.
Combining the information from Lightpollutionmap.info with Google Earth can help you pinpoint where appropriately dark skies intersect with an interesting subject. Once you have your location in mind, it’s time to figure out how things are going to line up in your image.
There are two smartphone applications that take the legwork out of determining moon phase and location, when the Milky Way core will line up over your subject, and pretty much every other consideration you have for the type of image you’re trying to create. These are the Photographer’s Ephemeris and PhotoPills.
Get proficient with these two applications and you will completely eliminate guesswork from the equation.
The last bit of planning software that you will want to employ is your favourite weather forecasting app. I typically use the satellite and local forecast from The Weather Channel to hunt for clear skies.
Don’t automatically discount some cloud activity, however. High, wispy stratus clouds can add a wonderful layer of drama when reflecting light from the last moments of twilight or the rising/setting moon.

Cameras, lenses, and kit for star photography
1. Tripods
It really doesn’t matter how incredible the specs on your camera are if your images are blurry. A solid base is important for many things in life, and your photography gear is no exception.
When I first started to make landscape images, I couldn’t fathom spending good money on something as seemingly simple as a tripod and ball head. The error in this thinking became painfully obvious as I missed shot after shot due to my worthless, wobbly tripod. In the end, I wasted a lot of money on substandard gear, and ended up spending the cash on a solid carbon fibre setup anyway.
My personal tripod of choice is Really Right Stuff TFC-34L mated with a Really Right Stuff BH55 ball head. A stable platform is important for landscape photography in general, but it is absolutely critical in star photography where your shutter can be open anywhere from 30 seconds to several minutes.
Read more: A Guide to Choosing a Tripod Head
2. Cameras
Camera sensor technology has come a long way in the last decade, and astro photographers are the clear winners. ISO 1600 used to be practically unusable due to ugly digital noise patterns that no amount of post processing was going to salvage. Today, I can ratchet my Nikon D850 up to ISO 9000 and come away with a workable image if I’m in a cold and clear enough environment.
If you have decided to focus solely on astrophotography, the Nikon D810A is absolutely unparalleled.
So what makes the Nikon D810A special as the world’s first full frame camera dedicated to astrophotography? Most cameras’ infrared filters are rather broad-ranging and filter out some visible red light, as well as IR. The filter on the D810A is much more precise, meaning the camera is around four times more sensitive to long-wavelength red light than an ordinary DSLR.
This radically improves the ability to capture the Hydrogen Alpha spectral line – the exact colour emitted by the hot clouds of Hydrogen gas that are found in emission nebulae.

Although Nikon has become my manufacturer of choice due to its excellent dynamic range, manageable shadow noise, and fantastic lens selection, the other top brands offer excellent options for shooting stars.
As Sony makes Nikon’s sensors, you can expect similar image quality from the A7R series. Up until recently, the general rule of thumb was that you wanted to choose a camera model with less megapixels – like the Nikon D3S (12.1MP). The smaller pixel count meant less noise at high ISO and in the shadows.
Advances in technology, however, have allowed for similar image quality in higher megapixel cameras. The recently announced Sony A7R Mark IV with its 61 megapixels could allow for huge, clean print sizes that have never been possible before.
For those Canon users who are feeling particularly jilted right now, fear not. Historically, your sensors create a more challenging noise pattern in dark areas, and the dynamic range hasn’t been able to match Nikon or Sony for many years.

However, I’ve always found the colours coming out of the Canon cameras to be far superior and require less post processing effort than my Nikon files.
Canon was at serious risk of being left behind in the sensor war, but recently came out with the 5DS and the 5DS R, which “cancels” the effect of the anti-alias filter used in the normal 5Ds to get slightly higher sharpness. At 50MP, we are approaching medium format quality imagery. The digital noise pattern in the 5Ds is substantially improved from its predecessor, making it a worthy companion when shooting the night sky.
Pro tip: While cranking up the ISO for your star shots is desirable, each step introduces increasingly difficult to eliminate noise. Shoot your landscape subject during the last light of blue hour at low ISO. Since the landscape doesn’t move, you can leave the shutter open for much longer than the 20-30 seconds that are the max allowable to keep the stars from trailing. You can combine them easily enough in Photoshop later. Just make sure that you refocus when you are ready to capture your star files.
3. Lenses
For lens choices, fast glass is the key to nighttime success. The venerable Nikkor 14-24mm f2.8 is the ultimate piece of kit for capturing brilliant wide-angle shots of the cosmos. The big takeaway from this round-up of gear is that the same setup that I use for my general landscape photography is wonderfully capable for shooting detailed and clean star images.
Things get a little more complicated if you want to make the jump into deep sky astrophotography, but you can capture some of the larger targets with a standard DSLR and telephoto lens. Mating a Nikkor 80-400mm f4.5/5.6 to my Nikon D850, I was able to make this image of the Andromeda Galaxy.

4. Star tracking devices
It’s not quite as easy as mounting your camera to your tripod and opening the shutter like you do for Milky Way images, however. There are a couple of additional pieces of kit that you need to add to your collection.
In order to capture a target as faint as Andromeda, you need to be able to keep the shutter open for several minutes – even at ISO 1600 or so. The only way to do that while keeping the stars sharp is to mount your camera to a tracking device.
I use the iOptron SkyGuider Pro and, while the learning curve on this rig is fairly steep, a few hours was sufficient to learn how to set up the system, align it with Polaris, and be up and running.
Since you will need to take several identical exposures, adding an intervalometer to your session will make things much more manageable. Although pricey, the Nikon MC 36 is an excellent tool that allows for a night full of image capture with minimal fuss.
This Nikon MC 36 is also key to those of you who are fans of making star trails.
Learn more: Star Trails – How to Take Captivating Night Sky Photos
Although I don’t see myself investing in a telescope for deeper astro images, I’m anxious to go out and shoot with the Nikkor 600mm f/4 and see what kind of results I can attain.
Post Production Software
Whether you’ve come home with a single ISO 9000 file, or a card full of hundreds of exposures that need to be combined, for some of us the work has just begun. If you are an image manipulation junkie like me, Photoshop CC is indispensable.

Lightroom and Adobe Camera Raw are wonderful tools to get your images started, and you can get good results just using the powerful engines in those programs. However, being willing to spend the time and energy to get comfortable with Photoshop will unlock an entirely new realm of possibilities for creating beautiful images.
Hand in hand with Photoshop for almost all top pros is Tony Kuyper’s exceptional TK Luminosity Action Panel. Sean Bagshaw has created a wonderful set of tutorial videos that guide you through the basics of how to make sense of the panel and fully effect your post processing. If you are looking for the single most valuable resource to take your image development to the next level, then in my opinion the TK panel is it.
The software mentioned above is wonderful for taking a single frame, or a foreground and sky image that you merge together, and adding the proverbial icing on the cake.
But what if you’ve been trying your hand at deep space photography and come home with hundreds of light, dark, flat, and bias frames that need to be combined? If you are on PC, Deep Sky Stacker is a solid program that will help you combine all of your frames into a Master file that you can pull into Photoshop to finish. 
For Mac users, there is are a couple of programs that will do the job: Nebulosity and StarryLandscapeStacker.
If you are looking to take the swan dive into the pool of astrophotography, Pixinsight is the ultimate software for selecting, stacking, and developing your star shots. Fair warning: you are entering an entirely new sport which will require you to learn a completely new “language”. The results, however, are astonishing. If you are going to get serious about shooting stars, investing the time, money, and energy to learn this piece of software is a worthy pursuit.
In conclusion
As with almost any genre of photography, it’s certainly possible to take star photos with the most basic piece of kit. Learn how to control your camera in manual mode, set it to JPEG, and take some neat images of the starry night sky.
With a little more careful consideration and gear selection, you can take your astrophotography to the next level and do some groundbreaking work.
Whether you want to create gallery-worthy photographs, or merely experiment with your camera taking your very first star shot, make sure that you take some time to look up and marvel at the universe spread out above you. After all, isn’t that one of the reasons we all got into star photography in the first place?


