
How to Shoot and Process Star Trails
In the times of film photography, almost any astrophotographer – myself included – started by shooting star trails. You can still start with that in the digital age. It’s easy and you don’t need fast and expensive lenses – and it’s fun.
If you place your camera on a tripod and take a photo of the night sky spanning a few minutes, you will see that stars draw small arcs. The Earth rotates around its axis, while the stars appear fixed in the night sky. Stars actually move, but you cannot observe their proper motion unless you observe them for many, many years. That’s because they are very far away.
Star trails are images showing the apparent movement of the stars as the Earth rotates, and there are plenty of creative opportunities for them. Let’s take a look at how to photograph star trails, as well as how to process the shots into your final image.

What gear do you need for star trail photography?
Any digital (or even film) camera with manual settings can be used. In terms of lenses, shorter focal lengths are preferred – this means you can also include part of the landscape in the photo.
You can also shoot star trails at long focal lengths. This is especially true if you want, let’s say, to photograph a bright planet setting in the sky. Always shoot with your lens hood on as it will take longer for dew to form on the front element of your lens than when shooting without it.
Read more: The Ultimate Guide to Astrophotography
You definitely need a tripod for star trail photography; the sturdier the better. Photographing star trails requires your camera to be in the same position for many minutes, and sometimes even hours.
Use the most rigid tripod you can get and weigh it down to prevent any movement caused by wind gusts. Shooting from a flimsy tripod may result in wiggly star trails. Also, keep an eye out for people coming to close to your tripod. On the one hand, they might touch it and induce vibrations. On the other, they might be standing in front of your lens and that will translate into gaps in your star trails.

It will be almost impossible to shoot star trails without using a remote release, such as an intervalometer. If you don’t have an intervalometer, you can set your camera to burst mode and block the button of your cable release.
If using an intervalometer, set an interval of one second between frames – never set the interval longer than that. If you can set an interval smaller than one second, do it. You don’t have to worry about buffer space or the card’s writing speed. You can use the slowest memory cards available, because buffer space is affected only when shooting short exposures at a high cadence. In this case, everything happens at a very slow speed and the camera will have plenty of time to write all images to the card.
Also, think about investing in a dew heater. Star trails take a long time to complete and dew might form on the front element of your lens. A dew heater heats up your lens and prevents dew from forming. They are relatively inexpensive, but f you don’t have such a device then you can improvise by sticking one or two chemical hand warmers around the lens hood.
Techniques for taking star trail photos
There are two ways of photographing star trails.
1. Using bulb (B) mode
The easiest way is to go to a place with low light pollution. First, place your camera fitted with a wide-angle lens on a tripod and set the ISO to 100, the aperture to f/8, and the exposure time to Bulb. Then keep the shutter open for at least half an hour. At least one hour would be even better.
You will get beautiful star trails in the end. But such a long exposure will also produce quite a bit of digital noise, especially on warmer summer nights – even at a low ISO. Also, the electronics inside your camera might get damaged by overheating.
Besides that, lots of satellites and airplanes might pass through your field of view and ruin your shot. Or you might bump into your tripod and ruin your shot. Finally, any fainter stars will not be recorded due to the low ISO.
2. Stacking exposures
A safer way of shooting star trails is by taking a series of shorter exposures and then stacking them with a specific software. Using this technique, you can shoot from light-polluted places (even from downtown). It will also be easier (still not very easy, but easier) to remove aircraft or satellite trails from individual shots.

Setting up the shot
For setting the exposure time you can use the 500 or even the 600 rule. There’s no need for perfect point-like stars in individual frames here. Starting from that exposure time, set an aperture and ISO so that the image will not be overexposed and the ISO will be at its lowest value.
Read more: Understanding the Exposure Triangle
You definitely need to have Long Exposure Noise Reduction turned off. Otherwise, after each shot, the camera will take another with the same exposure time, but without opening the shutter and you will get gaps in your star trails during this “dark time”.
Dark frames
Think about shooting dark frames too. Subtracting a dark frame from your image will reduce the noise level, and that means a higher quality photograph. Capturing dark frames is easy – you just need a bit of patience.
A dark frame is an image (can be more than one) taken at the same exposure length, ISO, and ambient temperature as the “normal” shots that show stars, but with the lens or body cap on the camera. Basically, a dark frame only captures the random electronic thermal noise from your camera sensor. Don’t worry about manually subtracting dark frames – I will explain to you in the processing section of this article how to do it automatically.
Aiming the camera
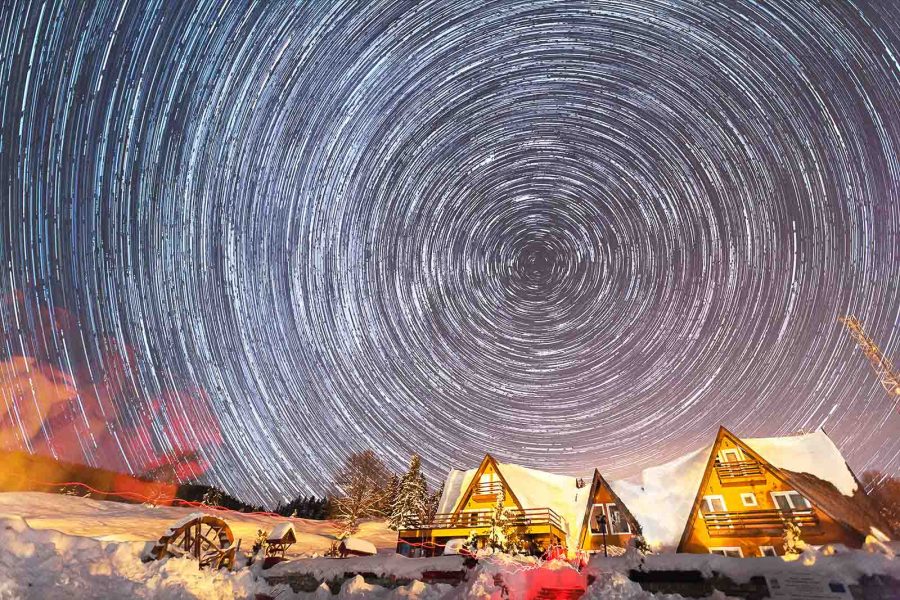
For your first star trails photos, frame it so that the celestial pole is in your image. You will get beautiful, concentric star trails around the poles. If shooting from the Northern Hemisphere, Polaris will appear almost static and point-like and close to the North celestial pole.
In order to get a good amount of trailing, keep on shooting for at least one hour.
There are different methods of stacking all these photos in one final star trail images. Some cameras can even do the work on their own. Some Olympus cameras have a shooting mode called Live Composite that is exceptionally useful for shooting star trails.
If you don’t want to let the camera do the work, you can do it with software.
How to process and stack your star trails photos
There are a couple of ways that you can create your final star trail images from the multiple frames you have captured during a shoot.
1. Stacking star photos in Photoshop
You can stack all your individual images in Adobe Photoshop and merge them using the Lighten blending mode, but the process is pretty tedious and time-consuming.
You can also use a third-party action called Advanced Stacker Plus (available at Star Circle Academy) if you want to do all your processing in Adobe Photoshop.
2. How to use StarStaX for star trail photos
My favourite way of doing it is by using StarStaX – a piece of software developed specifically for stacking individual shots into star trails. The software is very intuitive, but I will walk you through the whole process. StarStaX is free and can be downloaded from starstax.net. It works both on Windows and Mac OS X.
Before taking your photos to StarStaX, import them into your favourite raw developer to convert them to TIFF or JPEG files – StarStaX is not able to work with raw files. I prefer using Adobe Lightroom or Adobe Camera Raw to develop my raw shots as I believe they offer the best performance when it comes to astrophotography, but you are of course free to use any software you like.
Apply your desired settings to one of the images in the series that you are going to use to compose your star trails photo. Then, synchronise your settings between all photos. As I always recommend in astrophotography, be careful when converting your raws. Don’t go crazy with saturation or contrast – and try to preserve star colour. Colourful star trails look amazing.
Read more: 5 Mistakes to Avoid When Processing Star Photos

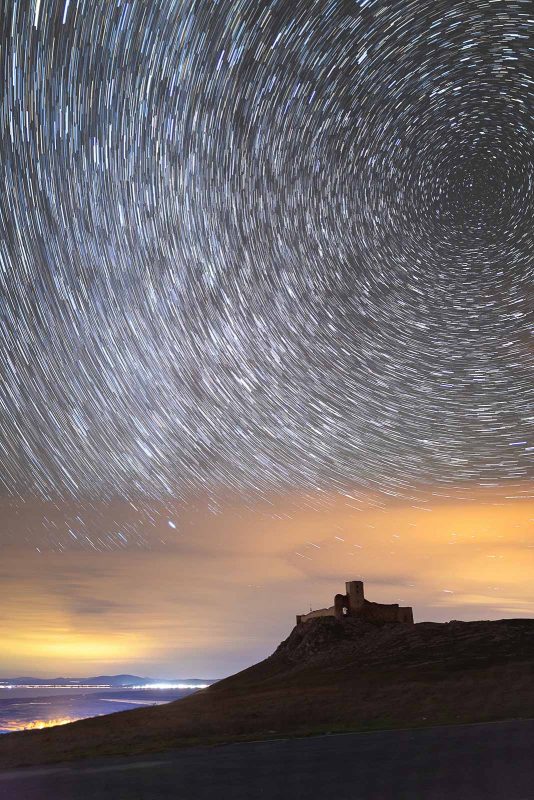
For demonstration purposes, I will use a series of photos taken in the small village of Cincșor, Romania. The Fortified Evangelical Church is in the foreground. The series was shot with a Canon EOS 5D Mark III and a Samyang XP 14mm f/2.4 lens.
Once you are happy with your adjustments, export all the photos into a single folder.
Read more: How to Edit Star Photos – First Steps to Processing in Astrophotography
Open StarStax and upload your photos in the software. If you shot dark frames during your star trails session, you can also upload them at this moment.

StarStaX has a pretty useful option that can fill the small gaps in your star trails that form between exposures when the shutter is closed. Be aware that setting a high level of gap-filling will result in unpleasant effects.
It requires a bit of trial and error until you are happy with this setting.

You then hit Start Processing… and that’s it. Get a coffee and wait for your computer to do the work. When it finishes, just save the file in your preferred format.
As scene I photographed had a fairly wide dynamic range due to architectural lighting on the church, I took an HDR shot of the foreground and merged it in Adobe Photoshop with the star trail image. To do this, I had the two photos on two separate layers and used a mask over the church.

In conclusion
Shooting star trails is both didactic and fun. You can experiment a lot with framing and with parts of the sky you choose to shoot. Try and take a photo centred on the celestial equator and see what happens.
Clear skies!


