
How to Photograph Ocean Giants

It’s safe to assume that the vast majority of us first brought our cameras underwater with dreams of capturing something truly massive! For me, the allure of photographing large sharks and ocean mammals was simply too much to ignore, as I would (and still do) find myself obsessing over such encounters on an hourly basis.
There’s something about coming face-to-face with an animal much larger than yourself, in an environment that basically forces you to fully commit to that moment, that’s simply euphoric. Being able to photograph these kinds of moments is incredibly special and extremely addictive.
Although big animal photography is rewarding, it comes with many challenges, even for the most experienced underwater shooters.

These subjects are often difficult to track down and even harder to approach. Once you finally find a willing participant, the open ocean can be unforgiving, with strong currents and large swells making the technical side of photography quite testing.
Whether you’re a beginner to underwater photography or a seasoned shark-shooter, keep on reading for my guide to photographing the ocean’s giants!
All about wide-angle
There is quite a lot to consider when it comes to capturing large marine species, however, nothing is more important than understanding that this particular task is best suited to wide-angle photography.

The term wide-angle refers to any image that has been captured with a lens with a short focal length. Common examples of wide-angle lenses include 16-35mm, 10-20mm, 10-17mm, and 8-15mm. Each of these focal lengths will produce a wider field of view, allowing you to fit more subject matter into the frame.
Now, if you’re fairly new to underwater photography, you may be wondering why on earth you would choose to use such a wide lens, as it would obviously be much more difficult to fill the frame?
One of the primary rules in underwater photography is to get as close as you possibly can to your subject – then get closer again. The idea behind this rule is to minimise the amount of water between your lens and subject as much as possible.

This is because the further your subject is from your lens, the less colour, detail, and light will be captured, resulting in a poor quality image. By using a wide-angle lens, you will be able to get nice and close to your subject, ensuring a tack-sharp image with crisp details and vibrant colours, while keeping the entire animal in the frame.
Make no mistake, it isn’t always easy, but that’s what makes it so rewarding!
Read more: Underwater Photography Ethics and Code of Conduct
Let’s talk equipment!
Before venturing off on your next adventure in search of ocean giants, you will need to make sure you have the right tools for the job.
1. Choosing a lens
Your choice of lens is perhaps one of the most important pieces of equipment to consider when it comes to capturing something special. The lens you choose will of course depend a lot on the style of image you are aiming to create. However, there are two key points worth considering.

Firstly, think about the size of the animal you will be shooting, as well as the expected conditions in which you will be diving with them. For example, tiger sharks in the Bahamas are known to come within inches of your camera; for this reason a super wide-angle lens, such as an 8-15mm, would be ideal.
Conversely, humpback whales on the east coast of Australia tend to keep their distance. Therefore, a lens with a bit more reach, such as a 16-35mm, can be more appropriate.

Secondly, you want to ensure your lens is capable of achieving sharp focus, regardless of how closely your subject approaches. Many species will approach incredibly closely, sometimes even making contact with your camera housing.
The last thing you want is an out of focus image because your subject was too curious! Both Nikon and Canon’s 8-15mm, as well as Tokina’s 10-17mm, are excellent options with close focus distances of 5-6 inches.
Read more: What Equipment Do You Need for Underwater Photography?
2. Choosing a camera body
Most modern cameras capture images of at least 16mp, which is of course plenty for most functions, whether it be for online use or prints. However, there are benefits to having greater resolution, particularly when it comes to photographing large marine species.

Besides being able to capture more detail, one advantage of having greater resolution is the ability to crop images to enhance your composition, without losing noticeable quality.
Your subjects won’t always want to interact closely, and will sometimes remain a few metres away; an image captured with a 45mp camera will have significantly more potential, and will allow a larger crop than one captured with 16mp.
Fast autofocus is another area that will help your big animal photography. Many large species in the ocean move incredibly quickly, sometimes only allowing a fraction of a second to lock focus and capture a frame. A camera capable of quick, reliable autofocus is a big help.

Lastly, consider the speed at which a camera is able to shoot continuous frames. The ability to shoot at 7 frames per second or faster can be a useful function, particularly for quick encounters, such as bottlenose dolphins making a close pass.
Read more: How to Choose Your Best Images After a Shoot
3. Strobes vs natural light
Strobes can greatly assist your images by enhancing colour, details, and sharpness. However, deciding whether or not you will use them when it comes to photographing large species depends on a few factors.

The majority of big animal encounters will take place from a boat, and you will be required to enter and exit the water multiple times throughout the day. Strobes are generally large and heavy, making them more hassle than they are worth in these types of fast-paced situations.
Leaving the strobes behind will allow you to be much quicker in and out of the water, improving your chances of a good encounter.
Other situations, however, are well suited to strobe lighting, such as the shark diving that takes place in the Bahamas. Here, you remain stationary on the seafloor while many different species of shark cruise by.

At the end of the day, the decision of shooting with strobes or natural light will largely be determined by personal preference. Always research your target species, as well as the dive conditions, and weigh up the pros and cons.
Read more: A Guide to Using Flash with Wildlife
Recommended camera settings
Camera settings are of course going to vary a lot depending on the speed of the animal and the light available, as well as your personal preference as a photographer. Before entering the water, however, it’s helpful to have a rough idea regarding your focus settings, as well as your shutter speed, aperture, and ISO.

1. Focus modes
Check your focus mode is set to continuous autofocus, as well as enabling as many focus points as your camera allows. Almost all big species will be in a constant state of motion during an encounter. Therefore, it’s important to be able to lock focus as quickly as possible.
2. Shutter speed, aperture, and ISO
Your settings will vary quite a lot, depending on whether you are using strobes or relying on natural light. This is primarily because strobes usually have a maximum sync speed, which limits your shutter speed to about 1/250.

Shooting with strobes
A shutter speed of 1/250, coupled with an aperture of f/8, is a great place to start. ISO can then be adjusted as required to help balance exposure. However, remember to keep it within the parameters of your camera. Increasing ISO too high will introduce excessive noise into your image.
Keep strobe power set low to moderate, to ensure a quick recycle time. Many big animal encounters will last only a few seconds. You want your strobes to be able to fire in quick succession, to capture multiple frames of the interaction. A short burst of light from a close distance is often all that’s required.

Enter the water with your strobes positioned just a few inches either side of your dome port. As a general rule, the closer your subject approaches, the closer the strobes should be to your dome port, and vice versa.
Take a few test shots of your dive buddy at the same distance you are hoping to photograph your target species, and review. Make sure the exposure is optimal and the backscatter (particle) is minimal.
Shooting with natural light
Without the assistance of external lighting, you will need to rely on a faster shutter speed in order to freeze the action. A shutter speed of at least 1/500 is a good starting point.
You will likely have to open up the aperture nice and large (low f number) to compensate for exposure. Similarly to above, ISO can be adjusted as required. However, remember to avoid any excessive noise in your image.

When shooting with natural light it can be helpful to switch your camera to continuous shooting mode. Many big animal encounters are fast and fleeting, and the ability to shoot multiple frames per second can be the difference between achieving the shot and missing it.
However, remember to always remain deliberate in your composition. It can be tempting to utilise the ‘spray-and-pray’ technique, however this rarely pays off, and often results in poorly composed, out of focus images.
Read more: Composition in Wildlife Photography – Getting Creative
Different tips for different animals
Once you start interacting with a variety of different species, you will quickly learn how differently many of them behave. For example, sea lions often respond well to lots of movement, noise, and splashing, whereas grey nurse sharks require a calm, still approach.

Read on for some specific tips on capturing exciting images of sharks, sea lions, and whales.
1. Sharks
While sharks are not everyone’s cup of tea, there is no denying that a close-up image of a mako or bull shark will wow just about anybody!

Safety
The vast majority of sharks pose no threat to you as a diver, and are definitely not the mindless killers they have been portrayed to be over the years.
They are, however, still wild animals, and must always be approached with respect and caution. Only dive with reputable operators that have extensive experience with the particular species, and follow their directions at all times.
Behaviour
Typical behaviours vary quite a lot between species. For example, blue sharks are known to be quite inquisitive towards divers, whereas blacktip reef sharks will tend to swim away as you approach.
One behaviour that is shared amongst most shark species is particularly useful to be aware of as a photographer: sharks are highly sensitive to eye contact. Making use of your peripheral vision, and avoiding looking directly at the shark as it approaches, can significantly improve your chance of having a close interaction.
Shooting tips
Sharks have a number of interesting anatomical features, including their sharp teeth, iconic dorsal fins, and eyes. Keep these key features in mind when composing your images.
Focus on the details! Sharks often have interesting mating scars, as well as many fine details around their snouts and eyes, such as their ampullae of Lorenzini (electroreceptors). Emphasis on these details can greatly enhance an image.
Always prioritise a fast shutter speed when photographing sharks. Many species move very quickly through the water and will turn even quicker at the last second, often resulting in motion blur around their snouts. A fast shutter speed and deliberate focusing through the viewfinder will help.
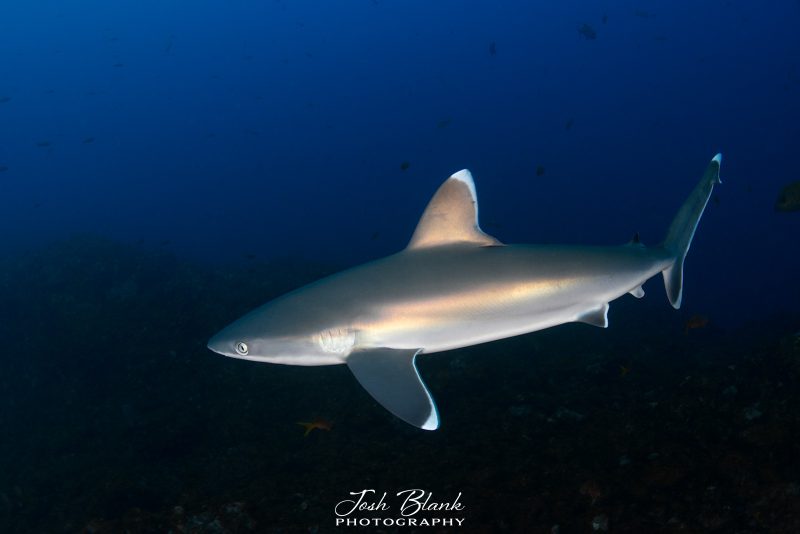
Many species of shark have reflective skin, making them easy to overexpose. Keeping strobe power low, as well as being mindful of your ISO, is useful for preventing this.
2. Sea lions
Sea lions are a lot of fun, and very cooperative when it comes to photography!
Safety
Sea lions are well known to be very safe for humans to swim with. However, as is the case with all wild animals, it’s important to always approach with respect and caution.

While the smaller pups just want to play, the much larger bulls can be territorial and are usually best avoided.
Behaviour
Divers can expect to be playfully nibbled, nudged, and, in some cases, even sat on! Sea lions are an absolute joy to shoot, and will happily provide you with endless compositions while approaching literally 1 to 2 inches from your dome port.
Shooting tips
Sea lions move insanely quickly and like to show off their impressive agility. A fast shutter speed is vital, even if you have to enhance the ISO a little more than you would usually like to balance the exposure.
Don’t be afraid to shoot your strobes at a slightly faster shutter speed than typically allowed. Many strobes have a maximum sync speed of 1/250, but can be fired at 1/320, or even 1/400.
However, you will start to see black banding on the tops and bottoms of the images, where the strobes have been too slow. Keep this in mind when composing your images, knowing that you will have to apply a crop in post-production.

A super wide-angle lens, such as 8-15mm, is most appropriate due to the closeness with which the sea lions will consistently approach.
Have fun with them! Diving with sea lions is unique in that noise, movement, and splashing actually tend to improve interactions. Brightly coloured fins can also turn into a sea lion’s favourite toy – anything to get their attention!
3. Whales
Many divers consider interactions with various species of whale as the holy grail when it comes to photography.
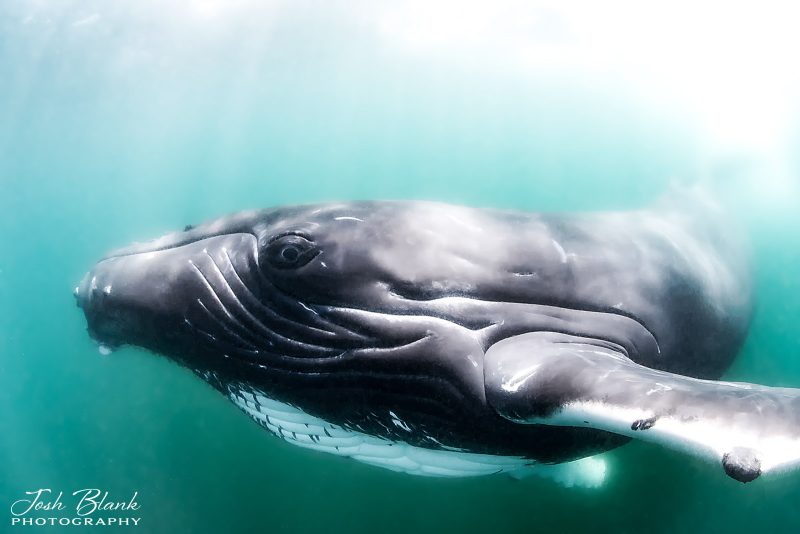
Although they’re not always easy to photograph, it is an extremely rewarding experience to simply occupy the same space as these ocean giants!
Safety
Whales are not inherently dangerous towards humans. However, they are very large wild animals, and should be treated as such. Always go with a reputable operator and listen to the skipper’s directions.
Behaviour
Behaviour varies quite a lot between specific species, as well as where in the world you are diving with them. Some whales, such as dwarf minkes or humpbacks, have specific migrations that they take part in each year, allowing for great photographic opportunities for divers.

While super close passes are not to be expected, they can occur, so it pays to be ready!
Shooting tips
Leave the strobes behind. Most encounters with whales will take place on the water’s surface where there is plenty of light, and will also involve a lot of getting in and out of the boat. Shooting continuous frames is a great way to improve your chances of getting that one perfect image during a close pass.
Similarly to sharks, whales often have a number of iconic features, such as the tail fluke, eyes, and of course their immense size. Aim to make these features central points in your images.
In conclusion
Photographing the ocean’s megafauna is not an easy task, but I promise you that the chase alone is rewarding within itself.
The above tips and tricks will give you a great starting point but, ultimately, it’s up to you to grab your camera and get shooting!


