
How to Photograph Hummingbirds
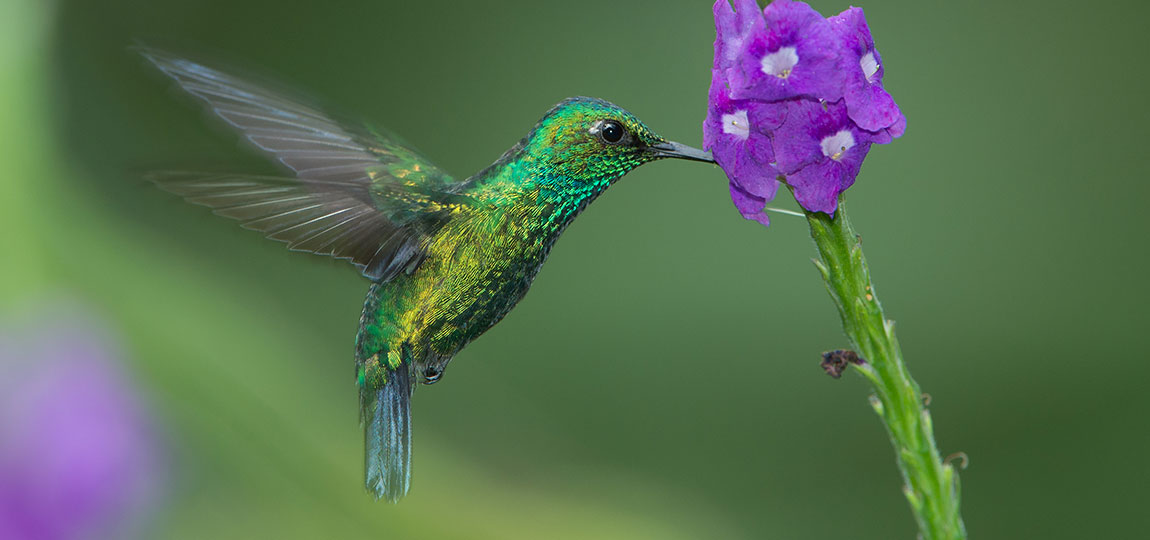
Hummingbirds are fascinating creatures. They are mostly very small, with the bee hummingbird (Mellisuga helenae) being the smallest bird in the world, weighing just 1.6 grams. The giant hummingbird (Patagona gigas) is much bigger and weighs between 18 and 24 grams.
Whilst not everyone will be presented with an opportunity to photograph hummingbirds, the same principles discussed here can be applied to photographing small passerine birds.


Freezing the Movement
Hummingbirds move extremely quickly, flittering between flowers and beating their wings at around 50 beats per second. Freezing this movement is near enough impossible using just a fast shutter speed, so instead we must introduce flash into our photos to do this. To achieve this high speed bird photography, there are some pieces of equipment that are essential.

1. Flashgun
Firstly, a flashgun is a must – using the pop-up flash on your camera won’t suffice here. The best flashes on the market at the moment are:
However, there are many alternatives available if you don’t want to spend top dollar. You can see the Canon options here, and the Nikon options here. Most flashguns will do, although avoid the cheapest models as their power will be limited. Personally, I use the Nikon SB-800 flashgun.
2. Sync Cable and Flash Bracket
To effectively use off-camera flash, you’ll need to get hold of a sync cable and flash bracket. The sync cable allows you to indirectly connect the flash to your camera’s hot-shoe. Take a look at these for both Canon and Nikon.
Flash brackets are obviously essential for lifting the flash high enough so to not cast shadow from the lens. They also give a more pleasing result from the flash as the light is not reflected straight back at the camera, but instead at more of an angle. There are many brands and different models available, and which you need will depend on which lens you use. In my set up shot, I am using a Wimberley Flash Bracket.
3. Flash Extender
Since we’re using flash for wildlife photography, we can’t have the camera right up-close with the subject. Plus, using a telephoto lens gives a much nicer bokeh and allows us to fill the frame with the hummingbird. Luckily, flash extenders are available to increase the reach of your flash. You can find a variety available at B&H Photo – ensure that you get the correct size for your flash.
4. Remote Trigger
I strongly recommend getting yourself a remote trigger for this type of photography. YongNuo is a great, low cost brand for triggering your shutter remotely.
Methods for Photographing Hummingbirds
You may find yourself in a situation where you have hummingbirds coming to a dedicated feeder. This means you can easily predict where the hummingbirds will appear. Getting a sharp, in focus shot of a hummingbird is a numbers game – there will be many, many photos headed straight for the bin! However, with persistence you will eventually get the shot you wish for.
Work out the position that hummingbirds are approaching the feeder from, and set up your camera to photograph the point where they hover just before hopping onto the feeder. Make sure to keep the feeder out of the frame. You will need to do a lot of trial and error to get the focus right – this is a definite challenge, but it makes it rewarding when you do get it right. Make sure you are manually focussing so you can make this precise.

If you are photographing hummingbirds flittering between flowers, apply the same principles. Find a ‘pleasing’ flower with a clean background, and set up your camera to capture a hummingbird as it hovers and feeds from the flower. Following their patterns of behaviour will help you to determine the most likely area they will visit.
Once you have the frame set up, it is simply a case of firing the shutter whenever a hummingbird approaches. You could be waiting a long time until you get this right!
The Settings
This is where it gets a little tricky. Your shutter speed is not the most important factor here – but you can’t have it any faster than the sync speed of your flash. Usually, this is a maximum of 1/250 second. Any faster than that and the light from the flash won’t effect the image properly, and you may see a ‘curtain’ of contrasting light appear in your photo. Set your aperture to around f/8, ensuring that your bokeh remains smooth and clean.
Your flash freezes the movement, so it is important that you get it right. Flashes can have their power varied – and the power of the flash is adjusted by the duration of the flash itself. So, a lower power has a shorter burst of light, so is better when it comes to freezing super-fast motion. However, you have less light in this case, so some photographers will opt for multiple low-power flash units. For this reason, it is unlikely that full power will be appropriate for this – and you also need to be careful not to ‘blow out’ the colourful, iridescent feathers of the hummingbird. I set my flash to manual and use it at around 1/8 or 1/16 power. Depending on lighting conditions, this varies.
Further Reading: “A Guide to Using Flash with Wildlife“
If you increase the ISO of your camera, you can balance the flash out with the natural light available to bring a more clean result. If you rely solely on the light of the flashgun, then you will have a harsh, contrasting image.
Make sure that you keep your camera in burst mode. This is a case of firing the shutter as fast as possible when a hummingbird appears! Eventually, one of the images will hopefully be perfectly focussed and exposed.
The remote trigger mentioned in the equipment list earlier allows you to stand away from your camera and fire it from a vantage point. This means you can move the camera closer to the hummingbird’s expected position, helping to fill the frame with such a small subject.
It’s definitely a game of lottery – once the settings are all correct, then it takes a bit of luck to get the bird in the correct focus plane.
Further Reading: “How to Photograph Birds in Flight“
A Note on Ethics
Using flash with wildlife brings into play some questions on ethics. Don’t overuse it – you should give the birds regular breaks from the blast of the flash gun. If the animal you are photographing shows fear or a change in its behaviour because of the flash firing, then you should seriously consider stopping your photography. Unnecessary stress on an animal is not worth it for your photo! Take a look at this article which discusses the ethics of wildlife photography in more depth.


