
How to Include People in Starscape Photographs

Landscape astrophotography can be a very rewarding hobby. Shooting a breathtaking landscape against a background of stars can end with a magical result. But, sometimes, you might want to make the landscape a bit more alive and include one or more persons in the frame.
Why use people in your photographs?
There are a few reasons for doing this.
People add scale to your photograph. A landscape showing some rock formations on the shore might not tell you much about the size of those rocks. Ask your friend to climb those rock formations, or pose next to them and, just like that, the whole landscape becomes more relatable.

People can make a not-so-appealing landscape more interesting. Imagine you are on a featureless beach; just sand as far as you can see. Having a person in the frame will add another point of interest to the image and make the whole landscape more dynamic.
Read more: How to Find Great Locations for Landscape Photography
People just look cool doing different activities under the night sky. If you have a friend that enjoys rock climbing you can photograph them bouldering at night, for example.

Promote the hobby of amateur astronomy. If you love astrophotography and you’ve never joined a star party, it’s time to do it. Photographing amateur astronomers observing the night sky is very fun.

How to focus your photographs
Firstly, let’s talk a bit about focusing. In astrophotography we work at wide open apertures and use infinity focus for the vast majority of the time. Shooting at wide aperture, let’s say f/1.8, the depth of field will not be that great. The people in your photograph will not be particularly sharp if they are close to your camera.
In traditional landscape photography, this is solved by focusing the lens to its hyperfocal distance. Simply put, the hyperfocal distance is the focusing distance that gives your photos the greatest depth of field. Everything from half of the hyperfocal distance out to infinity is going to be acceptably sharp.
However, the hyperfocal distance trick doesn’t work that well in astrophotography. Stars will not be very sharp in this case. Perhaps they will be sharp enough to be shown on social media, but not to be printed at a larger scale.
If you want the people in your photos to be acceptably sharp, ask them to be at least 4-5 metres from your camera, and focus on the sky.
Read more: How to Get Sharp and In Focus Stars in Starscape Photography

How to safely position your subjects
Don’t forget to ask your models to stand as still as possible throughout the duration of the exposure. Remember that movement will not show too much if your subject is far away from you. Also, especially if the people you photograph are close to you, you could perhaps find something for them to lean against (a feature of the landscape, for example).
Before setting up the frame and positioning the people you are going to photograph, carefully inspect the area for any hazards (if possible, do this during daytime). If you’re on a mountain ridge, close to a precipice, or next to deep waters, ask your models to choose a place where they feel safe.
Don’t try to push them to pose in a place where they don’t feel comfortable, just because you have a fabulous framing idea. It’s just not worth it.
How to shoot silhouettes
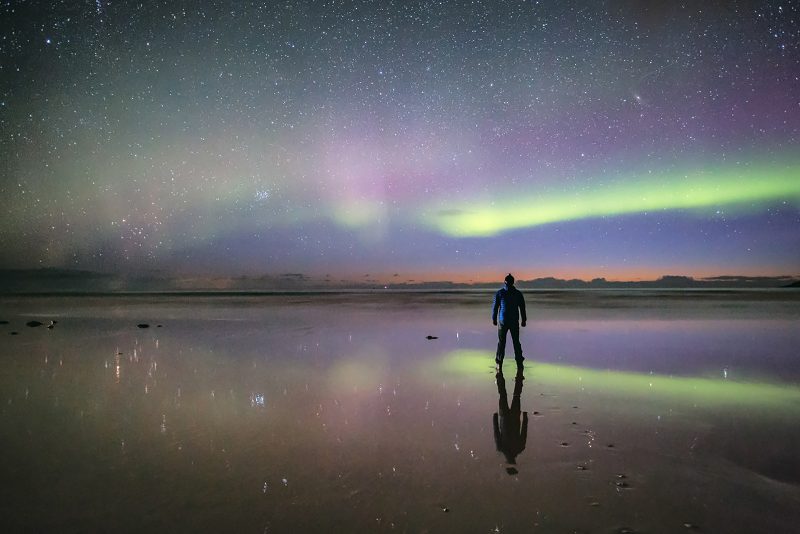
There are basically two types of astro-photographs that depict people against a beautiful night sky. You can either have the people showing as silhouettes, or you can actually see details of their clothing and, even their faces.
Silhouettes work better when there’s no Moon in the sky, or when the people you photograph are far away from the camera. You can also shoot silhouetted people against a rising Moon or against the filtered image of the Sun (maybe during an eclipse, for added drama).


While shooting silhouettes against a backdrop of stars or the aurora is pretty much self-explanatory, it’s a bit trickier to shoot silhouettes against a rising or setting Moon. You need far better planning.
The first thing you need to learn is where the Moon rises or sets. You can find this out using planetarium software or photo planning apps, such as The Photographer’s Ephemeris. Once you know this, you can start planning your framing.
You need to decide how large you want the silhouette to be, compared to the diameter of the Moon (I would suggest doing this at Full Moon first, it’s easier). Let’s say you want the silhouette to be half the size of the Moon, and let’s assume your model is 1.7 metres tall.
It means that the apparent diameter of the Moon should be around 3.5 metres. Thus, you need to calculate the distance at which you place your model. There’s a simple formula to remember: the distance equals 100 times the desired apparent diameter of the Moon.
Applying the formula, we get a distance of 350 metres. You can use the same formula if you place your subject in front of the Sun, just remember to use proper filtration. Obviously, the same formula applies for buildings or any other landmarks of known size.
How to shoot in detail
But, perhaps you don’t want people to show just as silhouettes against the night sky.

I prefer shooting such frames during the different phases of twilight, or when the Moon is present in the sky but it has a small phase. This is because I don’t like using any artificial light at night.
If it’s too dark and you need to make your model more obvious in the frame, you can use an LED panel with variable intensity set at minimum power. If you don’t have a LED panel, just use your phone.
Open an app that turns the screen white (there are specific apps that do this, or just open your e-mail client), and use a piece of white paper tissue in front of the screen to diffuse the light. Through trial and error, find the right amount of light needed to properly light your subject. You will not need a lot of light.

A special note: if you want to shoot amateur astronomers observing the night sky, don’t use any white light. It will ruin their dark adaption (and yours too), and they will not be happy. Use a very, very dim red torch. Or, even better, use only starlight and the red lights of their gear.
If you really insist on having them lit in a special way, plan it together with your subjects and shoot at the beginning of their observing night, before they get dark adapted.
Clothes are also quite important when doing this kind of astrophotography. Choose clothes in bright colours for your models. A bright yellow down jacket will always look better than a black jacket in such images.


I know this is an unpopular opinion, but I suggest not using any headlamps that throw a bright beam of light towards the stars. Firstly, it has become a bit of a cliché and is overdone. Secondly, and more importantly, it sends the wrong message.
Light pollution is more and more present, hiding the night skies from the eyes of an increasing number of people. Taking photos of the night sky with beams of light directed at it simply doesn’t help in making the general public more conscious of the effects of light pollution.
There’s even a third reason for not pointing white headlamps at the sky: there might be some other fellow astrophotographers in the area, and the beam will ruin their photos.
When to avoid using people in astrophotography
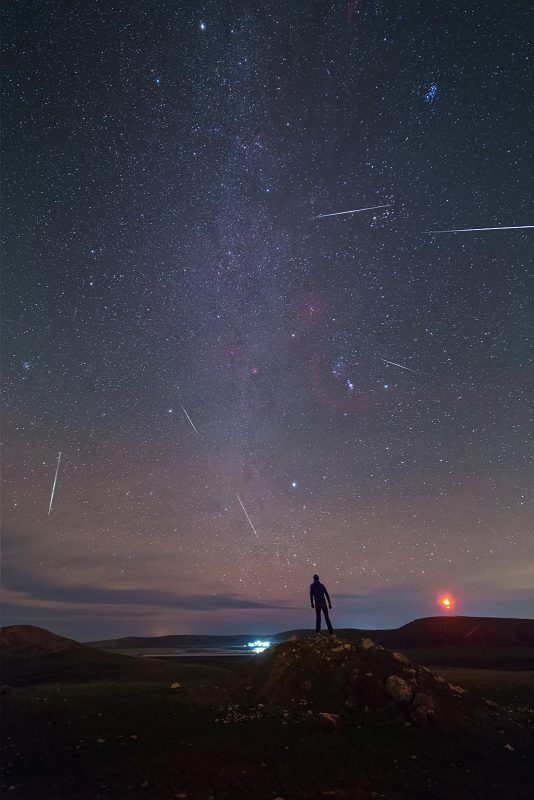
There are situations when having people in the frame doesn’t really work from an astronomical point of view. One such case is when you shoot star trails or any kind of astronomical event spanning a longer period of time, such as a composite image of a meteor shower, or the evolution of an eclipse.
Having a stationary person in a frame such as this is a bit weird, as what happens in the background takes a long time, and it’s not natural for a human being to be stationary over such a long period. If you’re not after the documentary-style aspect of astrophotography, you are free to add people into such images.

In conclusion
In the end, using people in your astro-photos is just another creative exercise. So, go under beautiful skies and have fun!
Clear skies!


