
How to Start Taking Landscape Photos

I have been a professional photographer for the better part of two decades. When I started out in my new career, I regarded myself as a wildlife photographer without any ambiguity. However, even in those days, it was difficult to make a living purely from photographing wildlife so inevitably the title “wildlife photographer” became a little blurred around the edges as I began to write about wildlife and photograph other things – most notably landscapes.
Why photograph landscapes?
It was about five years into my professional life that I realised I needed to improve my skills as a landscape photographer.


There were many reasons why I felt this way. I was writing articles for magazines and giving talks about wildlife and needed good quality photographs of the habitats in which wildlife can be found. I live in Cornwall (UK), a place blessed with amazing landscapes and seascapes which sell much more easily than wildlife photos (with the possible exceptions of kingfishers and puffins).
My professional portfolio was expanding to include books about photographing Cornwall as well as walks around the county, all of which need good landscape photographs to fill their pages.
Read more: How to Be a Professional Wildlife Photographer
I am now at the point where I am as well-known for landscape as I am for wildlife photography. I undertake landscape photography commissions, lead one-to-one workshops, produce calendars of Cornish scenes, and work with a variety of travel magazines. The transition into landscape photography was a deliberate step and was made without any specific training.
I picked up hints and tips from various people and places, including my camera club and online. The rest was down to practice and being prepared to spend time in the field. I don’t know everything about landscape photography but I am probably fairly well placed to give a few tips to others who want to start out in this field of photography.
Landscapes are easy, right?
I think there is a feeling that landscape photography is easier than wildlife photography because the landscapes don’t fly off or hide away. This is true; it is very easy to photograph a landscape, you just turn up whenever is easiest for you, compose your picture, and press the shutter button. But unless you are very lucky, this process will lead to an unexceptional photo even when the view before you is itself exceptional.
To make the step from mediocrity to excellence, you have to realise that taking good landscape photos will take a lot of time and careful planning. It isn’t for the half-hearted; it will take imagination, organisation, and even some perspiration. Believe me I have done a few 100 metre sprints with my tripod and camera bag to catch a moment of light that even Usain Bolt might have missed, though I doubt my recovery time is as good as his!
Use the right gear
Photography is an expensive business and, having splashed out a lot of money on a big lens for photographing birds, there might be some reluctance to spend big on landscape photography gear. However, it is always best to save up and buy quality equipment than splash the cash on a wider range of cheaper options. So I have always tried to spend my money wisely.
1. Cameras and lenses
I use a full frame DSLR camera (Canon 5D range). Crop-sensors don’t have the same control over dynamic range and are mostly disappointing for landscape photography.
My go-to lens for landscapes is the 16-35mm – I use the f/4 version by Canon which is very good. This lens allows me, even forces me, to use foreground in my photography – something which is often beneficial in landscape images. Probably the next most useful lens is the 70-200mm, and then the 24-70mm.
Read more: What’s the Best Lens for Landscape Photography?
It might come as a surprise to learn that a telephoto lens is useful for landscapes, but with a longer lens it is possible to pick out vignettes of colour, light, and shade from within a wider, more complex scene.

2. Other kit
A decent tripod is essential. Something fairly heavy and robust is best. I like one that gets down low and I use it in conjunction with a wired remote release. The tripod forces us to take our time when making images and I like to use Live View along with manual focus.
Finally, a set of filters is useful. I have a range of graduated neutral density filters (I find the 2-stop hard and 2-stop soft filters most useful), a couple of neutral density filters (I use the 6-stop most often but also have a 10-stop), and a polarising filter which I use mostly for river scenes, waterfalls and the like.
Read more: The Essential Filters for Landscape Photographers
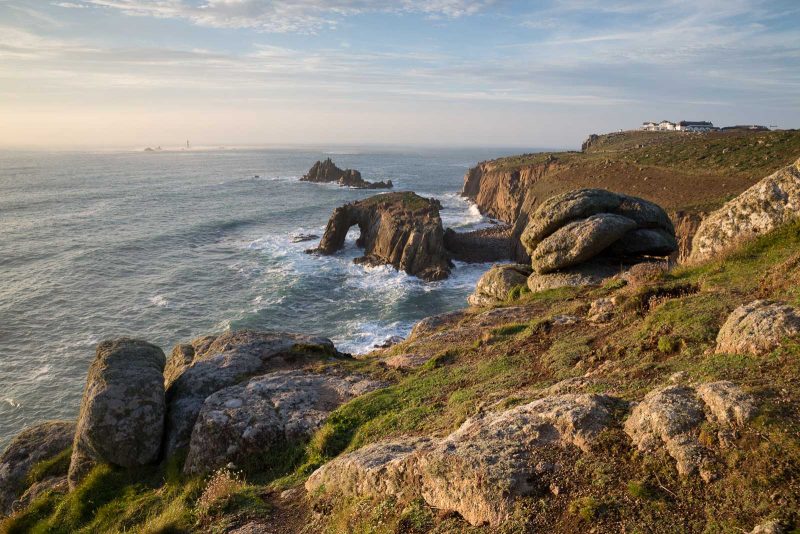
The following sequence of four photos (featuring Land’s End, Cornwall), show the use of filters:


Compose yourself
If you are already a keen photographer, you will have taken the first steps to becoming a decent landscape photographer. Even in my own early naive days as a landscape photographer, I had a fairly good grasp of composition. Many of the rules of composition apply to all photographs whether the subject is macro, birds, or landscapes.
I always hesitate when quoting the rules of composition because I feel I will be accused of a lack of creativity. My retort is that whilst I can accept that many of the best photos break the rules, I can say with some confidence that if you follow the rules you will get consistently good photos. Once we have proved that we can make consistently good landscape photos then we can start breaking the rules to come up with something more magical when appropriate.
I use the phrase ‘making photos’ rather than ‘taking photos’ in this context advisedly. We could stand a selection of landscape photographers at the same location with the same view and they would all make a different image. The photo might be there to be taken, but it is our responsibility to make the composition work – and that is often done by balancing foreground and background within the frame.

When you stop to compose a photo, there is probably a good reason why you have chosen that particular location and it might well be an attractive distant view. Compose the distant focal point on the top right or left intersection of thirds and then position yourself so that there is some foreground interest diagonally opposite in the frame.
Read more: Rule of Thirds in Photography – Composition Tips
Other rules of the compositional trade include:
- the use of diagonal lines
- paths or walls to lead the eye into frame
- overhanging trees to frame the scene
- three focal points forming a ‘triangle’ within the frame
- people for scale
- avoiding having bright areas on the edge or leading out of the frame.
Shedding light
Understanding composition is important, but in many ways it is the easy part of becoming a landscape photographer. Compositional skills can be learnt from the comfort of your armchair whilst reading appropriate articles or analysing images on the internet.
The difficult bit is getting out of bed early or staying out late to make the most of the optimum light for landscape photography. Understanding light and how it influences the landscape is critical to success.
Read more: How to Find and Use Light in Landscape Photography

Generally a low angle of sunlight is best because it casts light and shade across the landscape. The shadows emphasise the textures, forms, and contours which become essential as we convert a view with three-dimensions into an image with only two. We need this relief to give our image depth.
If the sun is higher in the sky, it tends to be best to shoot with the sun behind you – or at least to the side. As the sun sinks lower and loses intensity then it might be more dramatic to work into the light. This is when I would call upon my neutral density graduated filters to help control the bright sky.
Typically, I will use a hard-graduated filter if the horizon is unbroken (such as with a seascape) or a soft graduated filter when the horizon is broken by trees, rocks or tall buildings, for example.
Making plans for a shoot
It isn’t simply a matter of getting up early and heading to a location. If I don’t know the location very well, I might visit beforehand to assess the suitability for making a landscape photo. On that reconnoitre I will look at the various elements available for a composition and work out the optimum angle of light.
Would it be better at sunrise or sunset? What time of year would be best? Remember that in summer in the UK the sun rises in the north east and sets in the north west (approximately). Conversely, in winter it rises in the south east and sets in the south west. Only on the spring and autumn equinoxes does it rise in the east and set in the west!
Read more: The Best Smartphone Apps for Landscape Photographers
There are other variables, such as flowers, which might adorn the foreground in certain seasons – and when it comes to seascapes we might need to consider how high we want the tide to be.
When I have an understanding of the location, I will make a note in my diary on the days and times when I think the view will be at its best. If the day arrives and the weather is good, I will pay a visit. If not, I will wait until the next opportunity arises.
Returning to the scene
A good photographic location is worth re-visiting. The more you return, the better you will understand the way the light plays on that scene.

With my favourite locations, I try to return when atmospheric conditions are different. I am always watching the weather forecast and looking for unusual events such as mist, snow, or even storms.
I sense that there is a trend towards “landscape photography twitching,” for want of a better phrase. By this I mean people travelling miles to photograph particular locations because they have seen images captured by other photographers. Personally, I think we get better photographs of places and subjects that we have the chance to develop a more intimate relationship with. This is usually because they are local and we have the chance to re-visit at suitable times.
Completing the process
I am not one to spend longer at the computer than I need to. I would much rather be out in the field taking photos than stuck indoors.
My instincts as a wildlife photographer using slide film were very much to get the image right in camera, and that is the approach that I still aspire to. I shoot all my images in raw and my wildlife photos experience little processing on the computer (mostly global adjustments to contrast).
Landscape photographs tend to take a bit more effort in processing. That said, I only really use Adobe Camera Raw for my processing – but this includes local adjustments to exposure, contrast, shadows, and highlights.
What I have come to realise is that we must really understand light and contrast to get the best out of our landscape photos in processing. No two images will be processed in the same way, but I would say that some processing skills are essential for landscape photographers.
 Scene taken straight out of camera[/caption]

A photograph like this one of sunrise over Logan Rock takes a degree of processing on the computer because the range of contrast when looking into the sun is huge.
To try to control the bright sky I used two graduated filters, but this wasn’t enough to bring out detail in all the different elements within the scene – so I needed to use local adjustments in Adobe Camera Raw. In particular I needed to bring out detail in the shadows.
In conclusion
In the early days, I looked upon wildlife photography as a greater challenge than landscape photography purely because it is harder to get the subject to do as you wish. I now enjoy both equally and probably find landscape photography more fulfilling creatively because it is less about getting the subject to behave and more about your skill in composition and using the light – that is, after all, what photography should be about!


