
How to Photograph Bees

Bees can be a challenging subject to photograph. They are tiny, move fast, and are often quite skittish. Although there are more than 16,000 species of bees in the world, there are many common behaviours that can help you successfully photograph most of them.
In this article, I’ll share with you my tips and recommendations for capturing photos of bees that you will love, and that your family, friends, and the public will admire as well.


1. Study the subject
Behaviours
My first tip for photographing any creature in the wild is to study the subject. New photographers typically want to know about equipment and settings, but I can assure you that those things matter less than understanding the subject.
It is critical to be in the right place at the right time but, if you haven’t studied the subject, you’ll have to rely on luck. Lucky shots should be a bonus, not a strategy.

Particularly with small, fast-moving critters, you need to understand their behaviours, and bees are no exception. Knowing how they move will help you to anticipate the right moment to click, determine the best location to shoot from, and select the optimal camera settings for sharp, well-exposed images.
Read more about: How to Photograph Insects in Flight

Locations
Studying the subject will also help you to learn the types of flowers that bees prefer. Some species are generalists and will pick many different types of flowers. Others are specialists and will only choose certain types of flowers. Conversely, some flowers draw many species of bees, while others attract few or none.
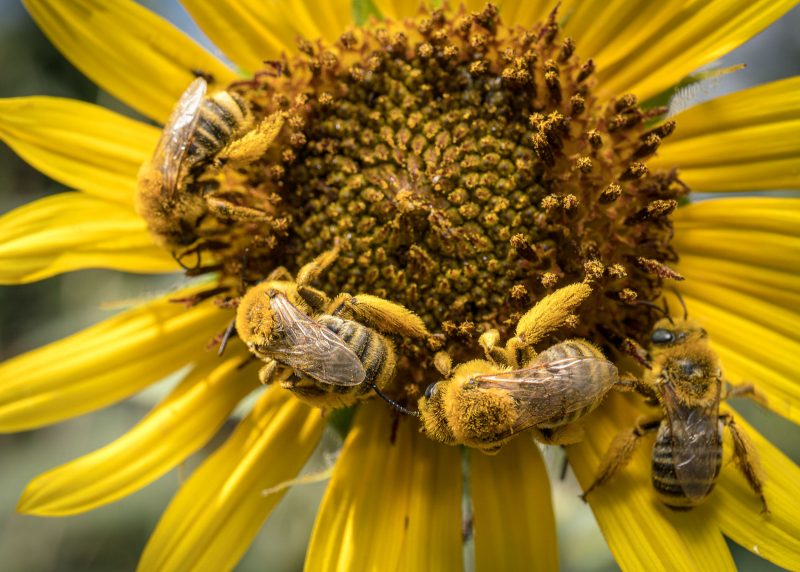
Common sunflowers are a great resource for most bees and a great place to begin. You’ll save quite a bit of time and effort in the field by learning where and when to look for them.

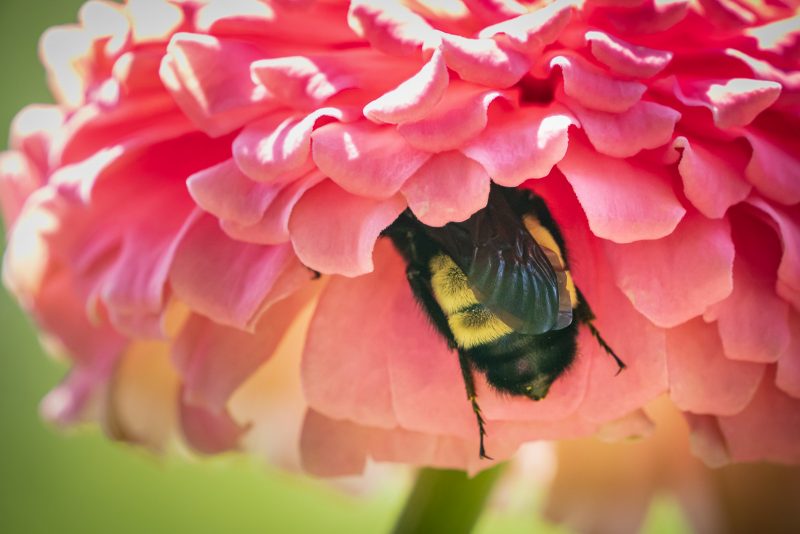
Sometimes you can find bees sleeping on, or under, a flower, which can really help you to get lots of closeup shots and a variety of angles. The best time to find them sleeping is early morning, just before sunrise, but you can sometimes find them settling down for the night around sunset too.
Action shots
If you want an action shot, such as drinking nectar or gathering pollen, larger flowers with wide open petals will be easier for finding a good angle. Again, sunflowers make a great choice, but blanket flowers and cone flowers work well too. Bees will also take longer to forage on large, pollen-heavy flowers, giving you more time and a better opportunity to capture the right moment.

Capturing bees in flight is by far the most challenging type of shot. As you observe bees, you’ll begin to notice moments when they fly more slowly, or even hover: cooler morning hours, cleaning off after visiting a heavily pollinated flower, guarding a nest, or seeking a mate.
Each of these situations will often make them hover, or at least slow down enough for you to focus and click. It will still be very difficult, but exponentially easier than trying to catch them zipping from one flower to the next.

2. Plan the composition
What’s your goal?
After studying the subject, you can start to plan your composition. Ask yourself if you want a closeup portrait, or a wider shot that tells a story.
Do you want a clean, minimal background, or one with pops of colour and texture? Do you want to document the subject for scientific purposes, or do you want to create art that people might put on their walls? The final goal will help you decide how to compose the shot.
Read more: How to Create a Frame Within a Frame Compositions

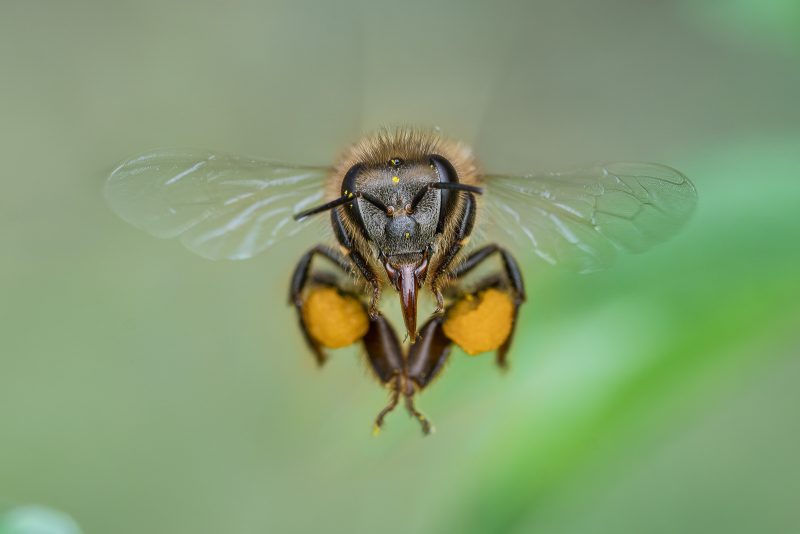
One of my favourite compositions is a frontal portrait with a minimal background. Especially with a bee in flight, this can make for a very impactful image. As you would with a human subject, focus on the eyes. The eyes of the subject are where the eyes of the viewer are naturally drawn to, so if the eyes are out of focus, the entire image will appear off.
Additionally, look for a unique angle, expression, or situation that could make the shot more interesting and compelling for a viewer.
If your goal is to capture images that people might want to hang on their walls, composing with flowers will not only appeal to a broader audience, but will also tell a story and bring the viewer into the field with you.
Look through the viewfinder as you move around, and find a position that balances the flower(s) with the bee. Put the bee in one third of the frame and the flower in another third. You may need to get ‘dirty’ and crawl on the ground before you find the right angle.

Staging
Some photographers like to use artificial backgrounds, such as colour cards or props, but I prefer to shoot in natural environments and backgrounds. Even with natural environments you can still do some ‘staging’.
Removing unsightly grasses and branches from the surroundings can help the shot look more composed and less cluttered. You can also add to the shot by adjusting your angle, or manually tilting a flower into frame to introduce more colour.

Light
Planning the composition also means thinking about light. Having good light is always important for photography, but is especially the case when using a macro lens and/or fast shutter speed, like you often need for bees. You’ll either need to make sure you have bright natural light, or use artificial lighting to avoid blurry, noisy, or poorly exposed images.

When photographing bees in bright daylight, you’ll have to decide whether you want the sun lighting the front of your subject, wrapping around the subject at an angle, or backlighting them. From behind, the light will produce a rim which can be very pretty, but you might need to bounce light back on your subject, or use artificial light for the front.
Whether relying primarily on natural light or flash, using a bouncer and/or diffuser will help make the light on your subject softer and more even, while avoiding harsh hot spots. Planning the composition in these ways will help you avoid having to delete lots of pictures later.
3. Choose the right equipment
Megapixels
My third tip is to choose the right equipment for the types of photos you want. If you’re after extreme closeup images, I recommend a camera with lots of megapixels. Bees are so small that, even with a macro lens, you will still often have to crop. More megapixels will allow you to do so while maintaining great resolution and detail.
My camera is the Sony A7R3 which has 42 full-frame megapixels, giving me a lot of room to crop.
Add-on lenses
You can also use adapter lenses that increase magnification, such as those made by Raynox or NiSi. With these types of lenses you might not have to crop, but they will also reduce your working distance and depth of field. This can make it harder to stabilize and focus, but can also work like a focus limiter to keep your camera from hunting outside the desired range.
The NiSi model can also be used on a standard telephoto lens to give it 1:1 macro capability.

Focusing capability
I also recommend a camera with fast focusing and spot focusing capabilities. Trying to lock focus on a tiny, fast-moving bee can seem nearly impossible at times. With fast, selective spot autofocus you can greatly increase the odds and worry more about composing than nailing the shot.
You will still need to be precise, quick, and steady to get the focus on the subject’s head, and click at the right moment. My Sony A7R3 is a super-fast focuser, as are many of the newer mirrorless cameras.

Lenses
For skittish bees, or to avoid trampling the flowers they are foraging on, I recommend using a telephoto lens. You will typically shoot with natural light while using a telephoto lens because you will be too far from the subject for flash to be very effective.
A telephoto lens with long reach but short minimum focus distance is your best bet. I use the Sony 100-400mm with a 1.4x teleconverter to shoot at 560mm with a 1m minimum focusing distance.

If you want to see maximum details and make your shots truly about the subject, a dedicated prime macro lens is the way to go. Most macro lenses from reputable brands are super sharp and will give you terrific quality, even those that are less expensive. If you have to buy on a budget, keep in mind that many of the cheaper lenses, while sharp, might not have autofocusing capability.
The Sony 90mm macro lens is my main macro prime, but I also sometimes use the Sony 50mm macro lens for a wider-angle look. Just make sure that you respect the subject when getting as close as a macro lens requires.
Read about: What’s the Best Macro Photography Lens?

Flash and diffuser
If you’re shooting with a macro lens, I highly recommend using on-camera flash and a diffuser. With a macro lens you’ll want to see extreme details, so you have to keep your ISO very low. Using flash will give you enough light to get the exposure perfect with a low ISO.
Speedlights can produce harsh light, but a good diffuser can soften the light and make it evenly surround the bee. A conical diffuser, which works like a portable mini umbrella for your flash, gives my favourite result.
My typical setup includes a Godox v860ii flash and the @ak_diffuser conical diffuser. Any diffuser will be an improvement over direct speedlight flash.

4. Use the right camera settings
Camera modes
My last tip is to use the right camera settings. First of all, learn manual mode. If you rely on AUTO mode, the camera will always try to expose for the scene instead of for the subject. Sometimes this is ok, too often it’s not what you want.
For example, if a bee is well lit but the background is dark, AUTO mode will try to expose for the background, leaving the bee overexposed. Auto mode will also try to ‘fix’ the exposure by changing shutter speed and/or aperture. You will introduce motion blur if AUTO slows down your shutter too much, and lose depth of field if it opens your aperture too wide.
Shooting in manual mode will allow you to get the exposure right for the bee rather than the background, whilst maintaining a good depth of field and no motion blur.

Aperture
In most situations, f/10 is my go-to aperture for bees. It is the sharpest aperture for my main lenses, and gives me a great depth of field without having to increase the ISO too much. This is especially important when using high shutter speed. Anywhere between f/8 and f/13 should get you good results most of the time.

Shutter speed
My recommended shutter speed depends on the situation. For a stationary bee in natural light, set the shutter as low as you can while avoiding motion blur. A longer focal length will typically require a faster shutter speed to avoid motion blur.
For fast moving bees in natural light, you might need to set it around 1/800th to freeze motion and for flying bees, 1/1600th or faster.
Using flash, you can freeze motion with the light rather than with the shutter. This means you can adjust the shutter more, to control the amount of ambient light reaching your subject and in the background. With flash, I typically set my shutter around 1/200 and adjust from there for ambient light.

Using a lower power on the speedlight will give you faster recycle times and freeze motion better, because lower power also means a faster flash of light. At about 1/16th power, this should be a fast enough flash duration to freeze even flying bees, as long as ambient light doesn’t hit the subject.
Read more: A Guide to Using Flash with Wildlife
ISO
My recommended ISO settings are also situationally dependent. In natural light I typically use ISO auto, and use the exposure compensation dial to adjust for the subject. With constantly changing light on the background and subject, this lets you keep the shutter and aperture fixed, and adjust ISO on the fly with your thumb.
If the light on the subject is not changing very much, you’ll be better served to set your ISO manually for a properly exposed bee each time.
When using flash, I always set my ISO manually since I am controlling the main light for the subject. I usually start at ISO 200, but it can range from 100-800. It ultimately depends on ambient light conditions, how dark or reflective the subject is, and how much of the background I want in the shot.
Always review your first few shots and adjust if needed, in order to make sure you are exposing properly for the bee rather than the background.
Read more: Choosing the Optimum ISO Speed
Shooting mode
As far as shooting modes go, I recommend continuous shutter with an active bee. With a stationary bee, you can use either continuous or single shot. Active bees move so fast that, oftentimes, the eyes are no longer in focus by the time you click. Continuous shutter will help make sure you get more shots in focus with an active or flying bee.

Focusing mode
My last recommendations are for focusing modes. I recommend using a type of selective spot autofocus with an active bee, and manual focus with a stationary bee. Using selective spot will require you to be more precise, but it will tell the camera exactly where to focus. With a stationary bee, I recommend manual focus as it will be more precise, and allow you to click only when the eyes are perfectly in focus.

In conclusion
As I said in my introduction, bees can be a very challenging subject to photograph, but it’s also extremely rewarding to observe them and explore the micro-universe they inhabit. Finding great shooting opportunities can be as easy as going into your back garden, or driving to a field of wildflowers.
I hope that with the tips I have provided, you’ll be able to improve the quality of your shots, and increase your quantity of keeper shots. I’m always happy to answer questions and help others succeed, so please reach out to me anytime!
Learn more about wildlife photography in our So You Want to Be a Wildlife Photographer? eBook.


