
How to Make Cyanotypes of Flowers

Alternative photographic techniques have become increasingly popular in recent years, chief among them is the cyanotype process.
Developed by Sir John Frederick William Herschel in 1942, this completely camera-less technique found practical application in the creation of blueprints. However, the artistic potential of the technique did not remain untapped for long. Within a year, Anna Atkins (a friend of Herschel’s) published a book of fascinating blue and white cyanotypes using her large collection of dried seaweeds and botanicals.


In this tutorial we will look at how to make botanical cyanotypes, using Herschel’s classic cyanotype process as a basis. However, we’ll focus on a more recently developed alternative technique – the wet cyanotype process – which leaves a lot more room for experimentation and variation.
What are cyanotypes?
The classic blue and white cyanotype process is simple. It is based on the fact that the two iron salts, ferric ammonium citrate and potassium ferricyanide, become UV light sensitive when mixed.

If you place a flat object on top of a dried sheet of paper coated with the iron salt solution and expose it to UV-rich light (from either sunlight or a UV lamp) a white silhouette of the object remains on the paper. A sheet of glass is usually placed on top of the object to ensure as much direct contact with the paper as possible; this helps create sharp outlines.
During the exposure, the paper quickly turns from yellowish green to the characteristic blue colour and then proceeds to fade to almost grey indicating that the exposure is complete. This process only takes a short time ranging from 2 to 15 minutes depending on the strength of the UV light source. Clouds filter out UV light, so sunlight exposures are best made on bright, sunny days.

After exposure, the glass and object are removed, and the paper needs to be rinsed in water. As soon as you submerge the exposed greyish paper in a basin of water, the blue colour returns and begins to deepen.

Any unexposed parts of the paper that were covered by the object will still look yellowish but will gradually turn white as the excess solution is washed out thoroughly. Washing the exposed paper also stops the exposure process and fixes the image.

The paper then needs to be hung up to dry. The blue colour will naturally deepen over 2 – 3 days if left exposed to air in a process called oxygenation. The process can be accelerated by putting the paper through a hydrogen peroxide bath after rinsing and before drying the paper, but this is optional and unnecessary.
Wet cyanotypes
Wet cyanotypes follow largely the same process as the classic blue and white method. The crucial difference is you’re working with wet paper by adding dish soap bubbles & vinegar to the exposure process. These two small additions result in very different images and impact the overall process.
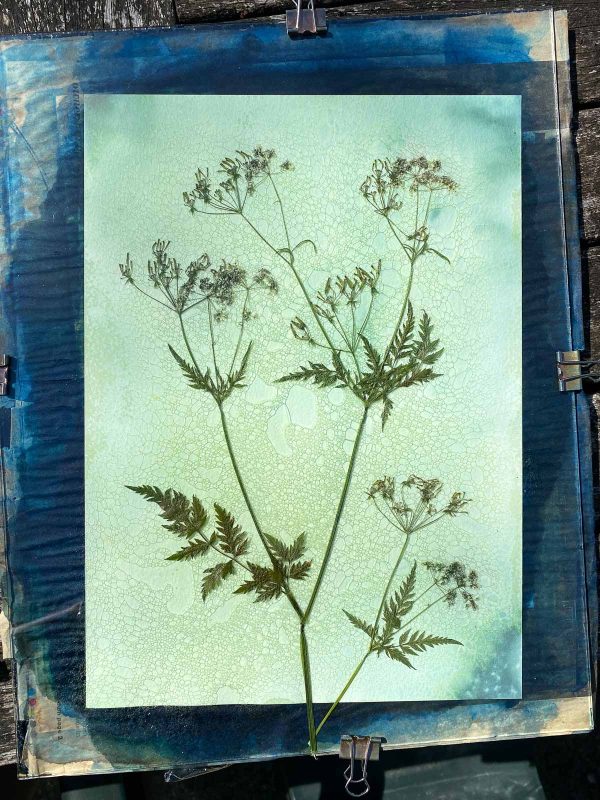
First of all, there is a much larger spectrum of colours. The blues now range from pine green, turquoise, and Prussian blue to deep, dark teal. There can also be yellow and red staining from pollen and plant pigments that leach out of the leaves and flower cells onto the paper.

The soap bubbles provide interesting and completely random background textures. As the paper is wet, exposure times are significantly longer, ranging from 1 to 6 hours and more depending on how sunny it is.
Longer exposures mean UV light has more time to penetrate delicate plant structures and can often reveal fine details like leaf veins.
The vinegar solution is necessary to counteract the alkalinity of the soap bubbles and is also responsible for the yellow-greenish tones in the images. These are usually at their strongest straight after exposure, and sadly always fade to some degree as the image matures.
Materials required for wet cyanotypes
It is relatively cheap and easy to get started with cyanotypes, all you need is:

- Cyanotype chemicals (Part A & Part B) e.g., from Jacquard. These usually come in a light-proof bottle in powder form and have to be diluted in water as per the instructions on the label. Once diluted, the salts have a shelf life of around a year. Keep parts A & B separate until you are about to coat the papers.
- Small container to mix the two parts, wide enough for the foam brush.
- Measuring spoons for mixing part A & part B in equal amounts.
- A set of foam brushes to evenly apply the solution.
- Unbuffered, heavyweight paper that can withstand being washed in water.
- Backboard and glass from old picture frames or a contact printing frame.
- Bulldog clips of varying sizes.
- Heavy-duty gloves.
- A long thin poker-like tool to nudge delicate plant material on the paper.
- An all-plastic spray bottle with a white vinegar solution – equal parts water and white vinegar should work fine, but feel free to experiment. Avoid a metal nozzle as the vinegar will eventually corrode it.
- Washing up liquid for the bubbles.
- A basin or tray to hold the soap bubbles, ideally large enough for your paper size.
- A large container to wash the exposed cyanotypes.
Plant material
Collecting your botanicals is a large part of the fun of creating cyanotypes; there are always things to be found in the garden and hedgerows at any time of year. When choosing your botanicals, look for thinner plants or flowers with finely divided outlines that are flat and less three-dimensional.
You can use pressed or freshly picked plants for your cyanotypes, and there are pros and cons for both depending on the plant. If you choose freshly picked plants, it can still be a good idea to press them into a pleasing shape for just a few minutes. It will be a lot easier to place them onto the bubbles when you assemble your image.
Paper choice
There are many papers to choose from for wet cyanotypes, ranging from expensive fine art papers, like Hahnemühle Platinum Rag, to inexpensive watercolour papers.
A lot of it is a question of personal taste, but good cyanotype paper has to meet a few requirements. It needs to be absorbent, ideally unbuffered and around pH neutral. Most importantly your paper should also be reasonably heavy weight, so it can withstand being submerged in water for several minutes. Slightly textured papers definitely suit the wet cyanotype look.
If you are just wanting to have an initial go at cyanotypes before buying the chemicals, you can also purchase small packs of pre-coated cyanotype paper online.
Wet cyanotypes step by step
Cyanotype chemicals can cause skin irritations, so always put on gloves when working with them. Wear old clothes or an apron as any spray will stain fabrics and skin. Cover your work area with plastic and take care not to splash the chemicals onto wallpaper and grout.
It can also be a good idea to cover the edge of sheets of glass with insulation tape to prevent cutting your fingers.
Preparing the paper
First, cut your paper to size. In a darkened room, mix equal amounts of Part A & Part B of the cyanotype chemicals in a small container with your measuring spoons. Only mix the approximate amount you think you are going to need.
Once the two parts are mixed, the solution only stays stable for a couple of days and needs to be kept in a lightproof container. Roughly speaking, two teaspoons of each solution (four teaspoons in total) is usually sufficient to coat about three sheets of A3 paper. However, this is dependent on how absorbent your paper is.
Dip a clean foam brush into the solution without overloading the brush. Coat the paper with parallel even strokes, first horizontally, then vertically. Take special care around the edges. This is particularly important when using the classic method, as every imperfection will be visible in the finished image. Wet cyanotypes are more forgiving. Leave the paper to dry before continuing.
You can coat the paper the night before, but make sure it is kept away from UV light. A darkroom, cupboard, or lightproof bag are ideal.
Image assembly
Cover your backing board with cling film and a layer of newspaper to soak up any excess moisture.
Choose your plant material and work out your composition on a piece of uncoated paper of the same size.
Fill a container with a shallow layer of cold water, add a large blob of washing-up liquid and agitate the water until a thick layer of foam has formed on top.
Put on the rubber gloves, take your coated paper, and place it gently upside down on the layer of bubbles. The bubbles will randomly stick to the paper. Lift it up and place it on the backing board.

At this stage, you can manually add a few more bubbles if required, but remember that the bubbles will spread once you apply the glass. Using the spray bottle, give the paper a few squirts of the diluted vinegar. Now carefully arrange your botanicals on the paper. You can use the ‘poker’ to gently manipulate fine plant parts (like flower petals) into place. Make sure your plants are not too close to the edge of the paper as they can move when placing the glass on top in the next step.
Now slowly and gently apply the sheet of glass. As you lower the glass, the bubbles spread out randomly and if you notice your plants moving, use the poker to guide them back into place before you fully apply the glass.
Clip the glass onto the backing board with bulldog clips and take the image outside to expose.
Exposure
Place your image outside on a flat surface, that is going to be in the sun for the next few hours. Wet cyanotypes can take anywhere from an hour to 6 or more hours depending on the time of year, your latitude, and cloud cover.
Initially, the colours will change very quickly from yellow to green, then to blue and almost white, after which, the final colours will slowly develop.

There is no hard and fast rule when the image is finished as it is dependent on the conditions, the plants, and how wet the paper is. For example, an exposure time of about 2 – 3 hours on a sunny summer’s day in Scotland is a good starting point.
Washing, drying, and maturing
Once the exposure is complete, bring the image back inside. Remove the glass and botanicals and insert the exposed print into a large container of water. Gently move it around for a few minutes.
You can also rinse the cyanotype under slowly running water, but you need to take care not to kink the paper. The colours will deepen and usually change more towards blue. Washing the print removes any excess solution, stops the exposure process, and fixes the image.

Hang the image up to dry and once dry leave it uncovered and exposed to air for 2 – 3 days for the print to oxygenate and the colours to deepen.
In the final stage, you may have to press your cyanotype print between books to flatten the paper.

Once you have mastered the basic technique, you are ready to experiment further. The possibilities are endless – here are a few ideas to try: add a few sprinkles of turmeric or paprika onto the wet paper before exposure, or stain the paper with tea or coffee. Try stacking 2 or 3 sheets of glass on top of each other and layer plant material in between. The higher layers will appear fainter in the exposed image.
How to photograph and digitise your cyanotype images
If you want to share your cyanotypes online or create prints, you will have to scan or photograph your original. For simple social media shares a phone shot can be sufficient, but if you want a good quality, colour-accurate file, you should use a proper camera (although you don’t need a fancy setup). All that is required is a camera, a telephoto lens, and a tripod.
Pick a bright, overcast day to avoid shadows and aim for diffused, even lighting. Choose a room without strongly coloured walls as they can create a colour cast on your image. Place your cyanotype image on a large piece of white card or mount board on the floor. Choose a lens with a focal length of between 50 to 120mm. A macro lens is ideal, as wide-angle lenses can distort the image.

Make sure your tripod is completely level and the camera faces down, so the sensor is parallel with the cyanotype. The image should sit squarely in the frame.
Leave a little bit of space around the image in your frame in case you need to correct any distortion or rotate the image a little bit in post-processing.
The best settings to use are manual mode, manual focus or single point focus, ISO 100, around f/8 and set your shutter speed to suit.
Use a cable release or set a 2 – 3 second timer. Remember to turn off vibration reduction, check your histogram for the correct exposure, and zoom in to double-check your focus in live view and after capture.

If you have several cyanotype images of a similar size, it can be efficient to work in batches as you only have to set up once, especially if using manual focus. All you have to do then is to keep an eye on the histogram for each image and tweak your exposure time if there are daylight level fluctuations in between images.
A good tip to help with colour accuracy is to put a grey card on your first image and set your white balance by placing the white balance picker on the grey card in post-processing. Adjust your other settings while visually comparing the digital file to your original cyanotype.
Looking after your cyanotypes
Cyanotypes can last for decades if they are properly looked after.
There are three things to remember. They love oxygen, hate direct sunlight, and like a pH-neutral environment.

When framing your images, always give them a mount so the image is not directly touching the glass and there is still a bit of oxygen present. Hang your images out of direct sunlight or they will fade.
In conclusion
It is easy to get hooked on botanical cyanotypes as they truly are a lot of hands-on fun to produce and although the process is simple, the creative possibilities are endless. The resulting images are a perfect mix of deliberation, experience, control, and happy accident.
Each cyanotype is completely unique and unpredictable. To me, they are a perfect antidote to a digital world full of mass production.
So, if you feel like trying something new, give them a go!


