
How to Photograph Meteor Showers: The Ultimate Guide
Meteors, also known as shooting stars, can be seen during any clear night. Some of them are barely visible, but some of them are so captivating that they might even change your life and send you on a career involving the study of the night sky. I have never met a person that was not impressed by meteors and pretty much every photographer with a mild interest in sky photography will want to know how to photograph meteors at some point.
Meteor photography is not a hard task, and it can be very rewarding if you are a little bit lucky. You can try to photograph meteors on any given night, but your chances of actually photographing one (or more) increase during meteor showers and especially during the peak nights of meteor showers.
What are meteor showers?
Meteors are visible all year round but there are times when more meteors appear in the sky. Those are the times of meteor showers. Meteors are produced by small particles entering our atmosphere at high speeds and ionising the gas around them through friction. That tube of gas will glow and that’s what we call a meteor.
At certain times of the year, Earth encounters clouds of such particles left behind by comets orbiting our Sun. When we meet one of those clouds, more particles will enter the atmosphere and we experience a meteor shower.

The most famous meteor shower of the year has its peak nights between the 11th and 13th August and is called Perseids. Another really beautiful one is the Geminids (with its peak on December 14th). In my opinion the Geminids are actually more spectacular than the Perseids but because they happen during a cold season fewer people are willing to go out and watch.
Other notable meteor showers are the Aquariids, the Lyrids, the Orionids, the Quadrantids, the Taurids, or the Leonids. The Leonids aren’t spectacular every year, but they have a 33 year periodicity. But one of these unusual Leonid peaks will certainly blow your mind. I will never forget the Leonid fireball storm on November 16/17, 1998. More than 150 fireballs in a single night!
Meteor shower activity is described by a number called ZHR (Zenithal Hourly Rate) and you will usually find that number cited in any article (scientific or not) about a certain meteor shower. Don’t be fooled into thinking that you will actually be able to see that many meteors in a single hour. The ZHR is a theoretical value and cannot be attained in practice.
Most of the time, the hourly number of visible meteors will be around 60% of the ZHR (if there is no moon present in the sky and you are in a dark location). Also, don’t be tempted to think that all meteors visible to the naked eye will show in your photos, even if they passed through the field of view of your camera. The eye is actually a better “meteor detector” than a normal digital camera.

In order to have a good chance of photographing meteors, you will have to go as far away as possible from light pollution; so urban areas are definitely not an option. A rural area is preferred or, even better, the top of a mountain.
Also, moonless nights will allow you to see and photograph more meteors. A bright moon will basically act like light pollution from a big city and it will wash out the more faint meteors. The moon will actually be a problem for 2019’s peak of the Perseids shower.
The best cameras, lenses, and kit for meteor photography
1. Tripod
You might be surprised that I start with the tripod and not the camera, but a sturdy tripod is paramount in meteor photography. You will be shooting long exposures and sometimes it might be windy, so you really need a good tripod. Consider weighing your tripod down with anything you have to hand if you need to make it sturdier.
Oh, and after you capture your first meteor, don’t start jumping around your tripod in celebration! Even a sturdy one will vibrate and you will end up with stars looking like little worms. It happened to me, after I photographed my first bright fireball, many years ago when I was doing astrophotography on film.
Try this: Gitzo Series 4 tripod
2. Camera
Any digital camera should do for meteor photography, as long as it has full manual settings. You need to be able to set the aperture, shutter speed, ISO, and focus. I would recommend a DSLR or mirrorless camera for the best results.
You don’t need a camera modified for astrophotography, but you will get better results with one as you will also be able to capture red nebulae in your field of view and the final images will look more interesting. A camera modified for astrophotography is a digital camera that had its IR-cut filter replaced with one that allows for a wider spectrum of wavelengths. These cameras will let you photograph red emission nebulae in the sky that are otherwise not that easy to pick up. But, I’ll say it again, using a stock camera will not have any negative impact on capturing meteors.
3. Lenses
Try these: Canon 16-35mm f/2.8 III or Nikon 24-70mm f/2.8 or Sigma 35mm f/1.4
For meteor photography we need wide-angle lenses, and one with a wide aperture. I believe the most useful focal range is between 17 and 50mm (on a full frame camera). You might be tempted to go toward the very wide focal lengths, thinking that covering a large area of the sky will yield for more meteors in your photos. However, you also have to consider that meteors will appear less spectacular with very wide shots, unless those meteors are exceptionally bright and long.
Personally, my favourite focal length for meteor photography is 24mm. But I also shoot with a fisheye lens, especially around the maximum of a meteor shower.

I would not recommend lenses with a smaller maximum aperture than f/2.8. You can still photograph brighter meteors using an f/4 lens combined with a high ISO, but a f/2.8 lens is a better choice by far. f/1.8 or f/2 is even better. Most meteors are faint and only last for a fraction of a second, and that’s why you need as much light-gathering capacity as you can get.
You might also want to use longer focal lengths for a very special type of meteor photography: smoke train photography. Very bright meteors sometimes leave a smoke train behind, visible for a number of seconds (sometimes minutes) to the naked eye.

These smoke trains will be beautiful in photos and doing a sequence of the evolution of such a train is very rewarding. For this, you can use small telephoto lenses with focal lengths between 50mm and 200mm, depending on the size and spread of the train. Don’t use a tracking mount as that will not show the real aspect of the smoke train.
Try these: Canon 16-35mm f/2.8 III or Nikon 24-70mm f/2.8 or Sigma 35mm f/1.4
3. Shutter Release Cable
A shutter release cable comes in very handy in any field of astrophotography; not only in meteor photography. It will allow you to get rid of any vibrations induced by your finger pressing the shutter release button on your camera.
If you don’t have a cable, you can use the 2 second self-timer available on your camera, but this will make you waste some time. An intervalometer will be of even greater use as you can program a sequence of exposures into it.
If you’re using a relatively basic remote release, set your camera to continuous drive mode and block down the button on your cable release. Most cables have a lock that does this, but you can improvise by using a piece of tape and a small, hard object (like a stone or bolt nut).
Try these: Camera intervalometers
4. Dew Heater
Dew is a big nuisance for astrophotographers. You will notice that, during some nights, your lens will fog up after some time. In order to combat that, first use a lens hood.
If that is not enough, and the atmosphere is very damp, you will need a dew heater. This is a small heating element that wraps around your lens and heats it, this way preventing dew to form.
Try this: Dew heater for lenses
5. Tracking Mount
A tracking mount is not a necessity in meteor photography, but it might be useful. The Earth rotates around its axis and that makes the stars appear to move across the sky. If you take a photo using only a fixed tripod you will be limited in your maximum exposure time as stars will start to trail after a short while. In order to avoid trailing, you can use a device called an equatorial mount (star tracker).

It moves at the exact same rate as the sky and it will allow you to use longer exposure times. So if you want to capture a detailed image of the Milky Way and hopefully get a meteor in there too, a tracking mount will be useful. Even if you don’t catch any meteors, you will still get a beautiful photo in the end.
Try this: Fornax LighTrack II
6. Spare Batteries
Especially during colder nights, batteries will deplete quickly. Have a few spare batteries with you and be sure to keep them in a warm place (e.g. under your clothes and close to your body). This way you won’t get caught short!
7. Warm Clothes
Even summer nights can be very cold, so be sure to have the right type of clothes with you. Use multiple layers of comfortable clothes. Technical mountaineering garments are definitely the best choice. Also, remember that drinking very warm beverages will actually make you feel colder!

The best camera settings for meteor photography
Camera mode: Manual. Any other mode is pretty much useless for astrophotography that doesn’t have the moon as its main subject.
Aperture: Open up as wide as your lens allows. If you want your photo to look better in the corners, consider closing down the aperture by one stop or so. Be aware that this will make not very bright meteors appear less spectacular in the photo.
Shutter speed: Usually, for meteor photography, we are not that concerned about stars that start to trail in our frame as capturing meteors is our main objective. But I think a photo with sharp stars looks better.
If your only intent is to show your images online, on social media, then the 600 rule might be enough. The 600 rule states that in order to get acceptably sharp stars you need to have an exposure time equal to, or shorter than, 600 divided by the focal length of your lens. (If you have a 50mm lens, you will need an exposure time of 12 seconds, for example).
But maybe you want to print those photos and hang them on a wall, or maybe your photos will be submitted for publication in a magazine. Then, the 600 rule will not be enough. I usually use the 300 rule or, if I happen to be very picky that day, even the 250 rule. So, instead of dividing 600 by the focal length of your lens, you will divide 300 by the same focal length. (According to the 300 rule, for a 50mm lens, you will need a 6 second exposure time in order to get pin-sharp stars.)

ISO speed: There’s no universal setting for ISO. ISO should be adjusted according to the performance of your camera, the level of light pollution at your site, and the phase of the moon. Depending on all these factors, I would recommend an ISO range of 1600 to 8000. Going lower than 1600, especially with f/4 lenses, is not very productive and you will photograph very few meteors.
Focus mode: Manual. It’s too dark at night for your camera to autofocus and it’s not that accurate when it comes to objects at infinity. In order to focus, set your camera to Live View, open the aperture to the max and pump up the ISO. Rotate the focusing ring to its infinity mark. Find a brighter star on the display of your camera, magnify the live view image as much as you are allowed by your camera and carefully fine-tune your focus until stars look at their most sharp.
Then, use some gaffer tape and carefully tape down both your focusing ring and zoom ring (if you use a zoom lens). This way, you can be sure that you won’t accidentally change the position of the rings. You should check focus from time to time as changes in ambient temperature might shift it a bit. More information can be found here.
Image format: Raw. As always in astrophotography, don’t even think about shooting JPG. RAW files will allow for a much better final result.
Long Exposure Noise Reduction (LENR): OFF. This setting, though useful for some astrophotography, will be a waste of time for meteor photography. Having LENR turned on will make the camera take another photo of the same duration of your original image, without opening the shutter. Then, this black image will be subtracted by the camera from your photo. By doing this, you will get a photo with less noise, but you’ll miss opportunities to capture other meteors.You can always take your own dark frames and subtract them in post production.
High ISO Noise Reduction: OFF. This should always be OFF for astrophotography.
Image review: OFF. You don’t need to have this ON at night as it will use precious battery life, and it will also ruin your dark adaption.
Where to point the camera
I am often asked where to aim the camera in order to photograph more meteors. There’s no answer to this question. Meteors will not favour a certain region of the sky.

However, I would suggest that you do not aim your camera at the radiant (the point where meteors seem to appear from), unless you are using a very wide-angle lens. This is actually a mistake made by lots of beginners. When they hear Perseids, they think that most meteors will appear around the constellation of Perseus. But that is certainly not the case, and that is actually the part of the sky where meteors will look less spectacular. The closer they are to the radiant, the shorter they are.
The best option is probably to aim around 45 to 60 degrees from the radiant. Then you just start shooting and wait. If you can set up multiple cameras pointing at different regions of the sky, then that is even better.
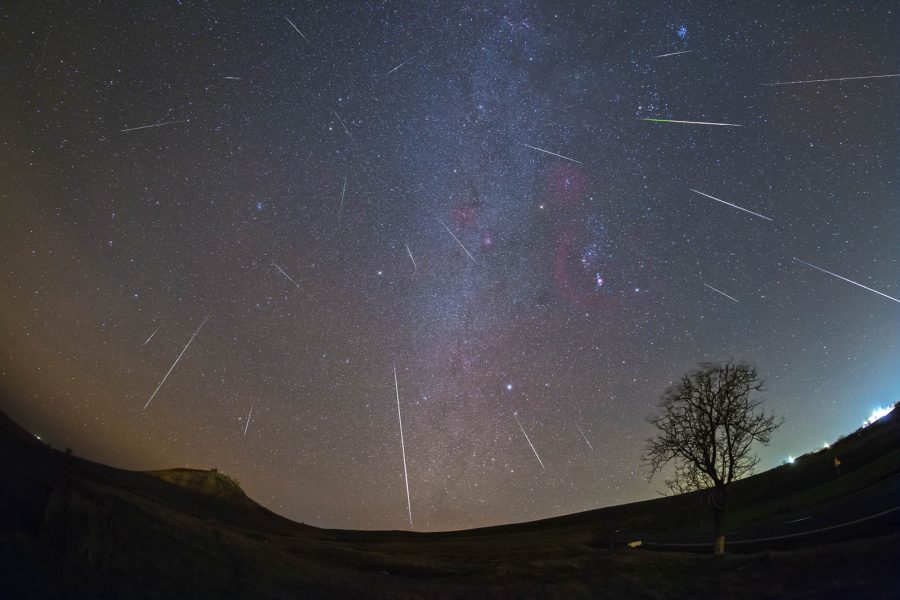
It is very common that, after a successful night of meteor photography, to combine all meteors photographed during the night into one single frame. A composite like this will show the position of the radiant. In order to do so, use images taken with the same focal length. Then, star align individual frames so that in the final composite the meteors will actually point to the radiant.

If star alignment is not done, the final image will not be “correct”. In order to composite your final photo, just add all the individual frames showing meteors on top of the other as layers of a photoshop file. Then select the “Lighten” blending mode for all layers except the bottom one. This mode will only keep the meteor from a certain layer and discard the rest of it.
Of course, framing some foreground and taking composition rules into account will make for a better final image.
In conclusion
Photographing meteors might be rewarding, but don’t forget to enjoy the show too! Don’t allow the camera to distract you from actually looking at the night sky and enjoying those long and bright fireballs. No matter how beautiful the night sky might be in photographs, it’s still just a pale representation of the real thing.
Finally, don’t forget to download my Ultimate Guide to Astrophotography for an in-depth look into meteor photography and all other aspects of shooting images of the night sky.
Clear skies!


