
Time-lapse Photography Guide: How to Shoot Amazing Videos
Creating an amazing and beautiful time-lapse video is very easy nowadays as the camera gear, software, and knowledge is more accessible and affordable. But knowing how to properly use your gear along with the environment around you will help you to create beautiful videos.
In this time-lapse photography guide, I will go over some equipment, post-processing tips, and other secrets that will help you create your next time-lapse video.


1. Essential equipment for time-lapse photography
Cameras
You don’t need the latest $6,000 camera to shoot amazing time-lapse videos. Any DSLR or mirrorless camera that can shoot raw images over 20 megapixels is perfect.
What is amazing about time-lapse photography is that it is all stills, but the final product is a video. You will be using the power of raw images to create your time-lapse. This means you can easily make a 6K resolution video using a $500 camera. There are no other art forms that allow you to do something like that.

Batteries and memory cards
Time-lapse photography takes time and will consume batteries fast, so make sure to purchase additional batteries for your camera. I highly recommend using a grip to double your battery life without having to change it. It’s pretty useful when it comes to day to night or Milky Way time-lapses, for example, as the camera will be shooting for hours. There is nothing worse than seeing the camera shut down in the middle of a shoot.
You are going to be shooting hundreds, and sometimes thousands, of raw images; that means you need to have enough memory cards. Shooting with two or three 64GBs cards instead of one 128GB card is safer in case something happens.
Use fast cards of a minimum of around 95 MB/s write speed to reduce the buffer time. The camera will be shooting continuously for a long period of time, so make sure that it can record the image on the card in the interval before shooting the next frame.
Intervalometer
Obviously, you can’t shoot a time-lapse without an intervalometer. Some cameras do have a built-in one, but I recommend getting an external one to keep control of your camera settings and your camera in general. An intervalometer is a remote control that will take a picture with a selected time interval. Most of them have a minimum of 1 second and can go for hours. You can also select the number of pictures you would like to capture for that specific time-lapse, or choose to have no limit.
Filters
Don’t forget to get a ND filter if you like to shoot during the day. It will help to smooth out the traffic, people, and any other fast-moving elements. An ND filter will create a flawless video and help reduce brightness flicker. That is the reason why I always have a 6-stop ND filter in my bag.
Read more: The Essential Filters for Landscape Photographers

Tripod
Finally, don’t forget to use a sturdy tripod. The tripod is going to be key when it comes to shooting time-lapse videos. Shooting a time-lapse takes time, and anything can happen when the camera is recording.
The most common issues I have come across in my career are wind gusts, shaking ground (from a bridge for example), or people bumping into it. If your tripod is too light or bumpy, you will end up with a huge number of blurry frames or shakes.
A carbon fibre option will be lighter to carry if you have to walk around or hike to your destination, but an aluminium one will usually be heavier and can sometimes be sturdier. This is why I have one of each and use the best one for the spot I am going to shoot from.
The ball head is also very important. A large, wide, and heavy tripod head will keep your camera steady, even during a windy day.
2. Working on location
Now that you have all your gear ready, let’s go and shoot a time-lapse.
When you want to shoot a time-lapse, you need to be thinking a little differently than when you want to shoot a single photograph. You will be capturing a period of time, not just one frame frozen in time.
A great time-lapse video needs motion and movement. That might be things changing, growing, floating, or evolving. Here are a few examples of common time-lapse subjects:
- Clouds
- The moon
- The sun
- City skylines
- Cars or people
- Light and shadows
- Stars
- Landscapes
- Flowers
Obviously, you can mix all of them together. If you are shooting for a long period of time, make sure you have constant motions from start to finish. This will create a more interesting time-lapse.

3. Camera settings for time-lapse photography
When it comes to camera settings, shoot raw images all the time. Select a white balance that fits your lighting conditions, but do not select auto white balance and do not change it during the time-lapse.
Shoot in manual focus and not autofocus. Remove any settings or features that will slow down the buffer time, such as the preview after taking the picture or the in-camera noise reduction.
Ensure that you shoot in manual mode. The key when shooting a beautiful time-lapse is to get the exact same exposure and colour on every single frame. That is why you want to control your camera as much as you can by having everything set to manual.
Aperture and ISO
Let’s start with aperture. I shoot most of my time-lapses between f/7.1 and f/13 to get sharp and crisp images. Of course, it depends on what and when I am shooting and how big my depth of field is.
Then, select the lowest ISO possible – usually 50 or 100 for a basic day time-lapse. If you have to select ISO 200 or 400 for a night time-lapse, well so be it. Always select the lowest ISO possible in your scenario.
Shutter speed
Day or night, having a slow shutter speed will help you to create a smoother time-lapse and reduce the brightness flicker. If you are shooting during the day, use a ND filter for that purpose. I do not recommend shooting a day to night time-lapse with a ND filter as it would get very dark after sunset. Use it only for full daylight shoots.
Choosing the interval
The interval describes the amount of time between each picture that your camera is taking during the time-lapse.
An interval too long will give you a time-lapse that appears too fast, and conversely an interval too short will give you too many pictures and a slow time-lapse that you probably need to speed up in post-production.
Think about how long you are going to shoot for and how fast your elements are going. Are you shooting clouds? Are you shooting cars in the city? Are you shooting the light changing? What is your main subject?
Here are some common intervals for you to use as a starting point:
- Clouds: 3 to 4 seconds
- Cars and people: 1 to 2 seconds
- Day to night transitions: 5 to 7 seconds
- Sunrise/moonrise: 3 to 5 seconds
Remember, there are 2 types of time-lapses: one where you are just looking to get a number of photos to create a few seconds of video, and another one where you want to shoot a period of time and the number of photos does not matter – you’ll stop the camera when you have achieved what you wanted.
But it’s important to think about how many photos you think you might want, along with the correct interval, to not end up with a 2 minute long time-lapse.
Shoot a minimum of 250 to 300 photos per time-lapse in order to get a minimum of 10 seconds of video at the end. You can shoot more than that during a day to night transition as you are shooting for a long period of time and it’s always better to have more content than not enough.
4. Producing your time-lapse in post production
Post-processing is probably my favourite part. Coming back home, loading the time-lapse and watching it at real speed is very exciting.
Organising your files
The first thing I do when I come back home is to copy every single sequence into a different folder. That’s also something you can do directly on your camera: you can create a new folder every time you shoot a new sequence.
I then put all those subfolders into another parent folder named after the day and location of the shoot. It’s a great way to stay organised with time, locations and sequences.
Colour correction
The next step is to colour correct and clean our image sequences by using 2 different softwares: LRTimelapse and Adobe Lightroom.

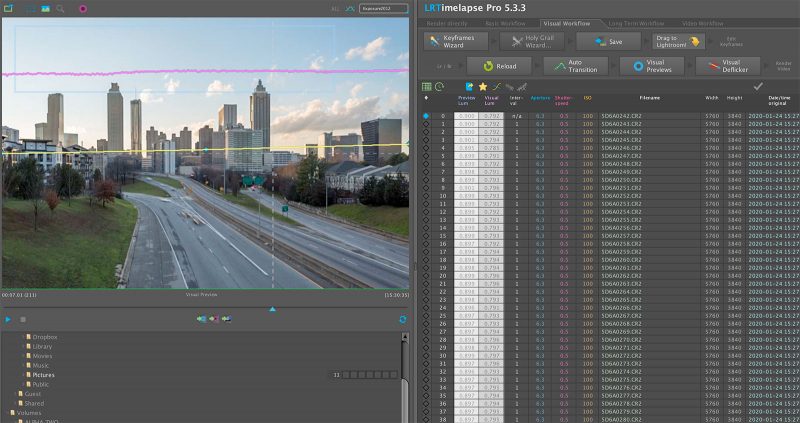
LRTimelapse (Level and Ramp Timelapse) is a software that works with the metadata of your raw files and allows you to apply different colour correction from one keyframe to another. The software can also play a preview video, before and after colour correction on Lightroom, and smooth out the entire sequence with an advanced deflicker.
It also includes a “Holy Grail Wizard” that cleans the exposure ramping in a day to night time-lapse. This makes day to night time-lapses really easy and affordable. LRTimelapse has a free version to try it out. If you like it, you can purchase a license to get more out of it.
When you first open LRTimelapse, click on the sequence you would like to work on in the finder (bottom left). In this example, we are going to work on a simple day time-lapse with 300 photos.
The program will load the Exif data and a preview of your time-lapse. Yes, you can play your time-lapse at 24, 25, or 30 fps right away without exporting anything. How cool is that?
Select the visual workflow at the top right – this is the best workflow to use for most time-lapses. Just follow each step as shown.

Step 1 – Selecting Keyframes
The first step is to select keyframes. Keyframes are images we are going to colour correct in Lightroom. With a basic day time-lapse, usually 1 or 2 keyframes are enough. If the light is changing and you will need to adjust the exposure or white balance at some point in the time-lapse, you can manually select 3 or more keyframes.
The “Holy Grail Wizard” button will light up only if LRTimelapse sees that settings were changed during the time-lapse. For this we are working on a regular day time-lapse with no exposure ramping (changing the settings during the time-lapse) whatsoever, so let’s move on to the next step.
Click on “Save”. This will save the new metadata and create XMP files. LRTimelapse will add a 4-star rating on those keyframes in order to easily find them in Lightroom.
Step 2 – Import in Lightroom
Open Lightroom and select the gridview in the Library.
Take the LRTimelapse button called “Drag To Lightroom!” and drag it to the Lightroom library. A window opens. Make sure to have “Add” selected at the top as you want to read the photos from where they are located on your hard drive. Then click “Import”.
Once the sequence is imported, click on “Filter” at the bottom right corner and select “01 LRT5 Keyframes”. Lightroom will display only the keyframes you created in LRTimelapse. As you can see, they appear as a 4-star rating in Lightroom. Those are the photos you will colour correct for that specific sequence.
Read more: Lightroom Colour Correction – Hue, Saturation, and Luminance

Step 3 – Colour Correction
Select the first frame and do your colour correction the way you want it. Be careful not to apply too much contrast, clarity, dehaze, whites, and blacks as they can create contrast flicker. Go easy when you colour correct a time-lapse to avoid any issues. The key here is to get a smooth transition between keyframes and between every single image, so do not go crazy with the colours.
You are free to use graduated and radial filters, but use the one LRTimelapse created for you on your images. They will show up on your picture once you click on it. You can also use the spot removal tool if you end up having a dust spot for example, but be careful as moving clouds and other elements could mess that up. The spot removal tool will be applied on every single frame of your sequence. Avoid dust spots by cleaning your lenses and even your sensor every once in a while!
Once you are done colour correcting the first image, we can copy all the settings to the following keyframes. If you have only one keyframe, go to Step 4 – Visual Previews.
If you have 2 keyframes or more, keep reading.
Click the first image you just colour corrected, then select all the ones after it. Go to the menu bar at the top. You should see an “S” for “Script”. Click on it and select “01 LRTime-lapse Sync Keyframes”. LRTimelapse will apply all the settings to the following images. Use this method instead of syncing with Lightroom to avoid any issues in LRTimelapse.

Select the second keyframe and adjust any settings if necessary. If you change anything, repeat the syncing process with the script tool to the following keyframes. Do not select any previous keyframes as you already colour corrected them the way you wanted to.
Step 4 – Visual Previews
When you reach the last keyframe, go back to the Library, select all the keyframes and save the new metadata on your images (Cmd+S on Mac or Ctrl+S on PC – or Metadata > Save Metadata to File).
Go back to LRTimelapse and click on “Reload”. LRTimelapse will read the metadata created in Lightroom.
Of course, it’s reading only the keyframes at the moment. This is where you need to click on “Auto Transition” and where the magic of LRTimelapse happens. The program will create new metadata for every single image between the keyframes and will gently level and ramp any settings. If you have only one keyframe, all the images will have the same metadata. If you have several keyframes, LRTimelapse will automatically write the new metadata and ramp everything for you!
When it’s done, click on “Visual Previews” to see a preview of your time-lapse with the colour correction applied.
Step 5 – Visual Deflicker
Flicker is the most annoying problem in time-lapse photography. Brightness flicker is usually created by the aperture of the camera not opening the exact same way for every single picture. That is why shooting with a slower shutter speed usually fixes the problem.
But having brightness flicker is not really a problem with LRTimelapse. If you see flicker on your sequence, you can select an area of your time-lapse where the light is changing naturally. That way, LRTimelapse will take this area as a reference.
A cloudless sky or a building with nothing passing in front of it is a great example of an area of your image where the light is changing naturally.
To do so, click on the first image and draw a rectangle on your preview. LRTimelapse will reload the “Preview Luminance” and the “Visual Luminance” curves.
You do not always have to select a specific area. Sometimes you can take the full image as a reference. Use this technique only if you have fast-moving elements such as cars, clouds or people very close to your camera. They can affect the overall brightness of your images but also how the deflicker reads your image sequence.

When you are ready to deflicker your sequence, select a number between 5 and 20 – that’s usually enough. Then decide if you want to do one or two passes. Two passes is great to get a better result. If you have a lot of flicker, select 3 or 4 passes and a bigger value. Again, don’t go crazy with the deflicker – it’s pretty powerful and a small number will usually do an amazing job.
When the new “Visual Luminance” curve is generated, we are now ready to export and create our video!
Step 6 – Exporting the Video
Finally, we are ready to create the video from the image sequence! Go back to Lightroom and click on “01 LRT Full Sequence” in the bottom right filter dropdown menu.
Select all images (Cmd+A or Ctrl+A). Click on Metadata > Read Metadata from Files.
Lightroom is now reading all the new metadata LRTimelapse created for all the other images between the keyframes.
When you are ready, click “Export…”. Select “Export to: Export Time Lapse (LRTime-lapse)”
Select JPG or TIFF and other settings you want. When you are ready, click on “Export”. Lightroom is now creating a new JPG or TIFF sequence.
When the sequence is exported, LRTimelapse will open a “Render Video” dialog automatically.

Select the codec, output size, frame rate, speed, quality, and any other settings you want to export your video with. If you are sharing your work on Instagram, a basic H264 is perfect. If you are selling your work and want the best quality possible, go for a ProRes 422 or 444.
When you are ready, click on “Render Video”.
Step 7 – Exporting with Adobe After Affects
If you own Adobe After Effects, you do not have to export a JPG or TIFF sequence using Lightroom. When you are done with LRTimelapse, close everything and open After Effects (AE).
You can change the frame rate of your sequences before importing them. Go in Preferences > Import. Do this before actually importing any image sequences into AE.
Import the image sequence you just colour corrected (right click in the “Project” panel).
Select only the first raw image of your sequence and make sure you have “import raw sequence” checked at the bottom. Then click “Import”.
AE just imported the sequence with the selected frame rate. You can now create a new composition, select the dimensions and export the video as you usually do with AE.

I like to use AE to export my videos as I find it a little faster than going through Lightroom and LRTimelapse. You can directly export from the raw images to the video; no need to go through a JPG or TIFF sequence in the middle.
Your time-lapse is now ready to be shared with the world!
If you are willing to spend a little more time on your video, you can re-import your clip in AE and clean it out. Cleaning a time-lapse is very easy as it only requires some basic AE skills with masks and layers. You can remove birds and planes that show up on only one image, you can stabilise your clip with the “Warp Stabilizer” or “Tracking” tools, you can smooth out water using the “Echo” effect and you can remove dust spots by masking them out. Taking the time to clean your time-lapse videos can increase their quality and value tremendously.

In conclusion
If you are new to time-lapse photography, start with simple day and night time-lapses as they are easy to create. Then, later on, you can slowly play with your settings and practise with exposure ramping. When you reach a good level with day to night transitions, you can also challenge yourself even more with motion controlled time-lapses, using a pan/tilt head and a slider, or even hyper-lapse videos.
When it comes to time-lapse photography, there are infinite ways to shoot an infinite number of subjects. But dedication and patience are a virtue, so go out and be creative.


