
8 Landscape Photography Mistakes to Avoid

I tutor on a lot of workshops each year and it’s a part of my job that I really enjoy. Watching people progress in their craft is really satisfying. Of course, a large part of any learning process is making mistakes – and then learning from them.
What I’ve found interesting over the years is that, when it comes to landscape photography, people tend to make very similar mistakes. So, if you’re new to landscape photography, here are a few things to watch out for.


Keep these points in mind and, if you can avoid them, you should be well on the road to taking consistently good landscapes.
1. Cluttered compositions
Composition in photography should be reductive: you start with everything that’s in front of you and (by lens selection and choice of viewpoint) reduce it down to what’s important. If there are too many elements in your composition, you obscure your message with too many distractions and the viewer will struggle to identify the main subject and the point of the image.
So, while composing, ask yourself what drew you to the scene and what the main message you’re trying to convey is. Then, try to exclude any elements which don’t contribute to this message.
Keeping compositions as simple as possible is a good rule of thumb.
Read more: Composition in Landscape Photography
2. No focal point
This is closely related to my previous point. While it’s not essential to have a clear focal point in every landscape image, it certainly helps in most cases. Images without a focal point will often leave the viewer unsatisfied, as their eyes travel aimlessly around the composition looking for something to settle on.
While this can be successfully employed as a deliberate device to create an unsettled mood, more often than not it’s just an error.

3. Using the wrong camera height
At some point, someone writing an article in a photography magazine advised setting up as low as possible “for a dramatic perspective” and photographers have been overdoing it ever since. It’s certainly true that setting up low emphasises the foreground, which can be dramatic, but think carefully before you do this.
By setting up low, you compress the middle distance or – in some cases – completely remove it. On occasions this is useful, especially if that plane is empty. But it can have a negative effect: it reduces or removes the separation between the foreground and background planes, with the result that you lose depth in the composition.

Often, taking the opposite approach and setting up from an elevated height is more successful, as this opens up the planes in the image and creates a greater depth in the composition.

These two shots were taken just a few moments and a few feet apart. They show the huge difference a subtle change of position can make. By moving forward slightly and raising the camera a little, the planes in the composition have opened up and created far more depth.
4. Inappropriate foreground interest
Foreground interest gets talked about a lot in landscape photography – and it is important. Used well, it can provide an entry point into the composition and can enhance linear perspective.
It’s easy to see how big foreground landscapes – popularised by highly skilled photographers such as Joe Cornish – have become popular.

However, there’s a lot more to it than simply filling the lower part of the frame with the nearest big rock, and attention needs to be given to choosing the right foreground elements.
Pay attention to the shape, size, texture, and colour of the object – as well as any implied movement into the frame. Choose objects which encourage the eye into the the composition and which complement the background and relate foreground, middle distance, and background to make a cohesive whole.
Read more: Composition Tips – Leading Lines and Vanishing Points
5. Incorrect use of graduated filters
Despite increases in the dynamic range of imaging sensors, and techniques such as HDR and exposure blending, graduated filters seem to be as popular as ever. These are half-clear and half-dark filters, used to darken a bright sky so that it doesn’t overexpose.
Photographers still like to use them because, for most, it is more satisfying to capture a shot in a single frame rather than bracket shots and blend them in post-production.
The classic mistake made by inexperienced landscape photographers is to ‘overgrad’. This is using a graduated filter which is too strong and darkens the sky unnaturally, or pulling it down too low in the frame so that you can see the transition line ‘cutting into’ the foreground.
Read more: The Essential Guide to Filters
Remember that, in the vast majority of lighting conditions, we expect the sky to be brighter than the land and anything else will look unnatural. When reviewing images on your LCD, check that the sky isn’t unnaturally dark and that the filter has been positioned accurately so that it blends in unobtrusively with the horizon.
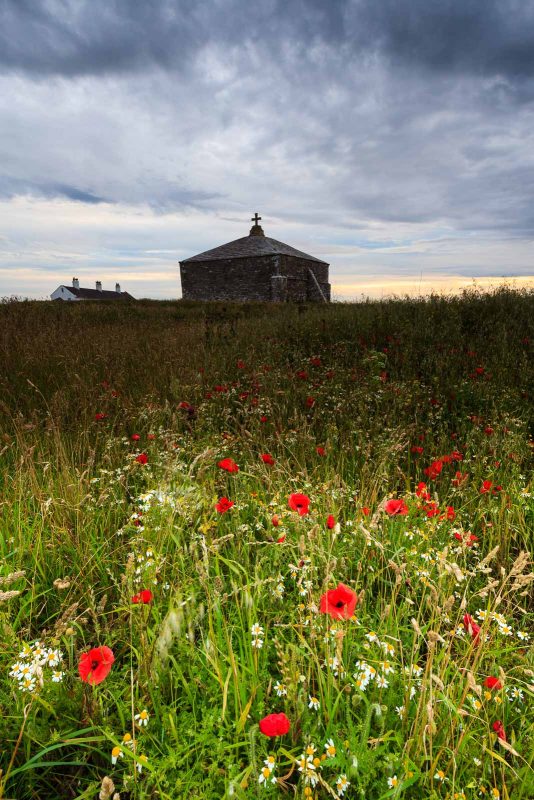
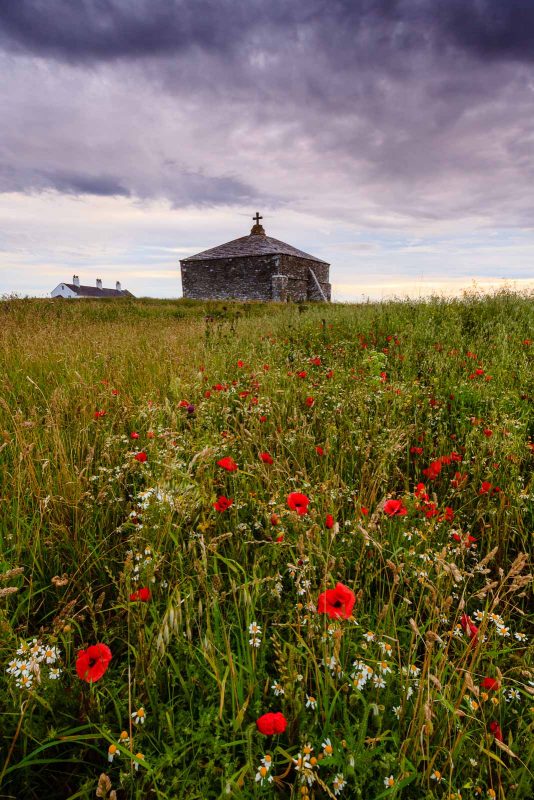
The first image shows a classic case of ‘overgradding’. The sky is unnaturally dark and the filter has been placed too low in the frame, so you can see where it cuts in to the foreground. In the second image, the grad has been used correctly
6. Blurring everything to oblivion
Another filter-related mistake is the overuse of ‘extreme’ neutral density filters, such as LEE’s Big Stopper (a 10-stop filter). These enable the use of very long exposures – even during the daytime – and the effects can be somewhat addictive. Misty water swirling around rocks seems to be incredibly popular.
This is highly subjective, but there are times when a more restrained approach gives better results. By choosing shorter long exposures of moving water – of between 5 and 10 seconds – you create attractive motion blur whilst still keeping some texture in the water.
This is especially true of waves washing over rocks, where the waves will keep their shape and still be recognisable for what they are.

That said, there are certainly times when ultra-long exposures of a minute or more are highly effective. For example, if you’re shooting minimalist compositions on the coast of subjects such as groynes, posts, and wrecked piers then long exposures work well by removing texture from the water and further simplifying the scene.
7. Using hyperfocal distance unnecessarily
Front-to-back sharpness is clearly important in landscape photography. So when inexperienced photographers discover the hyperfocal distance – the focusing distance which gives maximum depth field – the tendency is to automatically set it for every single shot.

However, it’s really only necessary for shots which have very close foreground interest. For compositions where the main elements are quite far away, you’re better off just focusing on your subject – or even setting infinity focus.
The hyperfocal distance places the edge of the depth of field at infinity. The issue is that if you use it when there is nothing close to the camera, you’re prioritising depth of field in the foreground where you don’t need it. While the background will still be ‘acceptably sharp’, by focusing further into the scene you will make it even sharper.
Read more: Where to Focus in a Landscape Photo
8. Arriving on location too late or leaving too early
We’ve all done it, and no matter how experienced you are you’ll still occasionally fall into this trap.
The most photogenic light is at the start and end of the day. But getting up early doesn’t come easy to most of us, so the temptation is always to cut it a little fine – especially with the early starts in the summer months when those extra 10 minutes in bed can seem really important.
But if you can force yourself up just a little earlier, it will pay dividends. Colour often starts earlier than you think and you don’t want to be rushing around in a panic, trying to find a composition while watching the conditions reach their peak. As a guide, try to arrive on location early enough that you can be setup a good 45 minutes before sunrise.

As for the other end of the day, make sure you don’t leave before you’re absolutely certain it’s over. At some point, we’ve all persuaded ourselves that the light has passed and then rushed home before the pubs shut or the kids go to bed, only to see the sky light up with a magnificent afterglow just as we’re driving away.
Read more: Golden Hour Photography – A Landscape Photographer’s Guide
In conclusion
Life is all about making mistakes and they’re a necessary part of the learning process. But it’s even better if you can learn from the mistakes made by those who’ve gone before you, so next time you’re out on a shoot keep these points in mind.
As well as helping you to avoid the mistakes, it will encourage you to follow a deliberate, considered approach which will also benefit your photography.


