
8 Tips for Taking Creative Photos on Safari

A couple of years ago a friend of mine asked me, ‘how do you go about taking creative images?’ Quite honestly, I did not have an answer. My immediate response was just that it came naturally.
After dinner that night, I sat and thought about what I do while on safari that might influence the kind of images I come back with. What are those conscious and unconscious decisions that lead to the kind of images I take?


In this guide, I will provide some tips for taking creative photos on safari. These are things that I do as a wildlife photographer, and I hope they will be useful.
1. Choosing a location
This is a prerequisite for increasing your chances of coming back with creative images from a safari. I often talk about going straight to where the probability of meeting your subject is the greatest. This means that as a creative wildlife photographer, your time isn’t mostly spent just searching for the subject.
I suggest to people to visit these locations first, before they try to seek out subjects that are harder to find. The Maasai Mara in Kenya is a fantastic example of such a location.
2. When to go
Choosing the right time to be at the location is probably even more important than choosing the location itself. The heightening unpredictability of weather is a key factor in this.
Let me just say, putting thought into the timing of your visit will probably be the most important part of your preparation.
Take a look at the images below. These were taken in Amboseli National Park in southern Kenya, during the dry season. With Amboseli, I love the dusty feel of the place and, more often than not, I plan trips here during the dry season.

3. Focus
In order to create creative images while on a safari, one of the key tools in your arsenal needs to be a focused goal. I usually visit a place with a few set compositions in mind. But more importantly, I visit a place with a few concepts in mind.
Let me give you an example: when I visited the central Serengeti area for the first time, I arrived with pretty much the same expectations as the Maasai Mara. I spent time there, made some decent frames, and came back with the same kinds of images that I used to take in the Maasai Mara.
This happened long before I began allotting equal importance to both the landscape and the subject. I was only concerned about creating images of cats or elephants. A few years of doing this passed, and I started seeing less and less story in my imagery, and more documentation.

Now that’s not necessarily bad, but it wasn’t satisfying for me. I definitely wasn’t using the incredible location to its full potential. When you plan a visit to a place, plan with precise focus on what you want to be your target.
For example, if you plan a visit to the central Serengeti, plan it so that you spend a lot of time near the Kopjes, because that’s the most iconic area. Once you have the right focus and you start spending enough time at a place, you will be able to better read it.
This includes the landscape, the subjects, and the light, all coming together to make better creative images.

4. Reading the light and planning your daily excursion
Now you have maximized your chances of good photographic opportunities by selecting the right location and time, and focusing on the unique elements of your chosen location.
Let’s move on to how you go about actually taking creative images. One of the lowest hanging fruits, in terms of creative wildlife photography, is to look for back-lit images. This is best done when the sun is hanging really low in the sky, or on a night safari with another vehicle controlling the light.

The key idea here is to draw a straight line between yourself and the source of light, with the subject in-between. Conventional wildlife photography uses a straight line between the subject and the source of light, with the camera in-between. Backlit images, when done correctly, are immensely more appealing than just plain images in good light.
They can lead to three kinds of images:
1. Silhouettes (with the background much brighter than the subject)
2. Rim-lit (with the background dark)
3. Back-lit (with a decent amount of detail on the subject, just giving a nice dreamy feel.)


From the perspective of exposure, the easiest way to capture silhouettes and rim-lit images is by first pointing your camera towards the source of light, locking the exposure-meter at that (read about AE-L/*), and then recomposing, focusing, and clicking.
Focusing can be tricky with strongly backlit images, so you might want to help the camera a bit with some manual assist.

With silhouettes, the general consensus is that the sky has to be orange, and that they are best taken at sunrise or sunset. However, the image above was taken at around 4pm with a nice blue sky. I urge you to break the stereotypes and look out for such opportunities.
5. Exposure, especially with drab backgrounds
On safari, we often come across scenarios where the background is a washed-out sky, or maybe something else that’s lighter than the subject, and not that pleasing to the eye. I find such situations perfect for using over-exposure to distract attention from a drab backdrop and add a pop to your subject.
This can be an often-encountered scenario, and it is very easy to execute. For some reason, I haven’t seen many people think consciously about over-exposure as a means to avoid competition in the frame, and I strongly suggest that you start thinking along these lines. The same goes for situations with very dark backgrounds too.

A strong underexposure with a brighter subject lends itself very well to creating eye-catching frames. This approach is much more commonly seen, but is still a very good one for making arresting and creative frames.
While I am on the topic of under-exposure, bear in mind that in situations where you have a side-lit scene, you can really utilise the under-exposure to make some artistic frames., For example, a cat walking towards you, or a bird sitting on a branch with the sun hitting at the correct angle.

Read more about creating high key images.
6. Looking out for compositions that speak more
Wildlife photography has taken the world by storm. With the new age equipment available now, it has become much more important to break the stereotype of just plain documentary images, and to immerse your own emotions and thoughts into the making of a frame.
I often go back to the following three techniques when I find myself in the field, at a loss for ideas.
1. Include more but show less
The key idea here is to keep the image as simple as possible. Include the environment in the image, but make sure that it isn’t too busy.
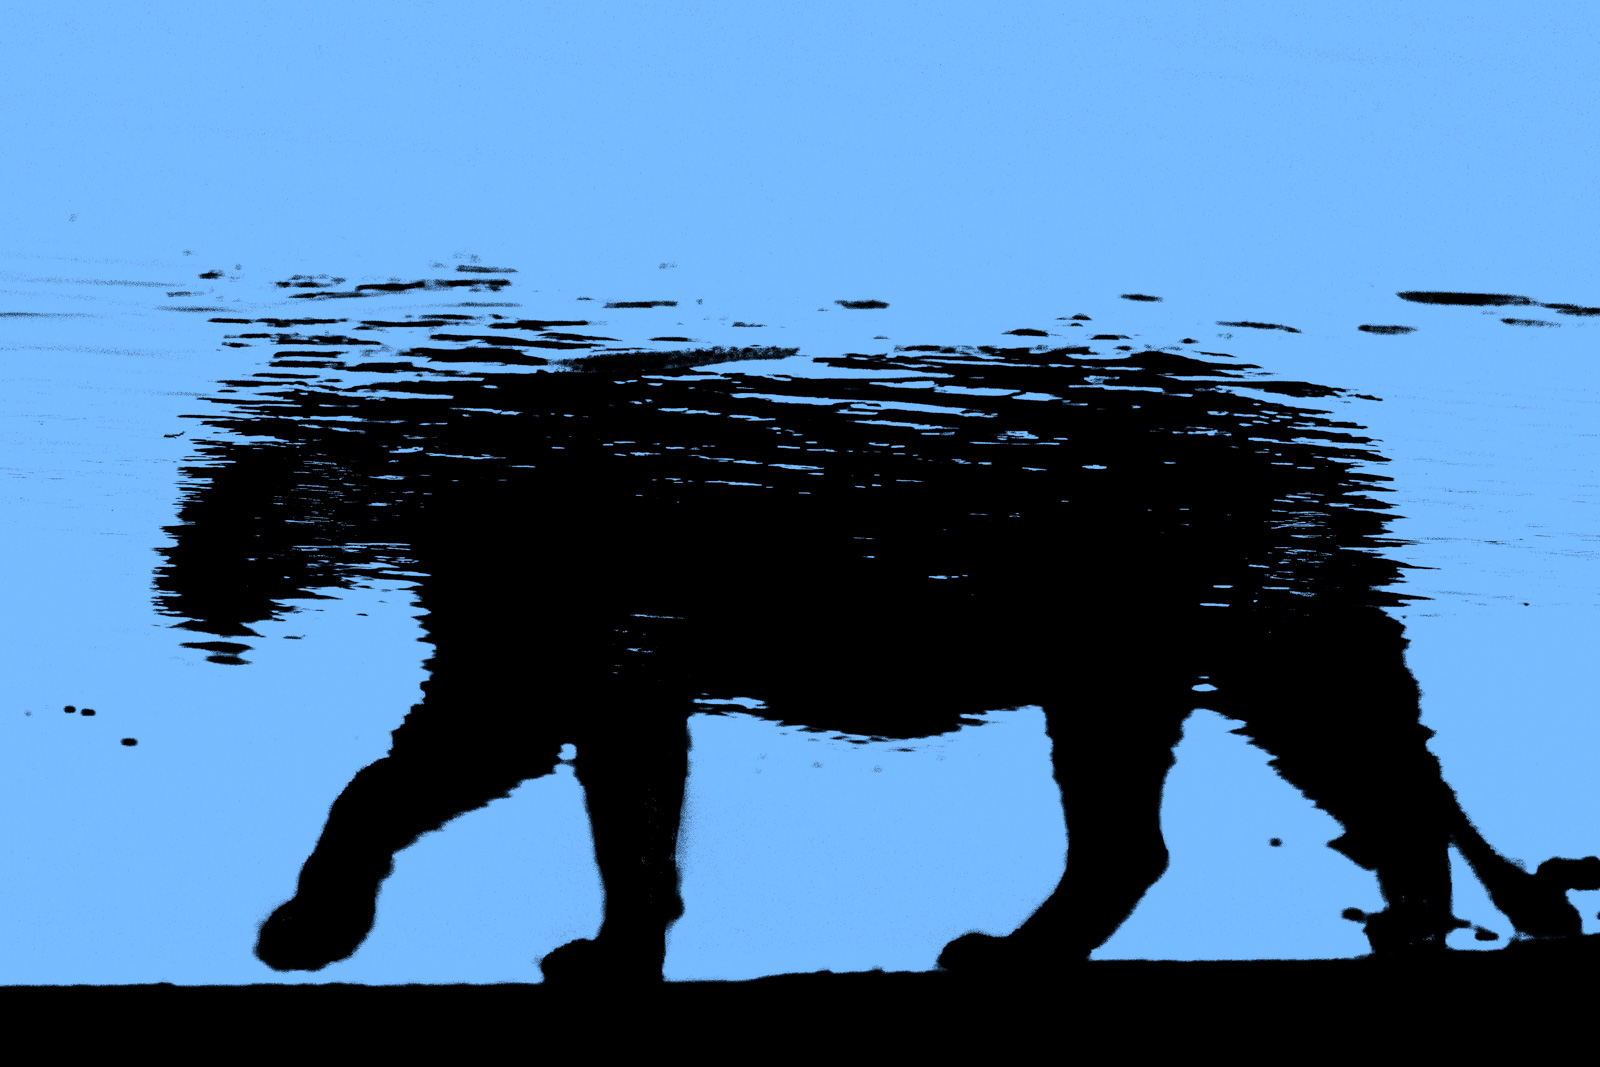
For example, with an elephant silhouette such as the one below, including a lot of the surroundings has given a new perspective to an otherwise generic silhouette.

This leopard shot is another example of including the surroundings to add story to the frame. It just makes the entire scene that much more meaningful and telling.

2. Use the foreground
This is a go-to approach for me. It helps to add a bit of intrigue and mystery to an otherwise normal or drab frame. By positioning my shot in this way, I can use some foreground object (close to me, but far from the subject to render it a blur), to actually block some of the subject.
This requires a lot of trial and error but, when it works for you, it really sets up an impressive shot. Once you get a hang of it, you will start seeing a lot of opportunities to try this. Be it snow, grass, sand, or bush, anything can help and add value.

3. Use natural elements
This point slightly ties back to planning. But even if you haven’t planned for it, if you ever encounter situations where you can predict rain, snow, dust, fire, or any other natural phenomenon, you should ensure you take full advantage of this by shooting during these times.
They say that bad weather is the best weather for a photographer. Take a look at the image below, shot in extremely dusty conditions, and remember that with dust, shooting into the light makes a world of difference.

7. Using your shutter creatively
We often limit our use of shutter to the fastest speed possible when photographing wildlife. While that’s a good general rule, more often than not, creativity comes with slower shutter speeds. Another unofficial rule is that your subject must be sharp.
I would recommend breaking both of these rules. Use slow shutters and don’t always go for a sharp subject. Take a look at the image of flamingos below.
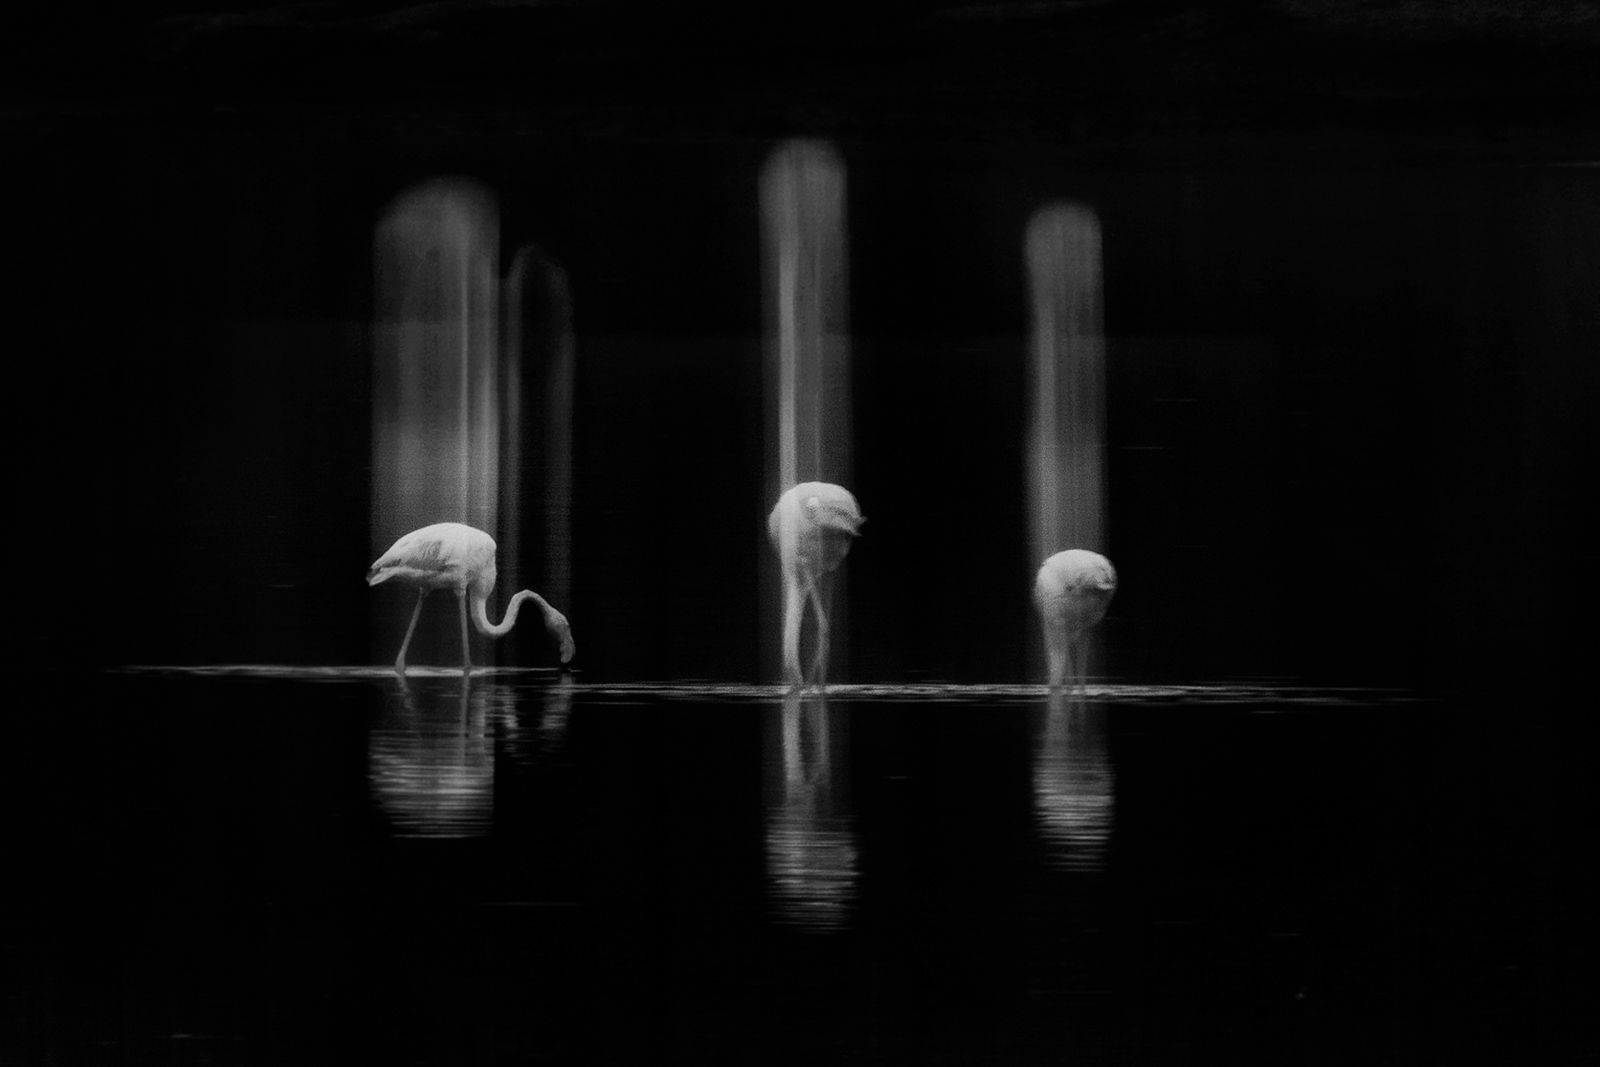
I deliberately shot at a very slow shutter speed, and moved the camera towards the end of the exposure in this image. The result is that I didn’t end up with a standard sharp image, but with an image that tells a story the way I want it to.
This technique is easily doable while on safari, and I urge you to give it a go next time you go out on a game drive.
Read more on creating movement in wildlife photography.
8. Using color tones (or a lack of them)
Whenever we get our hands on a new camera, we often test the color rendition and check how many millions of colors it can render precisely. However, when it comes to creative photography, I most often utilise monotone scenes, or scenes dominated by a single (or at most dual) tone (for example, black and white).
When I started teaching the basics of photography, I always kept white balance as something that is optional to change in the field. I would just emphasize the fact that, as long as you are shooting the image in RAW format, white balance is something that can be taken care of later.
Lately though, I have started to experiment a lot with white balance in the field. The below image of a lioness is an example of this.
This image could have been made with a warmer white balance, and I believe I would have kept it at that white balance, even while processing. But then I would have never got this image! I wouldn’t know the possibilities unless I tried in the field.
So, going forward, keep an eye on the white balance- not only for warm silhouettes, but cooler tones as well.
Many of my photographs featured in this guide are black and white. This is a medium that I rely heavily on these days. If you have an image that is rich in character, in terms of shadows and contrast or natural elements, there is a chance that the black and white medium will work well.
Black and white images help to convey emotions more clearly. At least, that’s my feeling.

In conclusion
I have discussed some tips and techniques that I use in the field on safari on a day to day basis. I hope you gained something from this. Please comment below any questions or thoughts that you have about creative wildlife photography.


