The Art of Minimalist Wildlife Photography

When I started taking pictures of wildlife some 35 years ago (am I really that old?), natural history photography, as it was typically referred to, was still much more of a science than an art form. This came from a long tradition of using the camera as a recording device and as such there was an emphasis on capturing all the important features of any given species in as much detail as possible. As someone who came into photography as a birdwatcher, my initial aims were of a similar vein of simply recording the birds that I saw. And with the limitations of a 70-210mm telephoto many of my early bird images were taken at the nest, often using twin flash units with an aperture of f/16 to get everything as sharp as possible. I bet there are virtually no images taken using this method now!

But as with most aspects of life, things ‘progress’ and the styles of wildlife photography are ever changing as equipment and techniques improve and become ever more innovative. One of the biggest ‘early’ changes for me was the acquisition of a longer telephoto lens. Not only did this allow me to photograph birds from a greater distance away from their nest sites, but it changed the look of my images due to the more limited depth of field afforded by the longer focal length. At this time (early 1980’s) styles were beginning to change as a result of photographers owning longer telephotos and more artistic images were being produced by the likes of Laurie Campbell, one of the great innovators and inspirational wildlife photographers of this period.


It was Laurie’s work in particular that first introduced me to the concept of out of focus backgrounds and foregrounds, a technique that is commonplace now but at the time was a very new approach. This is of course a consequence of the shallow depth of focus that results from using a 300m or longer lens set at a wide aperture setting. Unlike our eyes, the laws of physics limit photographic lenses so that only parts of the subject are in focus for any given focal length, aperture and shooting distance (between the camera and subject). This can be a limiting factor in some situations but it can also be used to great effect to create images that are much more pictorial or minimalist.

Using Aperture and Distance
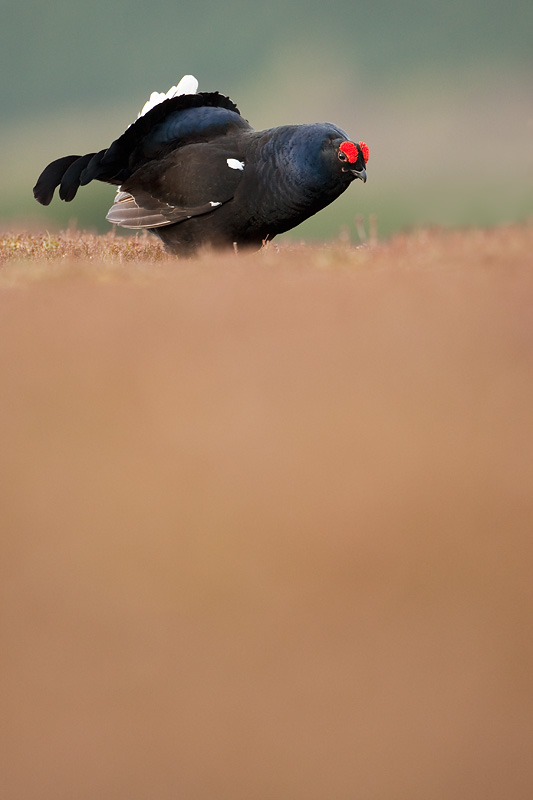
The technique of selective focus whereby only part of the subject, most typically the eye and head, is sharp and everything else is blown out of focus is very striking – albeit not to everyone’s tastes – as it places greater emphasis on the subject’s most important features. It’s an easy technique to employ if you’re using a telephoto lens of 300mm or longer assuming that you can get close enough to your subject. Being close is a crucial aspect of the technique, as you won’t get the same effect if you use a telephoto from longer range because more of the surroundings will be recorded in focus (although there are exceptions to this as discussed below). Aim to get close so that the subject occupies a reasonable part of the frame and set the aperture to the widest setting possible for the lens you’re using. This is most easily done in aperture priority (Av) or Manual (M) mode.
Further Reading: “How to Create a Beautiful Bokeh“
As a consequence of the close shooting distance and wide aperture, depth of field is reduced to just a few centimetres or even less if you’re shooting macro subjects, so precise focusing is important. Concentrate on keeping the eye sharp by using either One / Single Shot (for static subjects) or Servo / continuous focus (moving subjects) mode. Selecting a single focus point will help to ensure that accurate focus is maintained on the eye of the subject as opposed to a cluster or auto focusing point selection. To aid composition, select a focusing point that is off-centre to allow you to place the subject away from the centre of the frame. Composing with the subject on one of the ‘thirds’ within the frame works well, leaving plenty of space in front of the subject.
Shooting subjects off the ground such as perched birds using this technique will result in a muted out of focus background assuming that the background is distant. For small passerines, such as a robin-sized bird, this need only be 5-10m because you’ll inevitably be working at a close shooting distance (in order to capture the subject at a reasonable size in the frame) but for larger subjects (which will need to be shot from a greater distance) the background needs to be much further behind the subject to generate the same out of focus result. Consequently, it’s important to choose a situation that affords a distant background to achieve the desired effect for any given subject.

To a large extent the background for this style of photograph is more important than the subject itself and so it’s worth getting this right and / or looking at ways to optimise it for the best results. Any manner of background can be effective – skies, water, snow, grass or anything that is far enough away to be blown completely out of focus. The background also needs to complement the subject rather than vie for attention so the plainer the better usually with an avoidance of hot spots or unsightly distractions.
Further Reading: “The Importance of Backgrounds” and “Choosing the Best Foreground and Background“
In addition to defocused backgrounds, also consider the foreground as this can be used in exactly the same way to create a coloured ‘mush’ at the bottom of the frame. This really adds to the selective focus technique with the sharp subject sandwiched between two out of focus bands of similar or contrasting colours. The best way to generate out of focus foregrounds is to shoot from a very low angle as this brings the foreground much closer to the camera, thereby accentuating the effect. It also helps generate a more distant out of focus background. If your tripod doesn’t have a centre column then splay the legs completely and lay it flat to the ground for low level shooting. Alternatively, use a bean bag or even rest the camera/lens directly on the ground for an ultra low perspective. This is tough on the neck and back so you may prefer to use an angle finder to make things more comfortable. Waterproof outer clothing is also recommended!

Uncluttered Settings
Minimalist wildlife images are not exclusively confined to this kind of selective focusing technique and a similar result can also be achieved by photographing the subject in an uncluttered setting. This is possible when shooting in snow for example but can also be done for subjects on water or when photographed against the sky. In these situations the extent of focus (or more specifically lack of focus) is not the discerning factor in terms of the success of the shot, but rather the inherent simplicity of the subject’s surroundings. And because you are not as reliant on the physical limitations of your lens / aperture / shooting distance to create the desired effect, this means you can be even more creative with your compositions.

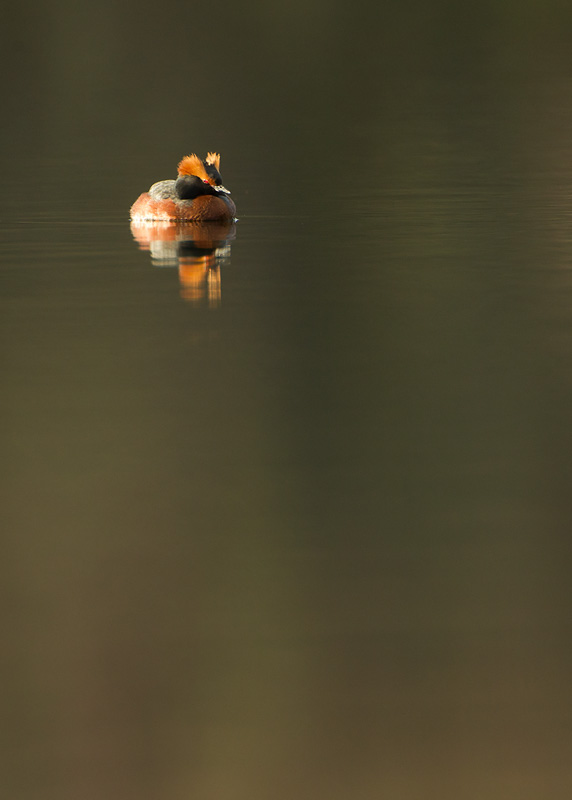
Scenarios that allow you to shoot your subject in a pristine uncluttered setting without distractions don’t present themselves too often, but when the opportunity arises it’s well worth grasping – and experimenting with! Snow is a favourite ‘medium’ to work with as this is the purest form of this minimalist approach, but calm coloured water is a good second. It is also possible to create a very dark or black ‘neutral’ background by shooting a well lit subject against a strongly shaded background and underexposing slightly. These kinds of situations allow you to use ‘negative’ empty space as a compositional aid, whereby the subject need only be very small in the frame but still maintain it’s strength as a focal point. Because there are no distractions, the subject will still dominate the picture space regardless of its size in the frame.

Where it’s more difficult to create this kind of simple image, you may want to experiment with a high key approach instead. The idea here is to over-expose the shot slightly so that the brightest parts of the scene are blown out with little or no detail recorded. It’s best done against an already bright background such as the sky or water and setting an exposure that records the subject as light as possible without losing (too much) detail. White birds such as gulls or terns in flight would work well for example when photographed against a plain white or pale sky. Similarly swans on ‘white’ water could be used to create an effective high key minimalist image.

These aren’t the only ways to create minimalist wildlife images and it should be said that the background / surroundings don’t necessarily have to be completely uniform in colour, or indeed provide no indication of the surroundings. The key though is simplicity and effective use of only one or two elements or shades of colour to compliment the subject. This together with a carefully crafted composition and good use of lighting is a great starting point. After that it’s down to your imagination and creative juices!