
7 Best Places for Photography in the Grand Circle, USA

Nothing can prepare you for the number of photographic opportunities within all the different locations that the Grand Circle in the USA has to offer. The first time I visited, I was completely blown away. I have now visited various parts of the Grand Circle 11 times and, even now, I am still humbled at the variety and vastness of what in my opinion is one of the most scenic regions of not only the USA but the whole world.
Most trips to the Grand Circle start by flying into Las Vegas. I must admit it’s not my cup of tea, but it’s always worth a look – especially some of the fabulous hotels, restaurants, and the night life. I normally fly into Vegas, stay overnight in one of the small motels and then get an early start in the morning when I’m refreshed after a good night’s sleep.


Buying a National Parks pass is a great idea and will save you many dollars, as most of the Grand Circle locations are composed of National Parks. The cost of a pass at the time of writing this article is $80, but trust me it’s well worth it and lasts for 12 months.
Let’s take a look at this landscape photography guide to the Grand Circle in the USA.
Find a photography tour in the USA: Browse the Nature TTL Hub
1. Death Valley National Park
The distance from Las Vegas to Death Valley is approximately 150 miles and a little over 2 hours by car. Obviously, it all depends on what time of year you intend to do the Grand Circle, but do not under estimate the heat and temperature of Death Valley. Take plenty of water with you and get there as early as you can.
This location is best photographed during early morning or late afternoon, purely because of the heat. If you go during any of the cooler months then any time of day will be good, but keeping hydrated is always essential.
You can spend at least a couple of days in the park photographing the numerous locations, but the following 4 hotspots are my favourites.
Dante’s View
The best view you can get showing the scale of Death Valley is from Dante’s View.

There is a viewing platform by the car park which gives you a fabulous view over the valley, but you can get better views if you walk along the obvious promontory where there are different rock formations and wild flowers giving you some fabulous foreground interest. A wide-angle lens is essential.
Devils Speedway
Drive back down the hill along Dante’s View Road to Badwater Road and turn left towards the Devils Speedway which is signposted and on the left.
The salt pan is noted as the lowest point in North America at 282 feet below sea level. I just love taking images of the shapes the crystallised salt makes.

Be careful walking amongst these fabulous formations as they are very fragile. They have been there for hundreds of years and can be lethal if you slip on them.
When you have filled a couple of memory cards, return to your car and drive along Badwater Road towards Furnace Creek. Do not under estimate the length of this road: it’s a 30 to 40 mile long road but goes straight past your next location which is Artists Palette.
Artists Palette
Continue to drive along Badwater Road until you come to a sign for Artists Drive. It’s not a long drive but well worth the trip. Along this road you will come to one of the most colourful regions Death Valley has to offer. These rock formations have every colour of the rainbow.

Don’t be frightened to walk amongst them. There are several little paths that take you into the colourful rocks that are quite breathtaking, especially in the late afternoon sun when the colours come alive.
Mesquite Flat Sand Dunes
For me this is one of the highlights of Death Valley, and whenever I’m in this region I always pay them a visit. They are located just outside Stovepipe Wells.
This is a great little location where you can take on board some refreshment, petrol, and overnight accommodation. This place is hot – very hot – so take plenty of water with you if you intend to walk out onto the dunes.

The best time to go is early in the morning when overnight breezes have wiped away the previous day’s footprints. If you can get a great cloud formation and get to the spine of one of the dunes then click away.
There are hundreds of dunes, all different shapes and sizes but they are all extremely difficult to climb – you’ll find you go up three steps only to slide down two, so it’s very tiring out there.
Don’t go too far out amongst the dunes, and always remember you have to get back – in the heat it can be quite exhausting.
The image above shows the sand formations that can be formed with the wind, and the peaks that can be formed on top of the dune.
2. Zion National Park
The distance between Death Valley and Zion National Park is around 290 miles, which is about a 5 hour drive. You will need to drive east and skirt around Las Vegas, so you could stop in if that is your scene.
Zion has got to be one of the prettiest national parks in all of the USA and definitely worth including in my Grand Circle landscape photography guide.
Angels Landing
I have hiked in many parts of the world, but the hike to the top of Angels Landing has got to be in my top three. This is a fabulous walk, but it’s not for the faint-hearted. If you have a head for heights then this is the hike for you.
It’s about a 5 mile round trip hike and the views when you are on the summit are absolutely stunning.
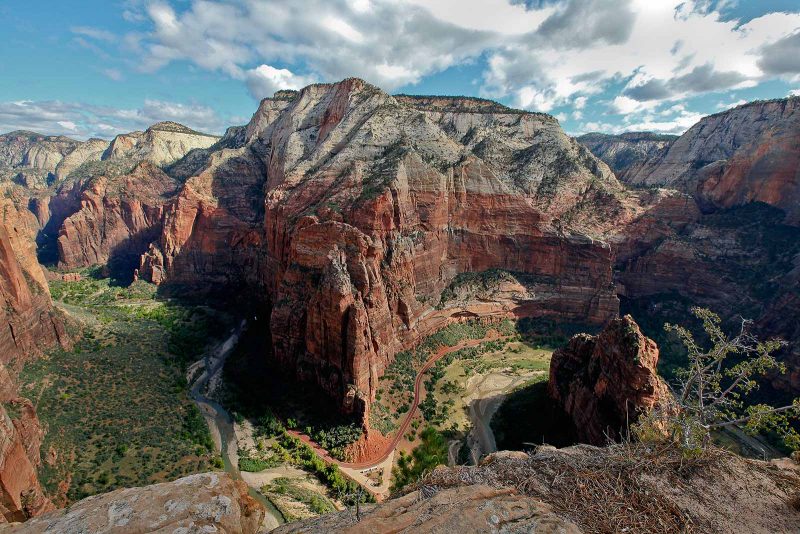
The chains you can see are dotted throughout the whole climb and are there for your own safety, so use them. People have been known to fall off this hike every year so it is important to be careful.
Here you can see the chains that you can use to assist you as well as the spine of the walk, which is where the name Angels Landing comes from. It was thought that only Angels would be able to get to the summit and that the spine was impossible to navigate.

Court of the Patriarchs
On your return from Angels Landing you will eventually come back to the river and bridge where you started your Angels Landing hike. I’m not expecting you to do these walks one after another, but it’s just a reference point to the start of your next photographic location.
The best way of getting to the Court is by the park’s shuttle bus. This is a free service that the park provides and is included in the pass fee for the day. It’s a great way of getting around Zion and, in some instances, it’s the only means of transport. The driver will give you some great information about the day’s activities, current walking conditions, and what trails are open or shut.
The Court of the Patriarchs is a set of sandstone cliffs and is named after the biblical figures Abraham, Isaac, and Jacob.

You can almost take this image from where the shuttle bus will drop you off, but I prefer to walk towards them on a small path that will eventually come to the Virgin River. If you look to the left you will see a large weir that makes for a great lead-in line for the shot.

I don’t want you to think there are only two locations in Zion National Park worthy of this article, as there are many such locations. It’s just we have many more National Parks to visit on our Grand Circle tour!
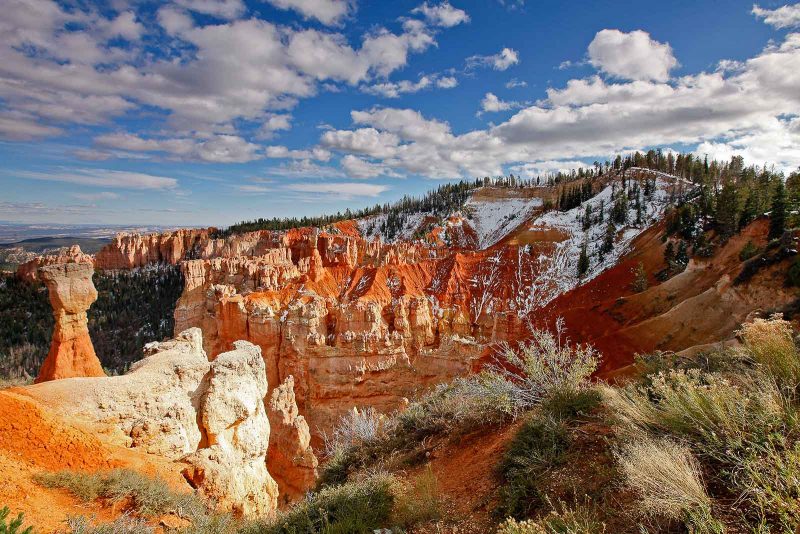
3. Bryce Canyon
Our next location is Bryce Canyon. It’s about 73 miles from Zion and a driving time of about 1 hour 20 minutes. The first time I saw Bryce Canyon I thought I was on another planet, and why this is not one of “The Wonders of the World” I’ll never know.
You can take your car along the scenic route which is well over 50 miles long with several stop-offs along the way. Each stop-off has its own parking area with viewing galleries overlooking the spectacle of each location. Fairyland Canyon is a perfect example of viewing down into the canyon.

You can also walk either along the rim to several of these viewing points or walk down amongst the Pinnacles via the Navajo Loop Queens Garden Trail. Bryce Canyon is perfect to get either a sunrise or sunset shot at Sunrise Point.

This location is also perfect for a winter shoot due to its elevation. The snow against the orange rock formations can look spectacular, so never write off going to this location in the winter months. In fact, we have visited this area in September when snow had already fallen.
4. Capitol Reef
The distance to Capitol Reef from Bryce is about 114 miles and a driving time of a little over 2 hours. The National Park is approximately 60 miles long and 6 miles wide and is famous for its desert landscape and rock formations.
Due to the colour of the rocks, it is best photographed at sunrise or sunset which really brings out the rich reds and oranges these mountains are famous for.

Hickman Bridge
Capitol Reef is also famous for rock arches; one of the most famous and photographed is Hickman Bridge.

It’s a large, elegant natural arc in a scenic side canyon far above the Freemont River. It’s best photographed around midday to avoid lots of strong shadows that can spoil your image.
Historic Fruita
My last choice for Capitol Reef would be Historic Fruita. There are lots of choices here for your composition: barns, mountains, rivers, and trees. Don’t forget to buy a fruit pie at the Gifford Homestead – they are delicious!

5. Arches National Park
The distance to Arches NP from Capitol Reef is about 130 miles and a driving time of about 2 hours. This is a huge national park and contains the highest density of natural arches in the world.
The best place for accommodation is in Moab, which is just a few miles outside the park. It has plenty of different types of accommodation which will suit all budgets, and there are plenty of things to do from rafting to high performance 4 x 4 trips.
It is well worth spending a few days here. But where do you begin photographing Arches National Park? Here are my favourite spots.
Delicate Arch
The most famous Arch in the park has got to be Delicate Arch. It’s about a 3.2 mile round trip – it’s a safe hike, and the view when the arch comes suddenly upon you is quite spectacular.
You can take this image at any time of day but you won’t be alone. Sunset or sunrise would perhaps be the best times for two reasons: it will be less crowded and the golden hour will bring out the colour of the arch.
Photographing the arch at night is also a good option, especially with the Milky Way on view, but you need to get permission from the park rangers.

Double Arch
This is quite a beautiful double arch, and part of a larger group called the Parade of the Elephants. It’s caused by erosion from above, rather than the side like others in the park.

There are no guard rails or fences to prevent visitors exploring and getting up close, but you have to be careful. Your image can look great up close, underneath, or from a long way away.
Look for boulders at the bottom of the arch as these make great foreground interest material, and try and take the image early in the morning when the sun lights up the arch.
Balanced Rock
Although not an arch, Balanced Rock is one of the most photographed features in the park. Considering the size, the 50 ft boulder is delicately balanced on top of a 75 ft pedestal.

For me, it is best photographed from a distance with any of a number of different foregrounds. With the rock being out in the open you can always get the light right because you can walk around the whole structure. However, the closer you get the more difficult it becomes without getting those converging lines.
If you walk just a little way north there are some colourful cacti, and when visiting in May they can be quite beautiful.
6. Valley of the Gods and Monument Valley
The distance to the Valley of the Gods from Arches National Park is about 130 miles and a driving time of about 2 hours and 40 minutes. It’s just a few miles down the valley road to Monument Valley, so I have grouped these two together.
I have photographed all over the world, but I must say this area is up there with the best (especially Monument Valley).
Valley of the Gods
This is on a 17 mile dirt road close to a little town called Mexican Hat. It’s easy to see why this town is called this as there is a rock structure that can be seen from miles away that looks just like a ‘Mexican Hat’.
Just beyond the town there is a road off to the right down a dip in the road. Follow this dirt road for 17 miles and you’ll drive along one of the most photogenic areas in the whole of the west. Structures like these are everywhere with colourful flowers dotted along the road.
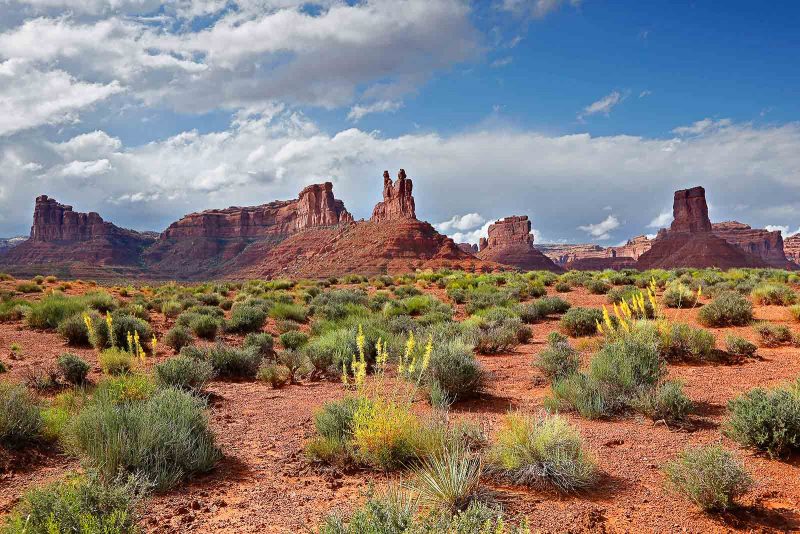
There are multiple stop-offs along the whole stretch, so you won’t have a problem in getting that perfect composition. The only thing you have to be careful of is that there are a few gullies that can flood after stormy weather, so just watch the weather forecast.
Monument Valley
The distance to Monument Valley from Arches NP is about 160 miles and a driving time of about 3 hours. For me, this is one of the highlights of the Grand Circle.
You can stay in one of two accommodations: ‘Goulding’s Lodge’ or ‘The View’. I prefer The View as every room is overlooking Monument Valley.
The question is how you drive along the 17-mile dirt road. You can either book one of the many trips that the Navajo provide, or take your own car at your own risk. I have done both on several occasions.
Your National Parks pass will not be accepted here as this is on Navajo tribal land, so you will have to pay a nominal fee for access – it’s around 10 dollars, but this will allow you access over a three-day period.

When you drive along the Monument Valley dirt road there are vistas in every direction. There are stop-offs everywhere so don’t be concerned for stopping if you see a classic shot you want to take.
As with all the parks that contain the ‘red rock’ that Utah and Arizona are famous for, doing the trip early in the morning or late afternoon is best for light as well as beating the crowds.
The classic shot you have to take is the Mittens. This can be taken from the car park so you don’t have to even venture out onto the dirt road to get it.

I was staying at The View hotel on one occasion and was woken up by an unbelievable thunderstorm. The beauty of this hotel is that everyone has a balcony overlooking the valley, so you could set your gear set-up without fear of a drenching.
I had never managed to capture a lightning strike before, but they were happening that often that I thought “today might be the day.”
Learn more: How to Photograph Lightning – The Complete Guide

When you take to the dirt road, don’t drive past John Ford Point. This is another highlight of the trip. I stopped here on my first trip and was busily taking images of The Point. Then, a Navajo Indian came over and said for a couple of dollars I could take his photograph. I jumped at the chance.
So, he got his horse and rode right out onto the point and just sat there with the rock formations behind him. A location and photography shoot that will live with me for a long time to come.

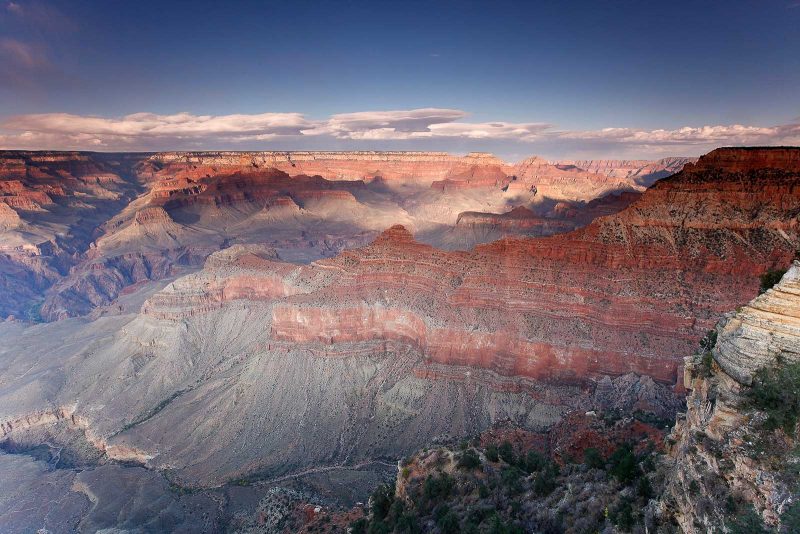
7. Grand Canyon National Park
The distance to Grand Canyon from Monument Valley is about 182 miles and a driving time of about 3 hours and 18 minutes. There are two rims you can visit when it comes to the Grand Canyon: the North and South Rims. These timings are for getting to the South Rim.
This place is just mind-blowing, and when you see it for the first time it really does take your breath away. There is no need to worry about what time of day you visit as there are overlooks that suit sunrises, sunsets, or just at midday.
The Grand Canyon has it all. As you can see from the ‘Desert View’ location, the sheer vastness and scale of the canyon is unbelievable, and couple this with the rock colour to get a winner.

I moved towards the ‘Pipe Creek’ location for a great sunset shot, but it could be one of the many locations dotted along the rim drive you can take at sunset. I have only listed a couple of Grand Canyon locations, but trust me there are many trails you can take as well as drives along this very impressive, photogenic route.
In conclusion
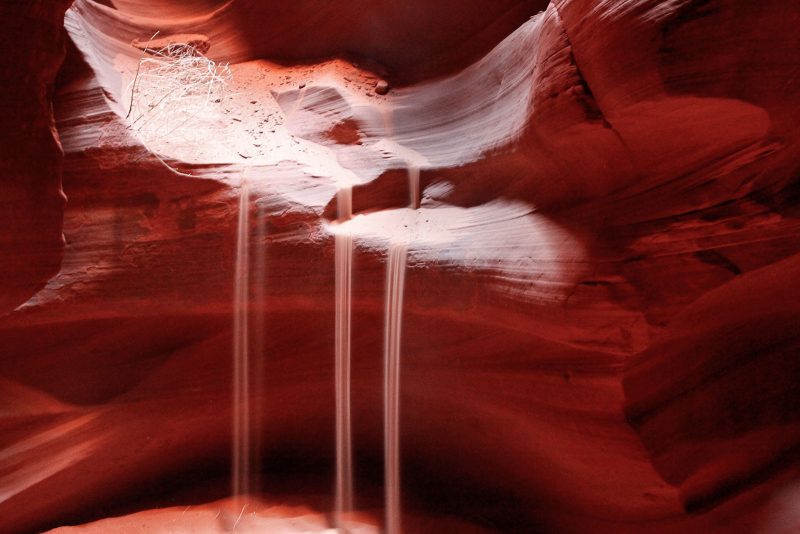
The Grand Circle has got to be one of the best photographic regions the USA has to offer. I have only listed 7 stunning locations in this article but there are many more within the Grand Circle that could be listed. Places such as Antelope Canyon and Horseshoe Bend near Page Arizona could easily be included here.

Dead Horse State Park in Utah is another classic that you must visit whilst on your trip. All locations are well worth taking your time with. Take plenty of SD cards and batteries because, trust me, you’re in for the trip of a lifetime.

Find a photography tour in the USA: Browse the Nature TTL Hub


