
How to Photograph Solar Eclipses

Of all astronomical events, total solar eclipses are probably the most spectacular. During a total solar eclipse the Earth, Moon, and Sun are so perfectly aligned that the Moon passes right between the Sun and our planet.
In a very happy coincidence, the distance between the Sun and the Earth is about 400 times the distance from our natural satellite to us, and the Sun is around 400 times larger in diameter than the Moon. That makes the Moon and the Sun have almost the same apparent diameter in the sky (around half a degree).
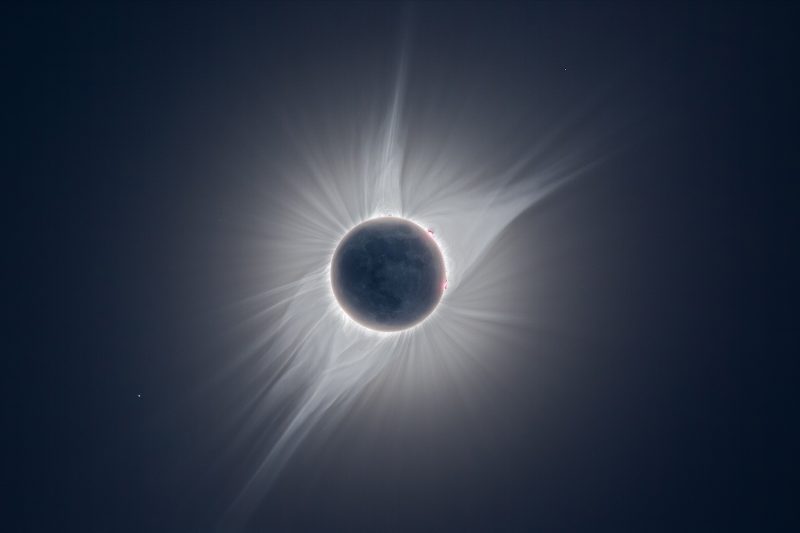
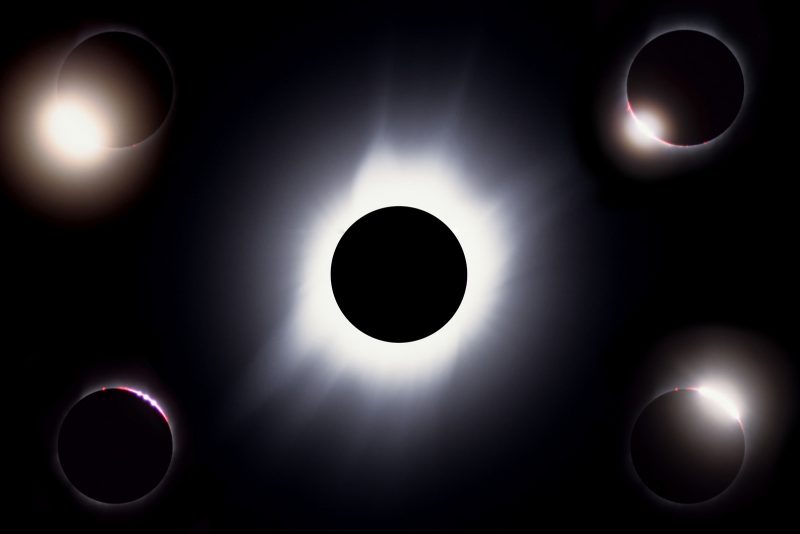
During this perfect alignment, the Moon will cover the disk of the Sun. When that happens, the solar corona (the outermost layer of the solar atmosphere) becomes visible around the dark disk of the Moon. For me, that’s the most beautiful sight in nature.

Cameras for solar eclipse photography
For specific pieces of equipment one eclipse photography, I will mention make my recommendations throughout the article as we cover the different areas. One thing is common, though: the camera. Any camera with interchangeable lenses is great for eclipse photography.
There is plenty of light to work with, so you’re not looking for cameras that perform well in lowlight conditions like you do for other genres of astrophotography. For wide-angle views during totality, you can even use smartphones or point and shoot cameras.

A cable release is also very useful, especially for total eclipses. Solar eclipse photography can be done handheld, to some measure, but a good tripod is highly recommended.
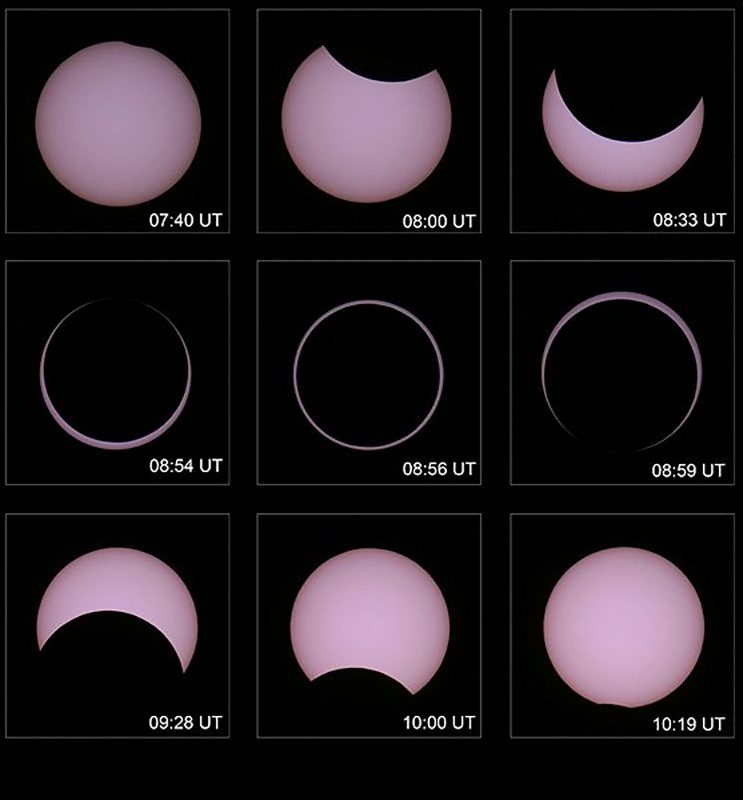
Partial solar eclipses
Every total solar eclipse will have a partial phase. Of course, there are solar eclipses that are only partial and don’t have a total phase visible from Earth’s surface. Also, any total solar eclipse will only be seen as a partial one when viewed from outside of the totality band.
When shooting the partially eclipsed Sun, you need proper filtration in front of the lens. By proper filtration, I mean solar filters.
Read more: How to Make a Solar Eclipse Filter for a Telephoto Lens
If partiality happens at sunrise or sunset, and you have a thin layer of clouds in the sky, you can photograph the Sun without using filters just like you would be photographing a normal sunrise or sunset. But be very careful with exposure times so that you don’t damage your sensor.
Never look directly at the partially eclipsed Sun through the viewfinder of your camera – even if it is very, very low in the sky. I can’t suggest a safe exposure time to use in such circumstances as that is affected by the presence of clouds in the sky close to the horizon.

Solar filters are cheap and there is absolutely no reason for not getting one. Baader makes some wonderful foil filters that can be cut to your needs and mounted in front of any lens or telescope. One thing to remember about solar filters: always attach them in front of the lens and never between the lens/telescope and the camera.
If you want a glass or polymer filter (these usually come mounted in a fixture that fits in front of your lens/telescope), look for a company called Thousand Oaks. Baader foil will render a white-blueish Sun, while these filters made by Thousand Oaks will offer warmer tones.
You need a telephoto lens to shoot partial solar eclipses. A 200mm is a good start, but a telescope with a focal length of around one meter is even better. As a starting point for your exposure, try 1/500th at f/8 and ISO 100 if using a visual solar filter in front of your lens, or 1/4000th at f/8 if using a photographic solar filter. Photographic solar filters are not safe for visual observations of the eclipse, but it is totally safe for photography.
As a fun fact, you can create images of the partially eclipsed Sun using only a pinhole. If you forgot to make one, you can just improvise one using your fingers and then photograph the image with your smartphone.

Annular solar eclipses
During annular solar eclipses, the Moon is a bit too far away to be able to cover the whole disk of the Sun and our star will still be visible as a very thin ring surrounding the black disk of the Moon.
In terms of photography, treat annular solar eclipses the same way as you would partial solar eclipses. You will need to keep your solar filter on for the whole duration of the eclipse.
Annular solar eclipses are especially interesting to photograph when they happen at sunrise or sunset. I am still to photograph such an event.
Wide-angle total solar eclipse photography
I’ve seen a few total solar eclipses, but I never stop being amazed by the colour of the sky and the way the landscape is lit during the total phase. Wide-angle photos shot during totality will show some of that, even though I believe they don’t come close to the real thing.
You must have a solar filter in front of your lens during the partial phases, but during totality the filters must come off.
If totality happens at noon, and the Sun is very high in the sky, you might need a 17mm lens to capture both the landscape and the eclipsed Sun. If totality happens after sunrise or before sunset, a 200mm lens (or even a 400mm one) will be the right choice. Simulate the aspect of the sky during totality and choose the right focal length for your wide-angle shots. You can make the simulation in a free planetarium software like Stellarium.
But, no matter the height of the eclipsed Sun, there is one lens that I love using during totality: a circular fisheye. Photographing those amazing gradients in the sky is just mind blowing. When shooting with the fisheye, I recommend pointing the camera straight up. Here are recommended lenses for Nikon and Canon cameras.

I’m usually using two cameras for wide-angle photos during totality. One is on a fixed tripod and has a circular fisheye lens on. Another camera has a wide-angle zoom mounted (usually a Canon 17-40mm f/4L) and is on a tripod that I move around, taking a few shots of the landscape and of people looking up.

I set the focus and focal length (if I’m using a zoom lens) way before totality starts and tape down both the focusing and the zoom rings on my lenses. I select an aperture of f/5.6, an exposure time of 1 second, and an ISO of 100. The cable release is mandatory. Using the 2 second interval timer built-in into the camera is not an option, and just wastes precious time.
Photographing totality at longer focal lengths
Wide-angle shots are great for showing the colour of the sky and general atmosphere during the eclipse, but if you want to see any details in the solar corona then you need to get close. 200mm would be a minimum. I believe the ideal focal length for shooting totality is between 400mm and 800mm.
I use a Pentax 75SDHF telescope for this purpose. It’s a light and portable refractor with an aperture of 75mm and a focal length of 500mm. As in any other kind of astrophotography, I like being very mobile and I don’t pack a lot of gear. I especially recommend this for solar eclipse photography as you might need to change location at the last moment because of weather.

Don’t forget to remove filters 30 to 40 seconds before totality. It’s useful to have audible alarms to remind you of this.
Baily’s beads
A few seconds before totality, Baily’s beads appear. This is an effect produced by sun rays passing through narrow valleys between the mountains on the lunar limb.
Baily’s beads continuously change their appearance, and shooting in burst mode is recommended. Also, be alert for the diamond ring.

Right at the beginning of totality you will be able to see the chromosphere – a layer of the Solar atmosphere. It’s visible for around 10 seconds after second contact and 10 seconds before third contact. Very short exposures (1/1000th to 1/4000th) are needed both for Baily’s beads and the chromosphere.

Solar prominences
During totality, you might see prominences. Solar prominences are huge clouds of plasma shooting from the Sun’s chromosphere. Compared to the solar corona (which extends a few solar diameters into space), prominences are quite small.
A longer focal length will be needed to better show the prominences: think about using a 2000mm telescope for that. To keep it compact, a Maksutov design is a good choice – but you will still be able to get beautiful shots of prominences by using the same lens/telescope that you use for shooting the corona.

Solar corona
Photographing the solar corona in all its glory is no easy task because its dynamic range is out of this world. You will need to take photos with pretty much all exposure times available on your camera in order to assemble a beautiful HDR image of the corona after the eclipse. Short exposure times (1/4000th) will reveal the brighter part of the solar corona, close to the solar disk, while longer exposures (up to a few seconds) will show faint streamers in the corona that are a few solar radii in length.
If you want to make a high dynamic range image of the corona, you can use software like Photomatix Pro. It will deliver more than decent results. If you really want to bring out lots of details in the corona, read the article “Eclipse Photography in the Digital Age” by Gerald L. Pellett from the January 1998 issue of the American astronomy magazine Sky & Telescope. It’s at page 117. You might say it’s an old article, but the techniques described there have not changed.
That’s what I use for processing my high dynamic range photos of the Solar corona. Everything is done in Adobe Photoshop and it involves merging multiple images with some rotational blur applied. It’s not an easy technique, but the results are better than just using HDR software.
After totality
When totality ends, everything that happened in the beginning happens in reverse order. First, the chromosphere appears for a few seconds, and then you get the diamond ring and Baily’s beads. Then, totality is over.
Just don’t forget to put that solar filter back on the front of your lens afterwards.
It will be very tough to photograph everything that happens during those few minutes of totality. Especially if you want to shoot both wide-angle shots and telescopic/telephoto views. That’s why I suggest automating your shooting process at the longer focal lengths.
This can be done by placing your telephoto/telescope on a star tracker and connecting your camera to a laptop. There are softwares that can take care of your shots. If you have a Mac, use Xavier Jubier’s Solar Eclipse Maestro. If you are a Windows user, get Eclipse Orchestrator. Both softwares will need a bit of programming on your side, but nothing too difficult. Test the scripts over and over again until everything works as planned.
Total solar eclipse photography involves a lot of planning, and I recommend not skipping any steps before the actual event. Rehearse everything.

Future eclipses
If you want to make plans for future eclipses, there is a great schedule of all eclipses until 2030 on this website.
In the near future, probably the most accessible total solar eclipse will happen on April 8, 2024 and will be visible from Mexico, the USA, and Canada.
I will say this whenever I am writing or talking about total solar eclipse photography: be sure to look at the totally eclipse sun! If during totality your shooting setup goes wrong, just forget about the gear. Don’t try to reset your camera and make it work; don’t try to refocus your telescope; don’t reboot your computer. Just forget about photographing the eclipse. Look at it and enjoy it.
Clear skies!


