
Making and Photographing Crystals With a Microscope
The last few years have been challenging, with many people stuck indoors more than they’d like. I spent the first year of the pandemic battling nightmares about being in beautiful places but unable to photograph. Then I bought a microscope and learnt how to photograph crystals.
It took me on a journey to places I wouldn’t have believed one could go. In addition to saving my sanity, it became a passion that draws me back in often, even as travel restrictions lift and the world clambers back to a semblance of normality.


In this article, I’ll explain what you need to make the sort of microscope photographs we’ll reference, starting with the fundamental requirements for your microscope. I’ll also explain what you need to create and prepare your specimens.
The main focus is crystals which we will sandwich between two polariser filters to bring out various colours. I’ll also share some of the many subjects I’ve found to photograph, which are limited only by time and imagination.
Buying a microscope
Let’s first look at the most basic microscope that you’ll need for this sort of work, and what I would buy now from what I’ve learned since buying my microscope and upgrading several components.

My microscope is a SWIFT SW380T compound microscope, which is likely to be the type that you would have used at school or in college. Without modification, this microscope will get you started, but I quickly found that the black objective lenses you see here produced an image that is only sharp in the centre.
To remedy this, I replaced the original lenses with what are known as Plan Achromatic objective lenses, which create a flatter image, sharp to the edges.
If I were to buy my microscope again today, knowing what I know now, I would go for something like the 40X-1000X Trinocular Koehler LED Microscope from Amscope. The higher top-end magnifications you’ll see are simply the addition of higher magnification eyepieces, which don’t enable you to get higher magnification photographs, so the 40X-1000X option is fine.
You can buy microscopes that can polarise the specimen, but they often only polarise the image seen through the eyepieces, making it difficult to photograph your results. Plus, the price jumps considerably.
The method I’ll talk about below works for both viewing and photographing your specimens, so I won’t complicate things by pointing you towards the higher-end microscopes.
Making your polarising filters
To create the amazing colours that we see in the crystals, you will need two polarising filters to sandwich the specimen between. This is probably the trickiest part of the setup.

I used an inexpensive circular clamp and some diamond-coated circular drill bits with inner diameters of 24 mm and 30 mm. I cut two disks out of old polarising filters that I had on hand and filed the edges a little to make them safe to handle.
I place one filter into the filter holder above the condenser light at the microscope’s base. This polarises the light that passes through the glass slide to illuminate the specimen.

Because we are working at very close distances, the second polariser in the sandwich cannot go directly above the specimen. Simply put, there is not enough space.

I find it easiest to unscrew the turret that houses the two eyepieces and the centre column that the camera attaches to, and I place the second polarising filter on top of the tube that the light passes through. This also gives us the benefit of seeing the same image with both the camera and the eyepieces.
Microscope camera adapter
If you want to photograph what you see, you will also need a camera adapter. On my second attempt at procuring a quality adapter, I opted for the Micronet NY-1S35 available from MeCan Imaging, and I’ve been very happy with it.

N.B.: to avoid harsh vignetting if you are using a full-frame camera sensor on a mirrorless camera like the Canon EOS R5, you will also need to add an extension tube between the camera and the adapter. I bought an inexpensive set of extension tubes that included a 24mm tube which is perfect for a Canon RF mount mirrorless setup.
How to make crystals
With your system set up with the ability to polarise your specimen, we are ready to create some crystals. Many substances can be used to make crystals. One of the easiest to find, available in any large chemist, is ascorbic acid or vitamin C in powder form.

Ascorbic acid dissolves in water but will also dissolve in ethanol. This means we can use a 1:1 water to ethanol solution, which will dry quicker. I put a small amount of ascorbic acid into a test tube, and then using a pipette I add 0.5 millilitres of water and 0.5 millilitres of ethanol.

Place the cap firmly on the test tube and give it a good shake to mix the solution. If you can get a vortex mixer, give the test tube a good buzz for 10 seconds. If the ascorbic acid has completely dissolved, add a little more and see if it continues to dissolve.
If you get to a point where there are a few grains of ascorbic acid that won’t dissolve, your solution is saturated, and you are ready to make your crystals.

Take five to ten microscope slides and ensure they are clean. If necessary, wipe them down with alcohol and allow them to dry, and blow off any dust with a rocket blower.
Using a pipette, draw off a little solution, avoiding any solid ascorbic acid that may be undissolved, and place a few drops onto each slide. If necessary, spread out the solution a little with the pipette.
Be careful to avoid getting this solution on your skin. Although some solutions are relatively harmless, some can cause irritation and burns.

If you used a 1:1 ethanol to water solution, it should dry within a few hours, but water alone can take 12 or more hours for crystals to form. If you are careful not to spill the solution while you place a slide onto your microscope stage, it can be fun to watch the crystals form.
For the first time, it may be better to let the solution fully crystallise before putting it under the microscope.
Polarise the crystals
To polarise our crystals and make beautiful colours, put your polariser filters in place. One in the filter holder above your condenser light at the base of your microscope, and the second on top of the tube that the light passes through from the objective lenses up to your eyepieces and camera port.
It’s generally a good idea to start looking at your specimen with the 4X objective lens, which gives you a 40X life-size view of the specimen through 10X eyepieces, and a similar magnification in a photograph. However, the photograph magnification is subject to more factors that we won’t explore in this article.
Place one of the slides with crystals into the slide holder on the mechanical stage of your microscope. Be careful not to allow the slide to drop onto the stage, or the crystals might shatter.

Turn on your condenser light, look through your eyepieces, and rotate the knob that moves your objective lens towards the subject until the crystals are in focus. Be careful not to go too far and hit the crystals with your lens, especially at higher magnifications.
Once focused, you may already see some colour, but if not, try to rotate the filter in the filter holder above your condenser. You might be able to rotate the filter over your condenser with your finger while the filter is in place, but if not, take the filter holder out, rotate the filter, and put the holder back into place. Keep repeating this until you see some colour in the crystals.
A good indicator that your polarisation works is that the background goes dark blue or black. If you don’t see any colour after fully rotating the polarising filter above the condenser, try flipping the polarising filter over. They only work if the light is polarised in a specific way.
If all has gone well, you should now be surveying a microscope slide covered in crystals such as those seen in the photo below.
After using the 4X objective lens to get an idea of what you have created, try switching to the 10X lens or even the 40X lens. I bought additional 20X and 60X objective lenses as I found the gap between 10X and 40X too large and wanted a little more than 40X as well.
All available magnifications bring a different look to the crystals.
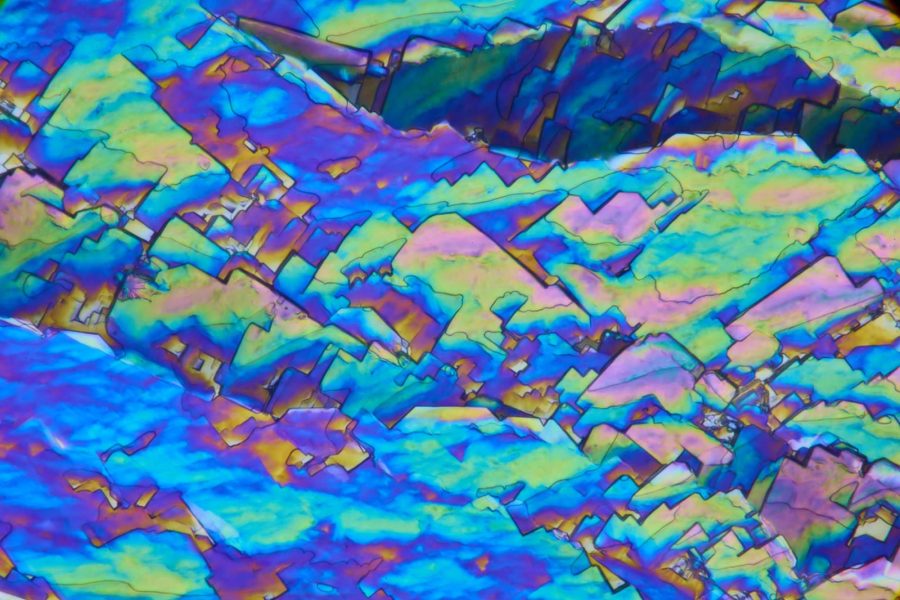
With ascorbic acid, you will often see large patches of grey crystals that aren’t very photogenic. It’s the edges of these crystals or valleys between drops of solution where the magic happens. You’ll often see this kind of organic pattern, looking like a multitude of coloured fans or strings of metal shavings.
This was a 25-frame focus stack shot with the 20X objective lens.
How to photograph crystals
I’m sure you are already itching to start photographing the crystals you’ve created, so here are a few pointers to help make that a more productive process.
First, I recommend you use some kind of remote release for your camera and leave it loose in the camera port rather than clamping the camera in a specific position. Leaving it loose allows you to rotate the camera freely, enabling you to adjust the angle, making the most of the crystal formations in your composition.

One other consideration, though, is that despite looking at a very shallow layer of crystals, you’ll notice that as you focus, you will see the shallow depth of field moving through the depth of the crystals.
You can adjust the microscope’s diaphragm to increase the depth of field to a degree. Still, it will rarely be possible to make a quality image without stacking multiple images together to form what’s known as a focus stack.
I’ve tried focus-stacking microscope images with several popular software applications, including Photoshop and Zerene Stacker, but my favourite is Helicon Focus.
I recommend buying a Pro license that includes Helicon Remote because this enables you to release the shutter of your camera with a keyboard shortcut via a USB cable, and creates a new folder for each new stack you create.
You can adjust the folder structure for your images under the image saving section in Helicon Remote’s preferences and use the shortcut CMD + T to take a photo and add it to your current stack. When you have finished a stack, you can send it to Helicon Focus to process, and then hit SHIFT + CMD + N to create a new stack and continue shooting.
The trick with focus stacking with a microscope is to use very small adjustments in the focus.
I usually decide on my composition and then move the focus up until I see the highest part of the specimen go out of focus, then move the focus down again until it starts to come back into focus, and then expose frame one of the stack.
I turn the fine-tuning focus knob on the microscope less than 1 degree between frames and keep going, exposing an image after each adjustment until you get to the deepest part of the specimen you want in focus in your final image.
You may find yourself doing anything between 5 and 30 frames regularly, sometimes with images requiring more than one hundred frames to get the required depth of field for a pleasing photograph.
Helicon Focus
Before using Helicon Focus, I recommend selecting the Raw Development Settings button in the bottom right corner and selecting the Raw in DNG out workflow, which gives you a raw image to work with after processing. Also, select ProPhoto RGB as the working colour space.
You can convert to smaller colour spaces for output to the Web or other uses later, but there’s no point in limiting the amazing colours you’ll capture while processing your images.

One final thing to change is the rendering method. You’ll need to experiment with this to see what works for you, but for microscope photographs, I’ve found Method B to work best, and I generally select between three and five for the Radius and between one and three for the Smoothing.
Then click the Render button, and let Helicon Focus process your image. It can take just a minute or two for smaller stacks or as much as fifteen to twenty minutes for larger stacks.
I rarely do any other processing in Helicon Focus after the stack is ready. I just go to the Saving tab and save my image as a DNG file.
To include some useful information about your stack automatically in your filename, go to the Helicon Focus preferences, and under the General tab, in the Save file name template field, use [SOURCE_DIR] X [COUNT]f [DATE] [TIME] ([PARAMS]). Then when I’m saving my image, I manually enter the magnification of the objective lens I’m using before the X to keep tabs on my magnification for later reference.

Now that you have everything set up and you are stacking your images, you can just go on safari, scanning your slides for interesting patterns and crystal formations. Then select a good magnification to capture some amazing abstract images.

From the same batch of slides as the first example above, I also photographed this wildly abstract scene with a 60X objective lens (above). In my mind, this looks like a painting of a rainbow-coloured mountain range with blue clouds rolling in from the left.

As a reference, here is the same photograph without the polarising filters (above). You can see that they are simply clear crystals.

It’s all about experimenting. Above, for example, is the same patch of crystals, but this time I moved the focus slightly above the crystals to blur them all, making for a pleasant abstract painterly feel.
Other crystal options
In addition to ascorbic acid, you can use sodium sulfite or citric acid. Citric acid is soluble in ethanol and dries quickly to form crystals. You can also add a little water, but it takes longer for the crystals to form.

Sodium sulfite is not soluble in alcohol so it should be mixed with water, and then wait for it to dry. Note that sodium sulfite is toxic and corrosive when mixed with water, so extra care is necessary when working with these crystals.

You can look up almost any substance imaginable in the PubChem database, and I recommend doing so before working with any new substance.
Not just crystals
As I mentioned earlier, though, the possibilities are endless. Here, for example, are the pollen tubes on an Azalea Anther created with a 100-frame focus stack and a little side lighting. I also used a technique called Dark Field microscopy for this image.

Here also is a polarised grey hair, appropriated from and used with the kind permission of my amazing wife. I used grey hair, not one of her much more abundant black hairs, because it’s almost transparent, making these beautiful colours from the polarisation.

Another thing I like to do is use a hand microtome to thinly slice plant matter, such as this section of azalea stem, then die it with a stain for this kind of semi-abstract microphotograph. I’m also fascinated by the tiny filaments captured on the outer layer of the stem.

This unlikely subject is a section of the stalk or peduncle of a cucumber, showing us what I believe is known as vascular bundles. I did say that the only limitation is our imagination.

Read more: How to Use Focus Stacking for Studio Macro Photography
In conclusion
I could go on with many more examples, but I don’t want to outstay my welcome. We’ve already covered a lot of ground. As you’ve seen, the microscope is a window to a world of endless possibilities.
The scientific side of this is fascinating, and I hope you agree that microphotography can produce some artistic results. There is a lot to ingest in this article, and I want to say thank you for sticking with me.
If you take the plunge and need any help, please don’t hesitate to ask in the comment section, which I’ll monitor. Or, feel free to contact me via my website.


