
How to Photograph Volcanos

When most people think about their favourite interaction with the natural world, moments of beauty and tranquility usually rise to the top of the list. A quiet forest, a babbling brook, or a field of flowers will provide photographers and non-photographers alike with a calm, centering experience that enriches the human soul. The adrenaline junkies among us might turn to something a bit more thrilling, however. Whether it’s battling a blizzard on a jagged mountain, or chasing tornadoes across the central plains of the USA, there are plenty of opportunities to be thrilled while connecting with nature.
But, without question, walking beside the liquid underbelly of our planet is the most dangerous. Witnessing the newest land on Earth being formed by a volcanic eruption is an experience that simply cannot be replicated. As photographers, we have the unique ability to bring the enormity of that moment to those who aren’t fortunate (or maybe foolish) enough to witness it for themselves. Make no mistake, there are countless ways an erupting volcano can kill you, and they are exceptionally difficult to photograph. But with dedication, preparation, and no small amount of luck, it’s possible to visit the edge of Hell and return to tell the story.


Getting access to volcanos
Rock turns to liquid and sulphur chokes the oxygen out of the air. Rain turns to acid, and the ground becomes a super-heated steam furnace when wet. Lava swallows everything in its path without regard for people or property, and there is always the possibility for an explosion that dwarfs the power of an atomic bomb and rains ash onto the landscape for hundreds of miles.
With these inherent dangers, it’s no surprise that gaining access to an erupting volcano is often difficult. Active volcanos that have slowly oozed lava for years, such as Hawaii’s Kilauea, are much easier and safer to experience than the powerful explosive events of volcanos like Italy’s Stromboli.
Kilauea was once the longest continuously erupting volcano in recorded history. A generally slow release of magma down the flanks of the mountain to the sea began in 1983 and never let up… until 2018, when a series of explosions and fissures emptied the mountain and silenced the flow. With such a long, continuous eruption, scientists had ample time to study the characteristics of the volcano and evaluate the risks.
When the flow meandered through Volcano National Park, visitors were thrilled to be able to walk up to the oozing lava and feel the scorching 1250 degree C heat for themselves in relative safety.

The explosive reaction of molten rock and ocean water is not something to be trifled with, however, so the ocean entry was closed to the public. When the flow diverted across private land, access became harder to control and those who owned the land where the lava traversed could and would allow limited access.
It was in 2011 that I first contacted local photographer and gallery owner Bruce Omori in Hilo, Hawaii, about taking a tour. Bruce had been studying and photographing the volcano for years, and has amassed an untouchable portfolio of some of the most incredible lava images the world will ever see. Under his careful guidance and tutelage, I was fortunate enough to shoot the various phases of Kilauea from 2011 to 2016.

Other continuously erupting volcanos like Erta Ale in Ethiopia and Yasur in Vanuatu require permission from the appropriate authorities, but photographers who do enough research and who display enough persistence are allowed to visit.
If ground access is restricted or impossible, take to the skies. When Bárðarbunga in Iceland rumbled to life in 2014, a colleague and I made the trip across the Atlantic to experience the eruption first hand.
Ground access was essentially impossible due to the distance from civilisation and potential dangers with this particular kind of rift eruption. The only option was to get airborne and fly into the eruption zone. A couple of outfits were offering aerial tours, and we selected Volcano Heli because of the opportunity to fly with the doors off and loiter over a specific composition.
Airplane tours are certainly cheaper, and with a high wing airplane you can still get good images of the action, but if a helicopter flight is a possibility, it’s certainly the better option. Although I thoroughly enjoyed my experiences on the ground, dangling my feet out of a helicopter just above an erupting volcano is something I will remember until my final hours.

With access sorted, it’s time to get to the brass tax of photography. If you thought it was challenging getting permission to visit an active volcano, wait until you try to shoot one.
Dangers of volcano photography
Anytime you are doing landscape photography, your personal safety should always be your number one priority and consideration. No picture is worth dying for.
When your subject is unpredictable, toxic, and unstoppable, it’s critical to understand the dangers and how best to avoid them. People have died out on the flow, and everyone who has spent any considerable amount of time with a volcano has had a few close calls.
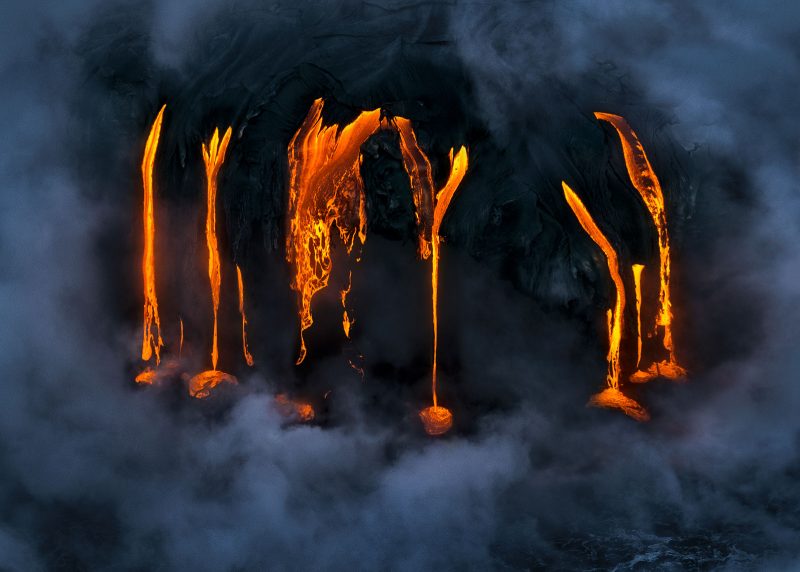
The lava bench that builds out into the sea will frequently collapse; lava tubes forcing their way into the ocean will explode into the air and shower the surrounding area with steam and rock, and the mixture of lava and water creates sulfur dioxide which can become lethal if breathed into the lungs.
So, assuming you are new to this type of photography, what specific dangers should you be aware of, and what measures can you take to stay safe?
Become an amateur meteorologist, for starters. You should have a constant sense of the wind direction, and stay safely upwind of any fumes or gas. Loitering under a lava plume will leave you choking on sulfur dioxide and coated with acid rain. I never venture anywhere near a volcano without a high-quality respirator and clean filters. But it should be understood that the respirator is used for an emergency egress, and not to stay stationary when being enveloped by gas.
At times, you will need to cross the flow to get to your desired shooting location. The lava crust can be very thin in these regions, perhaps having been liquid mere hours ago. Using an umbrella and tapping the ground as you go will help you detect whether the ground beneath is thin and covering a lava tube, but you can still count on things getting very hot. You should wear long pants and very sturdy boots. Despite your best efforts, you should expect the soles of your shoes to melt. Call it a hazard of the experience.

Once you’ve made it out to the part of the flow that you want to shoot, it’s imperative that you never turn your back on the lava. Surface breakouts are common and wildly unpredictable, and it’s easy to get cut off from safety if you aren’t paying attention; so it’s best to always have an eye on your escape route.
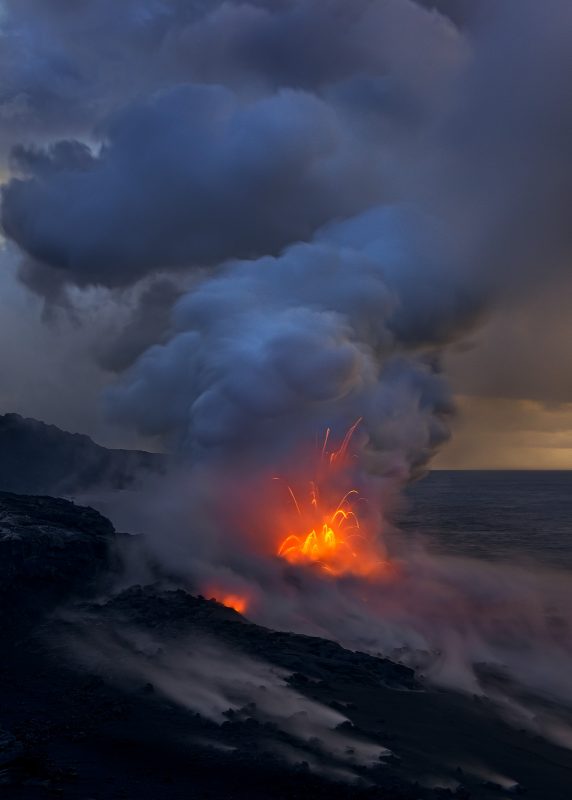
If you’re lucky enough to find a volcano that’s flowing into the sea, you’ll find that this is where the most dynamic and exciting conditions occur. Giant explosions are commonplace when a lava tube dumps into the ocean, resulting in spectacular showers of streaking lava – great for long exposures. This is where the plume is most concentrated and deadly, however, so staying upwind becomes even more critical.
Perhaps most alarmingly, keep in mind that you are walking on “land” that is nothing more than yesterday or last week’s oozing lava. As the waves crash into the lava bench, they erode the base beneath, and acres wide sections can and will break off and crash back into the sea, carrying everything with it.
The general rule of thumb is this: if you feel the ground shake and/or hear it crack, leave your camera and run. Fast.

Retreating from the ocean entry can often lull photographers into a false sense of security. Once you’ve acclimated to these dynamic conditions, it becomes easy to feel that the danger has passed. An experienced photographer leading a tour to the flow of Kilauea in 2018 was caught out when a heavy rain seeped into the lava tube below and created a superheated steam bath. He died instantly.
Shooting volcanos from the ground
If I haven’t scared you off from your mission of seeing an active volcano yet, the question becomes how does one successfully capture a lava image with boots on the ground?
To be honest, the difficulty cannot be overstated or underestimated. Anyone can point a camera and click the shutter. But to capture a compelling image of lava is extremely difficult and presents some unique challenges.
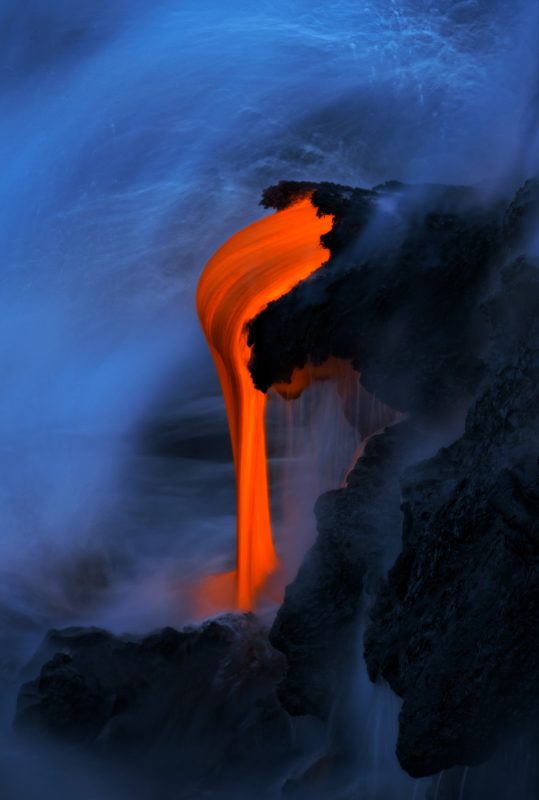
Firstly, your subject is constantly changing. Lava oozes and explodes, steam billows and fades, and water surges and retreats. Getting all these components to line up at the same time requires a little luck, and a lot of frames. With practice, you’ll learn to anticipate the timing of the moment when it all comes together.
Compositionally, things tend to be difficult when shooting from the ground because you can’t move around as much as you would like, so creating a balanced image is difficult. Allowing the steam plume to become part of the composition can help, and should be considered. Remember to shoot both wide and tight images. You will get a chance to shoot from 14mm to 500mm, so make sure to have all your lenses available and keep an eye out for different types of compositions.
 Try a variety of shutter speeds and see what effect pleases you the most. I find that a 1 second exposure usually yields the best result. Caution: when shooting up close with a wide-angle lens, it’s entirely possible to melt your tripod and your camera gear. Lava heat radiates a surprising distance.
Dynamic range is perhaps the biggest challenge in shooting lava. Cooled lava is mostly black, while the lava itself is exceptionally bright. Shooting at night showcases the liquid lava the best, and creates a mesmerising glow on the steam and surrounding area, but the dynamic range is impossible to capture without bracketing a lot of exposures. The trouble with this is that the lava is constantly moving, so it’s extremely difficult to get an HDR exposure to work.
There is a 15-30 minute period while the blue hour is fading where the light levels balance perfectly. It’s still dark enough that the lava is the star of the show, but light enough to allow for a single exposure and appropriate light levels. Ensuring you’ve arrived at the best composition of the outing at that time is critical, because it moves fast.
As photographers, we constantly want to know what gear and camera manufacturer makes the best equipment. Each brand has strengths and weaknesses depending on the genre of photography, and shooting lava is no different. In my experience with Canon and Nikon, I’ve found that Canon is far superior in how it handles the intense reds and yellows of the lava, but Nikon (and Sony) have a significant advantage in handling the extreme dynamic range.
Lastly, as a landscape photographer, I tend to avoid the human element in my images. It’s a personal choice for sure, but I like the natural subject to be the star of the show. Volcano photography has become the major exception to that rule for me. I encourage you to take at least a few frames with someone in the shot. In fact, a self portrait on the lava bench of Hawaii has become my personal favourite image. Not for its technical prowess or compositional attributes, but because it reminds me of being there and having one of the most amazing experiences a human being can have.

Shooting volcanos from the air
Many volcanoes around the world will only be accessible from the air, and the rules of shooting change dramatically. The long exposure streaking lava images go out the window, and you must adapt to radically different considerations when deciding what camera settings to use. Decisions become much more critical, as the compositional elements are changing constantly.
Simply put, there is no time to experiment with different camera settings, so it’s best to have a general idea of how to shoot the scene and set up your camera accordingly beforehand.

As a general rule, your shutter speed is going to be fixed, and quite fast. Helicopters and piston engined planes tend to vibrate, which causes blurry images at shutter speeds below about 1/500th of a second.
Ideally, you want to run your shutter speed up to 1/750th or even 1/1000th of a second, but with image stabilised lenses you might get away with 1/500th. Of course, if you are shooing telephoto images, you will need to increase the shutter speed even more. For a 24-70mm lens, 1/750th of a second will work fine.

The next piece of the exposure triangle is going to be aperture. In this case, it pays to have fast (f/2.8) glass, as you can usually count on being able to shoot wide open and still have everything in focus due to the distance from the eruption and a lack of a close foreground element.
With a wide open aperture and 1/750th of a second, you are left with ISO as the only thing you can adjust to nail the correct exposure. However, at $900 USD or so per hour for a helicopter flight, do you really want to be experimenting with your ISO and checking your LCD between shots to ensure you’ve selected the correct number?
This is where that “auto ISO” function on your camera (that you’ve probably never used in your landscape career) becomes handy. Allowing the ISO to flex to the wildly variable lighting conditions will allow you to continuously shoot and maximise your chance of nailing the shot.
The last consideration is making sure that the camera selects the correct exposure for you. If your DSLR has “highlight-weighted metering”, use it. It protects the brightest highlights (lava) from being overexposed and blown out. We know that it’s a lot easier to recover shadows than highlights with today’s sensors, and you can even use exposure compensation to do a quick bracket to boost the shadows if you find a particular composition you like. The dark areas of a volcanic scene don’t tend to move, so it’s possible to work in a frame with a better exposure.

A final important note about helicopter safety. If a lens or camera body were to fly out of the open door, chances are it would end up in the tail rotor. As this is a critical component to inflight stability, you will not want to change lenses during the flight.
Consequently, it’s best to have two camera bodies: one with a 24-70mm lens and one with a 70-200mm or 80-400mm lens attached. Keep the strap attached to the camera, and keep them secured around your neck for the entire flight. You’ll be distracted, and it only takes a split second of having a long lens protrude into the slipstream to have your camera ripped from your hands.
Timing
In general, volcanos are extremely unpredictable. They erupt when, where, and how they want. Volcanologists have become skilled at interpreting some of the early markers of impending activity, however, so getting connected with that community will enable you to get some idea of what’s potentially coming.
Be prepared to be very flexible… and patient. Once an eruption is imminent you will need to be on the move, as the duration of the event could be very short. Work on getting access immediately, and book potential helicopter or light airplane flights early. You will likely not be the only one who wants to witness the event up close.

In conclusion
Hopefully this article will give you an idea of what it takes to witness nature’s most spectacular natural phenomenon. Be safe in your quest, and I hope that you get to have the same magical experiences I have had witnessing the newest land on Earth being formed.


