
How to Photograph Great Spotted Woodpeckers

The great spotted woodpecker is a large, colourful, and exciting bird with a fairly confiding nature (when compared to the rest of its family). That makes it an ideal subject for bird photography.
Read on to find out how to photograph great spotted woodpeckers.


Finding and identifying woodpeckers
Great spotted woodpeckers are about the size of a song thrush. They have black and white plumage with a large white spot on their shoulders, which makes an obvious feature when the bird is perched.
In flight, we can see that their wings are black with white bars. Both sexes have a red vent – the area under the tail – but only males have a red spot on the back of their head.
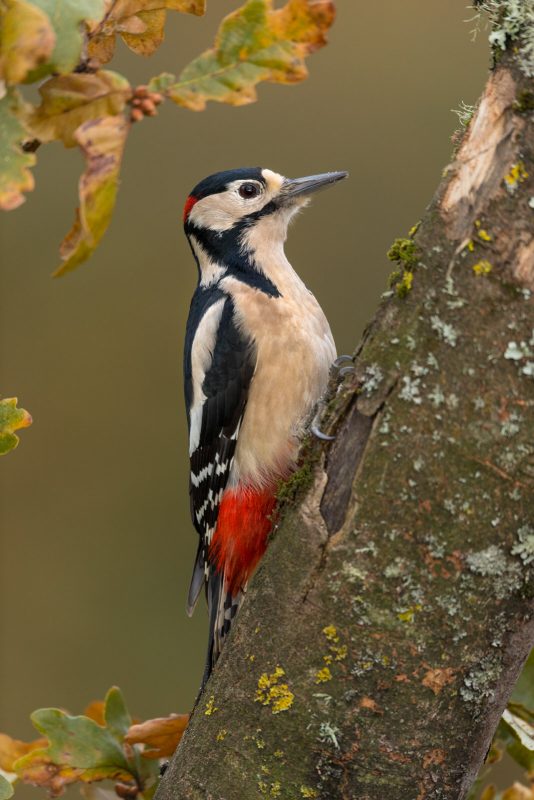
To slightly confuse the issue, in summer we might come across juvenile birds which have red caps and a slightly daintier beak.

Like other woodpeckers, they have a stiff tail which is used to support themselves against the trunk of a tree – a feature which we can aim to show in our photos of them.
In woodland, they can be difficult to locate by sight but their undulating flight path is obvious and their loud, sharp ‘kick’ call often gives them away. The other sound, for which they are known, is their drumming. Birds drum to establish their territories rather than to find food so drumming is usually only heard in spring, most often between February and April.
Feeding time
Great spotted woodpeckers commonly eat grubs which they usually find in rotting tree trunks by stabbing their beaks into the soft wood and using their long sticky tongues to probe into the holes, but they also come down to the ground to feed on ants – a trait common in some of their larger relatives including the green woodpecker.
Their diet also includes the chicks and eggs of other birds as well as seeds from cones and nuts from trees. The great spotted woodpeckers in my garden have developed a rather frustrating taste for the grubs of mason bees which live in our specially made insect houses.
Unlike many of its more timid relatives the great spotted woodpecker can easily be attracted to our gardens by the use of bird food. It is surprising how quickly a peanut feeder, a selection of fat-balls, or suet can tempt this species. Although extremely nervous at first, this is a bird which can become accustomed to us, particularly during cold weather.
That said I always find a hide, usually my garden shed, a good idea for getting natural-looking shots with the bird at its ease.
Read more: How to Photograph Garden Birds

It’s a simple enough task to set up a shed as a hide or to buy a portable hide and then start feeding the birds a suitable distance away with a carefully chosen background.
When we have a few shots of the birds on feeders, the next step is to get some logs or branches into which we can pushed peanuts or suet. I usually drill peanut-sized holes into branches so I can wedge peanuts in place and then get shots of the woodpeckers without being able to see the food.

Getting a bit more creative
The log setup can be enhanced by decorating it with natural vegetation. For example, last year I had the woodpeckers feeding regularly on one branch so I dug up a couple of my own foxgloves and stood them in a bucket of water to either side of the branch.
This makes the image a lot more colourful and gives the impression of a more natural habitat rather than simply a prop.

Once you have woodpeckers feeding it’s a good idea to keep them coming throughout the year. By doing this I have been able to get photos of them in the snow and with young, as well as experimenting with everything from spring flowers to autumnal colours, I’ve even drilled holes into old fork handles to get the archetypal garden image!

Another good trick for photographing woodpeckers feeding on concealed peanuts, is to experiment with shutter speeds. With a shutter speed of 1/100th of second or slower a woodpecker chipping out peanuts can look like a woodpecker drumming – not that I would ever dream of misleading anyone!

Thinking about the background
Consideration of background is one of the most important aspects of bird photography. I usually like a diffused background, so try to have a reasonable distance between the bird and whatever is behind it. As a result of this, the light falling on the bird and the background can be different. It isn’t unusual to have one in the shade when the other is in sun.
Prior to using digital cameras I wouldn’t have considered taking photos when the bird is in the shade and the background in sun, but so long as the sun is low in the sky this can work really well in digital photography.
The important thing is to process the image for the subject. Because the bird is in shade, when we correct the blacks and whites of the bird for colour temperature the background will become very rich, warm, and vibrant. Whilst I can accept this might be a bit shocking at first, and look quite unnatural, it is an interesting technique which I now use deliberately for birds, flowers, and other subjects when possible.

Nesting time
Photographing birds is made easier if we can predict their behaviour. We can then be in position in advance and make the most of the opportunities they offer. Apart from coming to food, the other time we can predict the behaviour of great spotted woodpeckers is when they nest.
Their nest sites are made obvious when the young hatch because they continually clamour for attention. If this sound is coming from a tree hole with a diameter of about two and a half inches, it is likely to be a woodpecker of this size. It is relatively easy to set up a hide and gradually move it closer to the nest site over a period of days (to allow the woodpeckers to get used to the hide being there). A standard approach would then be to use a telephoto lens from a hide but there are other possibilities.
There is no requirement to obtain a license to photograph great spotted woodpeckers at the nest, but we should take extra care when we photograph any birds at their nest site. If we wish to introduce anything, such as a hide or camera, into an area close by we should do so gradually, over a period of time and check at each stage that the behaviour of the birds has not been affected. If the birds continue to feed their young then all is fine, but if they stop we must reverse any steps without delay.
Read more: How to Photograph Nesting Birds

Last year I put up a few woodpecker nest boxes and was lucky enough to have a pair take up residence. Prior to them laying eggs, I put up a bracket for my tripod head on a branch adjacent to the nest box. A few days after that I made a pretend camera and tripod head and bolted them in position so the birds would get accustomed to it. I then left them alone until they had young to feed.
I set up my camera on the bracket close to the nest with a 16-35mm lens. I then attached a remote release – I use a hard-wired release which I have extended so I can trip the shutter from up to fifty yards away. When doing this it is important to cover the eye-piece of the camera because the light getting in through the viewfinder, when your head isn’t blocking the light, will fool the exposure meter into under-exposing. I use blu-tack for covering the viewfinder, though you can get dedicated plastic covers (which you can never find when you want them!).
With most remote photography, focusing must be done manually. There are many ways of dealing with the exposure, but I decided to set an ISO of 800 and use aperture priority. Knowing it would be sunny, I chose apertures of around f/8 and had shutter speeds plenty fast enough to freeze a small amount of movement.

Taking flight
Whenever you can predict the exact flight path of a bird, there is a chance of capturing it in flight. This is true of a woodpecker on a feeder as much as it is of a bird at the nest. My camera setup at the nest gave me the opportunity to try a few flight shots.
My decision making is slightly different for fast action. I select a fast shutter speed, usually 1/8000th of a second, and an aperture of around f/5.6 or f/4. Then I set the ISO to ‘auto’. This makes sure the camera shoots a fast shutter speed, but the drawback is that the ISO might creep up if it isn’t a very bright day.
To get the exposure for a woodpecker correct it is usually important to under-expose the image slightly because we want to ensure there is detail in the whites, but this depends on the exact situation. I found that with a dark-ish woodland background and full sun on the bird, I needed to underexpose by as much as two stops.
Read more: Choosing a Camera Mode – Which is Best?

In conclusion
I was delighted to have the woodpeckers nest in my nest box, but had I anticipated it happening I would have thought a bit more carefully about the location of the box. The background behind the box is a bit messy and so in the autumn I plan to install a nest box facing in a slightly different direction to give me a better view.
Even more annoyingly, I had planned a trip away which caused me to miss the youngsters showing their faces at the entrance hole. Never have I been so unhappy to go on holiday!
Next year you can bet that I won’t plan a holiday for late May, and I don’t mind betting that the woodpeckers won’t nest there again!


