
A Beginner’s Guide to Deep Sky Photography
Deep sky photography involves taking photos of objects beyond our Solar System. I’m talking about photographing galaxies, nebulae, and star clusters. Comets, even though part of the Solar System, are photographed using the same techniques.
Photography of the night sky can be divided into untracked and tracked astrophotography. In untracked astrophotography (used mostly for nightscapes), you set your camera on a fixed tripod and start shooting. Your maximum exposure time will be limited by the apparent motion of the sky, as stars will start trailing after a few seconds.
In tracked astrophotography (used for deep sky astrophotography), you track the apparent motion of the sky. This way, you can achieve long exposure times with pin-sharp stars.

What equipment do you need for deep sky photography?
I’m sure most people believe they need a lot of expensive gear to get started with deep sky photography. It’s definitely not the case, though. You don’t even need a telescope! But you do need a dark place, as light pollution will spoil the fun of shooting deep sky photos.

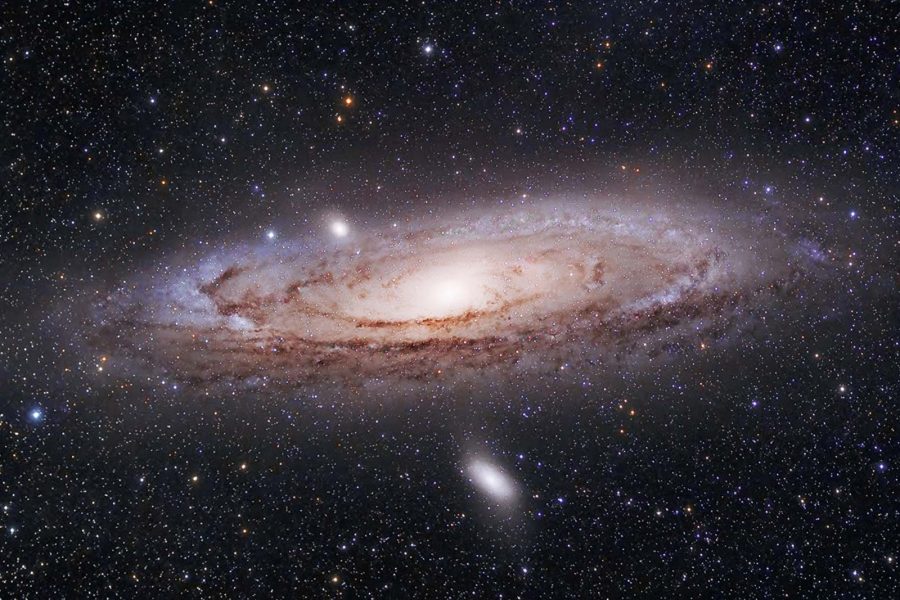
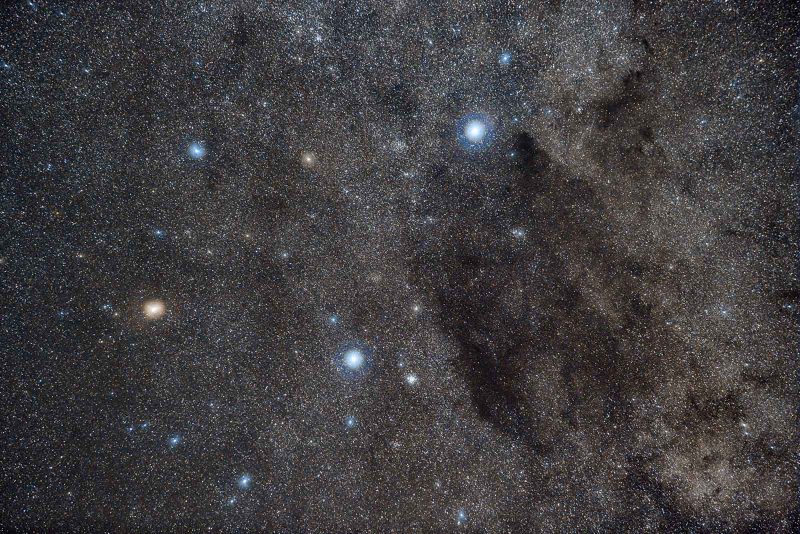
It’s pretty important to know the sky and to be able to identify your target between the stars. Learn the constellations and familiarise yourself with the position of brighter objects. Targets like The Great Orion Nebula, The Pleiades, The Magellanic Clouds or The Andromeda Galaxy are easily visible with the naked eye from a dark site.
When photographing fainter objects like, let’s say, The California Nebula (located in the constellation of Perseus), you will need sky maps in order to find your target in the sky.
I’m not the biggest fan of gear talk, but gear is pretty important in deep sky photography. This field of astrophotography is, in fact, a lot more technical (and even scientific) than “typical” astrophotography with landscapes.
1. Choosing a camera
Let’s start with the camera. Any DSLR, or mirrorless camera with interchangeable lenses and manual controls, is suitable for deep sky photography. Even though a stock camera can be successfully used to photograph many targets (like the Pleiades, for example), I would suggest investing in a camera modified for astrophotography.
Digital sensors are very sensitive to infrared light and that’s why camera producers fit them with a filter that cuts out infrared light so they can be used for day to day photography. But that filter also cuts off some wavelengths that are very useful in astrophotography.

One notable wavelength is that of Hydrogen Alpha. This particular wavelength is emitted by all red nebulae in the night sky. A standard camera will have some problems in rendering these red areas of the night sky. The red will be washed out, barely visible, and very long exposure times will be needed to show their true beauty.
Modified cameras will be a lot more sensitive to that specific part of the spectrum. Certain camera producers (Canon and Nikon) offer such modified cameras. Nikon used to sell an astro modified version of their D810 full frame camera, named the D810A. Canon used to sell the 20Da and the 60Da in the past. At the moment of writing, they now sell a mirrorless camera modified for astrophotography: the Canon EOS Ra.
There are also third parties that modify cameras for astrophotography. A notable example is a company called Hutech. I’m using a Canon EOS 6D modified by Hutech at the moment.
2. Choosing a lens
Most people expect that deep sky astrophotography is only done with telescopes. That is certainly not true. You can capture beautiful deep sky vistas with a 85mm lens or even with a nifty fifty!
Of course, top-notch lenses are preferred. Luckily, it’s a lot easier to find good quality telephoto lenses than wide-angle lenses. Also, you don’t need very fast lenses in deep sky astrophotography as you use such long exposure times, unlike in landscape astrophotography where you need fast lenses.
Once you get more experienced, you might consider getting a telescope. Even though there are lenses in the range of 400 to 800mm (or even more), I would suggest using a telescope when shooting with a focal longer than 400mm. A camera lens will be heavier, more expensive, and of inferior quality. Let’s dip into the world a telescopes to clarify some things.
Until you get better at polar alignment, I suggest shooting with lenses between 50mm and 200mm. Using a 50mm lens you can shoot in the direction of constellations harbouring bright and large nebulae. Such targets are Cygnus (the Swan), Orion, Taurus (The Bull), Auriga (The Charioteer), Carina or the region around the centre of the Milky Way. With the 200mm, you can shoot nebulae like North America (in Cygnus), The Great Orion Nebula, Carina, and IC 1396 (in Cepheus).

3. Choosing a telescope
First of all, telescopes come in two flavours: reflectors and refractors. Reflectors use a system of mirrors to collect light; they are often quite bulky and not very portable. They are more suited for visual observations or more advanced astrophotography.
Refractors use lenses as their objective. Refractors are more compact, but also more expensive per unit of aperture than reflectors. Apochromatic (or APO) telescopes use lenses built from special low-dispersion glass. APOs offer almost perfect chromatic and spherical correction for sharp imaging. They are more expensive than their achromatic counterparts, but they are worth every penny.
APO telescopes use 3 or 4 lenses in the objective. There is also a class of refractors called semi-APO or ED. They are less expensive than real apochromats and are probably the best choice for your first astrophotography telescope.
Good instruments for starters are the SkyWatcher 80ED or the Explore Scientific 80ED. Actually, pretty much any 80ED telescope out there is a good option. If you are looking for exquisite optical quality check out brands like Takahashi, TeleVue, or CFF Telescopes. For mounting your camera to the telescope, you will need a special adapter available at pretty much any vendor of astronomical instruments.

4. Tracking mounts
The Earth rotates around its axis and that is what makes the stars look like they are moving in the night sky. If we try shooting the sky from a fixed tripod, stars will soon start trailing in the frame and they will not be rendered as points of light, but instead as arcs.
In order to counteract that and expose for longer periods of time, you need a device called an equatorial mount. Smaller, more portable versions of such equatorial mounts are often called star trackers. They usually have a small motor and a set of gears that make your camera rotate at the same speed as the Earth rotates, but in the opposite direction.
This is great for shooting the sky, but any elements of the landscape will appear blurred in the final image.

Some tracking mounts offer multiple speeds. The speed at which Earth rotates is called sidereal speed. You will use a different speed if you want to track the motion of the Moon (you might need that when shooting a total lunar eclipse).
You can also set the tracker at half sidereal speed. This speed is of greatest interest for nightscape photography. At half sidereal speed, stars will only show obvious trailing after an exposure two times longer than when shooting from a tripod. This movement of the camera will still somewhat blur the landscape but not very much.
Personally, I don’t use this feature very often as the blurring in the landscape can be seen when printing images in larger formats. But for small prints or social media and on websites, it’s a great option. You practically double the exposure time, thus being able to use a lower ISO or use a smaller aperture.

Good options for star trackers are SkyWatcher Star Adventurer, iOptron SkyTracker, Vixen Polarie, or my favourite the Fornax Mounts LighTrack II. On the LighTrack and Star Adventurer you can also mount telescopes by using a counterweight system provided by the manufacturer
Simply put, I would recommend buying the most accurate star tracker you can afford. It will save you some frustration. Of course, a sturdy tripod will be needed to support your tracker.

5. Shutter release cable
As in any type of astrophotography, you need a shutter release cable. An intervalometer is a better option as you are able to precisely control the exposure time.
In deep sky photography, you need exposure times of a few minutes. You could use a normal release cable and count minutes using an external time source (like your phone), but it will be far easier if using an intervalometer. You can set the exact exposure time and replicate it for many exposures one after the other.
There is also an option of connecting your camera to an app on your smartphone or to a laptop fitted with software that can remotely operate a camera. There are lots of astrophotographers choosing to use a laptop when doing deep sky astrophotography.
Even though I don’t use a laptop (as I like being very mobile), I think it’s an option to be considered. You can also control your equatorial mount from it.
6. Dew heater
If photographing at night for a longer time, there is the possibility that dew will form on the frontal optical element of your camera lens or telescope. Of course, this will result in foggy images.
You need a dew heater to fight dew. That’s a heating element that wraps around your lens or telescope and warms it up, thus preventing dew to form.
7. Guide-scope and auto-guider
No equatorial mount will be perfect. In the end, it is a mechanical device built by imperfect machines. Even state of the art equatorial mounts will exhibit small tracking errors in the form of slightly elongated star images.
In order to make tracking more accurate, you can use an auto-guiding system. Such a system will follow a star in the sky and apply small corrections to the mount. You will need a small telescope, called a guide-scope, and a guiding camera (usually called an auto-guider).

The guide-scope is a small refractor (you can even adapt a fiderscope from a telescope into a guide-scope) mounted parallel to your imaging system. A 50mm diameter telescope with a focal length of around 160mm is enough for most applications.
Some auto-guiders are standalone and can work without a computer, but most of them will need a computer to send signals to the equatorial mount. Speciality software, like PHD2 (free), is needed for auto-guiding. Be aware that not all star trackers will be able to work with an auto-guider.
Think about getting an auto-guiding system if you want to work long lenses (or telescopes) and long exposure times. A carefully aligned star tracker should not have any problem with tracking the sky for at least 5 minutes at 200mm. The Fornax Mounts LighTrack II star tracker can easily track the sky for minutes even when using 500mm focal length telescope. This will be more than enough in the beginning.
8. Power source
All the gear will need electric power. The star tracker needs it, the dew heater needs it, and the laptop and the guide camera (if using) need it. There are lots of options for this. Pretty much all telescope producers will also offer an option for a power generator. Some of them are pretty heavy and bulky, though. Some star trackers will work with just a typical USB power bank that you might use to recharge your phone on the go.
Having gear out of the way, let’s get to the practical side of things.
Polar aligning your setup
In order for an equatorial mount to do its job, the rotation axis of the tracker needs to be parallel to the rotation axis of the Earth. The process of making these axes parallel is called polar aligning.
Basically, you need to point the rotation axis of the tracker towards one of the celestial poles. If you live in the Northern Hemisphere, you will use the North Celestial Pole which is conveniently located right next to Polaris – the brightest star in the constellation of Ursa Minor.
If you are south of the Equator you are not that lucky as there is no bright star close to the South Celestial Pole. But there are ways of finding that pole, too. You just need a special sky map.
Polar alignment is done by looking through a small telescope (usually called a polar scope) mounted parallel to the rotation axis of your star tracker. Some trackers come with a polar scope while other have it as an optional accessory and you need to buy it separately.

For wide-angle astrophotography, you don’t need very accurate polar alignment. But when shooting at longer focal lengths, polar alignment needs to be more and more precise.
In the beginning, polar alignment will not come very naturally, but it will become second nature after a few tries. When I got my first equatorial mount, it maybe took me 30 minutes to do a pretty sloppy polar alignment. Now, I can align my portable star tracker in less than 2 minutes if I want to be accurate. Otherwise, 30 seconds is enough.
Shooting your images
Once you are polar aligned, you can proceed to actually photographing deep sky objects.
1. Calibration frames
When doing deep sky photography, it’s advisable that – besides the photos showing the object you are photographing (known as light frames) – to also take calibration frames. Calibration frames are a set of images used to improve the signal to noise ratio in your light frames. We have three types of calibration frames:
- Dark Frames are, as their name says, dark. They will not show anything except for digital noise. You take dark frames by placing the cap on your lens. Dark frames need to be taken at the same ISO, exposure time, and ambient temperature as light frames. With time, you can build a dark frame library that you can use to calibrate further images shot in the same conditions. Take multiple dark frames. 16 frames is a good number to aim for.
- Bias Frames are also dark, but are used to get rid of something called read out noise. This is noise created by the electronics reading the content of the imaging chip. It’s easier to take bias frames. They also need to be taken with the cap on, but at the shortest exposure time available on your camera and at the same ISO as the light frames. The temperature is not important. You can take the same number of bias frames as dark frames.
- Flat Frames are used to correct for uneven field illumination, such as vignetting or dust spots on your sensor. In order to take correct flat frames, it is very important not to remove the camera from your lens/telescope before taking them. Also, don’t change the focus position. The easiest way to take flat frames is to put a white T shirt in front of your lens and make it as smooth as possible. Then, shoot the bright sky background (during daytime) using aperture priority mode. You will end up with an unevenly illuminated white image. The flat frames should be taken at the same ISO as your light frames. The temperature is not important. Take the same number of flats as darks.
Focusing the camera is done, as in any other field of astrophotography, using the Live View option on your camera.
If using an auto-guider, don’t forget to start the guiding process before you start shooting your light frames.
Read more: How to Get Sharp and In Focus Stars in Starscape Photos

2. Camera settings
Set the ISO to 800 or 1600 – this is enough as exposure times will be fairly long. If you’re shooting with a camera lens, not a telescope, close down the aperture by one stop in order to get sharper images in the corners.
In terms of exposure time, it depends on the amount of light pollution at your site. I think three to five minutes is a good start. If shooting objects with a high dynamic range, like the Orion Nebula, you will need a whole plethora of exposure times – from 5 seconds up to multiple minutes.

3. Reducing noise
For better signal to noise ratio in deep sky astrophotography, you shoot multiple exposures of the same object whilst maintaining the same framing. But how many images in total for a successful final image?
Easy answer: as many as you can take.
You can even spend multiple nights imaging a single object. All these individual images (also known as sub frames) will be stacked in post production. Keep in mind that the amount of noise reduction you get from stacking is the square root of the number of individual frames stacked. If you stack four frames, noise is reduced by a factor of two. Stacking 25 frames will reduce noise five times.

You can program the amount of exposures in your intervalometer or in your camera’s control software. Start the whole process and you are free to do other things: shoot some astro landscapes with another camera, observe the night sky with a telescope… or have a nap.
Post production
As in any kind of digital photography, some post processing is necessary in order to extract everything from your raw files. Post-processing for landscape astrophotography is pretty straight forward and can be easily done in Adobe Lightroom and Photoshop.
When it comes to deep sky astrophotography, things become a little more complicated. As post-processing techniques are not common to other domains of photography, specialist software will be needed.
In essence, post-processing deep sky photography has a few stages:
- Calibrating your light frames
- Star aligning (a process called “registration”) the calibrated frames
- Stacking and combining the aligned images using various algorithms
After these steps are done, you go onto colour correction, image stretching, detail extraction, noise reduction etc.

You will need software like Deep Sky Stacker, Images Plus or, my favourite, PixInsight. All these offer automatic image calibration, registration, and integration.
DSS works only under Windows and does not offer many processing options after image integration. Images Plus and PixInsight offer a full suite of different processes to be used at different stages of post-processing.
I believe PixInsight is the most powerful software when it comes to editing deep sky astrophotography. It doesn’t have the most friendly interface and it has a very steep learning curve, but it’s an amazing tool.
If you want to better understand the software and unleash its full potential, I strongly recommend you to get the book Mastering PixInsight by Rogelio Bernal Andreo – it’s a masterpiece.

In conclusion
I hope the amount of technical details in this article will not scare you away. This was just the tip of the iceberg when it comes to deep sky astrophotography.
It’s not the easiest and most straight forward field of photography, but the results are breathtaking.
Clear skies!


