
Zoner Photo Studio X Review: A Full-featured Editor for a Great Price
Zoner Photo Studio X is a comprehensive photo editor with a lot of potential, offering photo organization, non-destructive editing, layers, retouching tools, and creative export options – all for an impressively low price. In this hands-on Zoner Photo Studio X review, I’m going to tell you everything you need to know:
- What it offers
- How it compares to other photo editors on the market
- And whether the Zoner Photo Studio X is right for you
Let’s dive right in.


Price point
This is one of the big attractions of Zoner Photo Studio X. It costs only $4.99 USD/month, and for that Zoner packs the power of Lightroom and Photoshop into one simple piece of software.
You get the Digital Asset Manager (DAM) capabilities of Lightroom, the layer and selection tools of Photoshop, plus you get a few bonuses (such as the option to create collages, postcards, calendars, and more via the Create module).
Can Zoner Photo Studio replace Lightroom?
Zoner isn’t a total Lightroom/Photoshop replacement. Having tried to create a piece of software with everything, some small features slipped through the cracks, as well as high-level functionality in some of the more interesting features. For example, Zoner’s selection tools are nowhere near as far-reaching as Photoshop’s tools).
Plus, Zoner Photo Studio X includes some flaws that just aren’t present in Lightroom or Photoshop. The program’s interface isn’t especially sleek, editing can be slow, and the way the adjustment tools are implemented is far from perfect.
Before we get into the nitty-gritty, here’s the bottom line:
Zoner Photo Studio X is a good program, but not a great one. It can replace a more dedicated DAM program like Lightroom, but only if you’re willing to compromise on organisation features. The layer-based editing, while a nice bonus, isn’t enough to give programs like Photoshop or Affinity a run for their money.
The interface
Open up Zoner Photo Studio X, and you’ll find yourself confronted by a fairly simple set of tabs and tools. These stay pretty consistent as you move from module to module – something that beginners in particular will appreciate.
On the left-hand side, you have your photo access options:

Across the top is a bar with a few basic tools, including a slider zoom, as well as a fit to frame option.

Across the bottom is a filmstrip that allows quick access to other photos (though this, like Zoner’s other panels, can be toggled on and off with ease).

Moving over to the right-hand side, you have the tools and buttons from the current module selected.

Speaking of modules, Zoner has four of them, all of which can be accessed from the top bar:
- Manager, where you can organize all your photos
- Develop, where you can do non-destructive, slider-based editing
- Editor, where you can carry out layer-based edits and do more serious retouching
- Create, where you can produce art projects and other final products (e.g., collages, calendars, photobooks, prints)
Interestingly, Zoner has added tab functionality, similar to what you would expect from an internet browser.

This means you can open multiple tabs, moving back and forth between images or modules without losing your previous window.
All in all, the Zoner Photo Studio X layout is fairly intuitive, though it doesn’t look quite as sleek as Lightroom, ON1 Photo RAW, or (especially) Luminar.
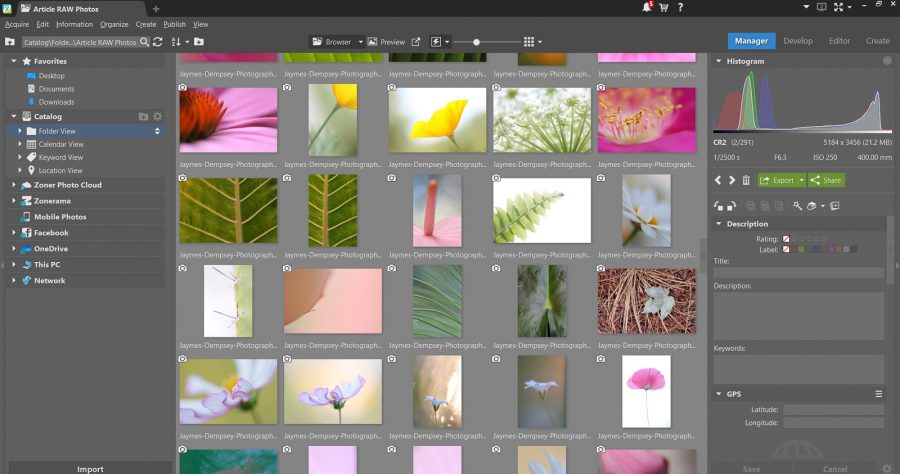
Organisation and photo management
Photo management takes place in the Manager module, with import options on the left-hand panel, and individual photo information on the right-hand panel.
Now, you have three basic methods of getting your photos into Zoner for editing. First, you can import photos into Zoner Photo Studio X by hitting the Import button and locating your files:

Second, you can catalog existing files (without doing any importing). Simply use the Catalog tool to bring existing folders within easy reach.

Third, you can use Zoner Photo Studio X with your existing desktop file structures. Just look for files via the locations on the left-hand panel, then navigate over to the Develop tab to get started with your post-processing.
Once you’ve accessed a file, you have the option to add ratings (out of five stars), colour labels, descriptions, keywords, and more via the right-hand panel. You can also see EXIF data from the photo, plus a histogram.
After using Zoner Photo Studio X for a few days, I found myself wishing for more intensive organisation capabilities. Like many photographers, I have a huge collection of images (around 300,000), which is why I need to drag photos into albums/collections and create nested hierarchies – without messing with my desktop folder structure.
Where Zoner does very well, however, is in terms of export capabilities. You can export individually (or batch export) by clicking the Export button, which opens a very thorough dialog – one that allows you to resize images, rename images, sharpen images, and more. You can even add presets for faster exporting.

Editing within Zoner Photo Studio X
Basic editing takes place within the Develop module, which is fairly fully-featured when it comes to editing options.

You have your white balance, exposure, color, sharpening, and lens correction tools, all of which are standard. Though also get a few little bonuses, including:
- Advanced hue, saturation, and luminance adjustments via a color wheel
- Advanced split toning with three separate wheels
- And the ability to alter individual channels with sliders

If you’re the type who likes to make sophisticated color adjustments to your images, Zoner won’t leave you disappointed.
Zoner also offers a surprising degree of flexibility when it comes to sharpening, including the ability to toggle between an Unsharp Mask and a Smart Sharpen option.
And you also get an interesting HDR tab, which is nice for working separately on highlights and shadows:

You can use Zoner’s own editing presets via the Preset menu, or create presets of your own.

While this may seem minor, it makes it far more difficult to edit, especially for folks who like to explore different options before finally settling on a result.
Masking
In terms of local adjustments, Zoner includes a number of useful tools:
- A gradient filter
- A radial filter
- A filter brush
- A smoothing brush
- And even a retouching brush
The first couple of tools are pretty ubiquitous, but the latter three (the filter brush, smoothing brush, and retouching brush) are harder to find in post-processing programs.
Unfortunately, the gradient filter, radial filter, and filter brush aren’t quite as powerful as you might need. You can make basic exposure adjustments and basic colour adjustments, but that’s about it.
Editor tab
Moving over to the Editor tab, you’ll find a set of more powerful tools, bolstered by layer-and-masking capabilities.
You can add adjustments to files, including familiar options such as Levels adjustments and Curves adjustments, but also some additional adjustments (e.g., Correct Chromatic Aberration).

You also have the ability to select parts of your images via the Selection tools. This is nice, but if you’ve ever experienced the power of Photoshop then you’re going to get frustrated, fast. There’s no Refine Edge brush, nor is there a Select Subject option, or even a Quick Selection brush. You’re stuck working with rectangular selections, magnetic lassos, and magic wand tools – none of which are ideal for more serious photo editors.
The story is similar when it comes to retouching tools. You have a basic Clone Stamp tool, a Healing brush, and that’s about it for removing objects. There’s no Patch tool, nor are there any of Photoshop’s other extras.
And while there is a nice group of project-style tools in the Create menu, it just doesn’t make up for these restricted editing options.

Zoner Photo Studio X review summary
Zoner offers some impressive editing features, especially in the Develop panel, but it falls down when compared to Photoshop’s incredible editing suite.

Is it the right choice for you?
Zoner Photo Studio X may not be the most impressive editing option out there, but it packs quite a punch. So who should think about purchasing Zoner Photo Studio X?
If you’re looking for a very low-cost non-destructive photo editor, Zoner could be a great fit – especially if you’re willing to sacrifice on digital asset management capabilities.
In the non-destructive editing arena, Zoner will take you far, allowing you to make professional-quality adjustments to your photos that surpass even Lightroom’s own level of control.
You also might go for Zoner if you like the idea of advanced layer-based editing but don’t want to commit to more complex options like Photoshop or Affinity.
Finally, Zoner is a worthy pick if you’re set on an all-in-one photo editor – one that gives you DAM, basic editing, and more advanced editing in a single, intuitive package.


