
How to Photograph Icebergs

Spotting your first Iceberg is quite an experience. From a distance, they can look rather small, but as your ship sails closer they begin to resemble their literal name. “Ice-berg” literally translates to “Ice Mountain,” and it’s not difficult to see why.
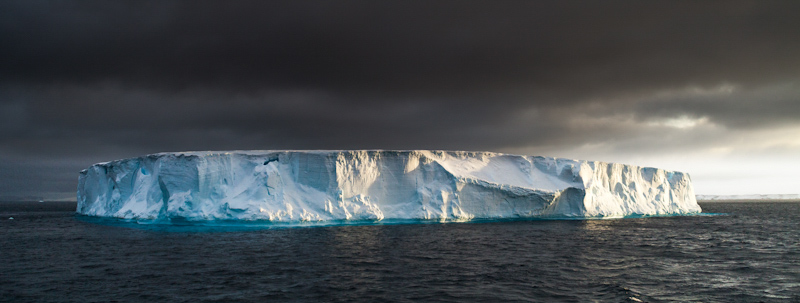
Particularly in Antarctica, huge icebergs can form that sometimes reach hundreds of miles in length. The Polar Regions are truly a dream for any avid nature photographer, but for most people the Arctic and Antarctic remain unreachable. For those lucky enough to be making a trip to one of these destinations, or who happen to live near these magical ice formations, read on for tips and techniques on getting some stunning photographs.


Composition
When you see that first iceberg, it might be difficult to avoid “happy snapping” and taking a huge number of photographs. My advice is to stop and think about the framing of the photograph first. It is more than likely that you will see hundreds of icebergs over the duration of your trip – so take your time! Remember to use the rule of thirds to get that equally balanced photograph. It’s important to keep the horizon line straight, but it’s not the end of the world if you don’t, as you can always straighten the image during your processing. Give extra space in your image for cropping, as shooting from a rocking boat can prove challenging.
Make sure to use an object to give an appreciation of the scale. This could be a fellow group of passengers on an inflatable speedboat, wildlife such as birds in flight, or even penguins. Try to add something into the foreground of the image that leads the viewer’s eye gradually into the photograph. This feature should slowly direct the viewer towards the main section of the image (in your case the iceberg or ice flow). More often than not, larger icebergs are surrounded by small chunks of ice that have broken off, but are floating nearby. These are ideal to place in the foreground of the image and can frame the iceberg nicely.
Tripod or No Tripod?
Tripods are an extremely useful tool to have in modern day photography. However, when shooting icebergs it’s more than likely that you will either be on a large ship, or a small inflatable speed boat. Using a tripod in these situations is more of a hindrance than a help. On larger ships, the engines create a slight, but constant, judder – and on the smaller boats there just isn’t enough space. Instead, shoot handheld or use a small beanbag to rest the camera on. With image stabilisation being a common feature on most DSLR cameras, camera shake shouldn’t be too much of an issue. You’ll be wanting to shoot at a fast shutter speed to make sure that the iceberg remains sharp, and further eliminate any camera shake. If you need more light, then bump up the ISO value. The majority of my images were shot between the ISO ranges of 100 and 400.
Zoom In
It is more than likely you will be incredibly close to these huge formations and will have a wide angle lens to capture the entire iceberg. I found my Sigma 28-300mm to be the perfect middle ground lens – having wide angle to capture scenic shots and zoom capabilities for close ups. Although it’s great to have stunning wide angle shots, sometimes zooming in on specific details of the iceberg yields great results. When larger icebergs begin to melt, chunks gradually fall off from different areas. With the wind and ever-present lapping water, beautiful streaks and lines are created all over the ice. These formations are great to focus on and provide an interesting and abstract view. Each iceberg is unique and has its own story to tell, so if you want to try something different – apply this method.

Polarising Filters
With almost constant daylight in the Polar Regions, light can be a challenging factor. Polarising filters are a must-have for anyone taking photographs of icebergs. They help to darken skies and manage reflections or glare from the surface of the sea. They are fantastic for bringing out the stunning blues and turquoises of the ice. These filters also allow you to capture the mysterious blue ice that lurks just under the surface of the water – a large component of a stunning iceberg image. Hoya produce good quality polarising filters that are made to fit a wide range of lenses.

However, don’t shoot all your images with your filter on! Reflections can often be breathtaking. It is best to shoot the icebergs on a cloudy day, as this cuts out the potential for blowing out the bright highlights of the white ice. Use stormy grey skies to your advantage by contrasting the grey of the sky to the white of the ice to create a dramatic and powerful image.
White Balance
Photographing bright white objects can pose a problem. This is especially evident with icebergs and attempting to capture the various hues of blue. By now, I think it’s common place to say: you should be shooting in RAW. There are a few ways to go about this:
- Auto White Balance: Simply stay safe and use the auto white balance feature on your camera. A large percentage of my photographs were taken with this feature applied, and as long as you are shooting in RAW and don’t overexpose the image, you can adjust this later during post processing.
- Spot-Metering: If your camera has spot-metering capabilities and you feel confident, expose for the blue areas of the iceberg and you shouldn’t lose any of the blue colouring. Remember again to shoot in RAW and adjust in Photoshop or Lightroom afterwards if needed.
Try Something New
The Internet is full of thousands of similar pictures of icebergs; a quick google search will reveal this. Why not mix it up and try something new? Add a neutral density filter and play with some long exposures. Try some zoomed in shots and create some abstract imagery. I decided to play around with a fisheye lens and was surprised to find I was one of only a handful of photographers on the trip to be using one. By warping the horizon (more often than not by pointing the fisheye lens downwards), I was able to give the effect that I was at the top, or in my case the bottom, of the Earth. This gives a whole new perception to the image. It’s also another fantastic way of getting really wide with your shots to capture the mind-blowing scenery that these icy-regions boast.

Climate change is a real factor and it is having a huge influence on the Northern and Southern regions of our planet. Human actions are causing the melting of sea ice in both Polar Regions and it is happening at an alarming rate. So much wildlife depends upon this ice for survival. If we don’t act quickly we could lose some of the most beautiful creatures and striking landscapes on Earth. I hope my images have given you an appreciation of these bizarre, but beautiful, natural creations.


