
How to Reduce the Size of a Photo
Knowing how to reduce the size of a photo is essential for anyone looking to share their images online. If you’ve uploaded full resolution images to the internet, this is a big mistake. Not only are they slow to load, but anyone with that file is able to create prints, products, and do other things with your image.
So, compressing your photos to reduce the file size is an important task. By file size, I’m referring to the data size of the image – e.g. turning a 10 megabyte file into something more usable, such as 500 kilobytes. Luckily, it’s relatively simple and easy to do. There are a number of imaging softwares available, all of which will be able to do this to some degree, but some are easier than others.


In this article, we’ll share everything you need to know to reduce the size of a photo.
Read more: Don’t Delete Your Raw Files for DNG Format
How to reduce the size of a photo without losing quality
The biggest fear you probably have about compression is the loss of quality. After all, no one wants their images looking rubbish online. However, reducing the file size does not mean that images will look pixellated if done properly.
There are a couple of important factors for effective compression:
Firstly, the pixel dimensions of your photo are a big factor. If your camera outputs a photo with 5000px on the longest side, then you’re going to want to reduce that. Typically, a photo shown online will be at 1600px on the longest edge.
This reduction will help greatly, but remember that you may need to sharpen your images too. Reducing the pixel dimensions so much can make things soft; adding a small amount of sharpening solves this. Note that Photoshop will do a good job at retaining clarity when reducing the file size, but in other softwares you’ll need to do this yourself.
Secondly, there is compression in the file data itself. I’m not going to pretend I know all the ins and outs of how compression works, but I do know what settings to tick to make things look good! If you’re interested in the mechanics, you can read about that on other websites that publish such thrilling content. This is usually under the title of “Quality” and offers a slider to choose a value from 0-100.
So those are the two mechanics we’re going to work with. Now, let’s look at some popular editing softwares and show you how to do this.
How to reduce the size of a photo in Photoshop
For users of Adobe Photoshop, reducing file size is simple.
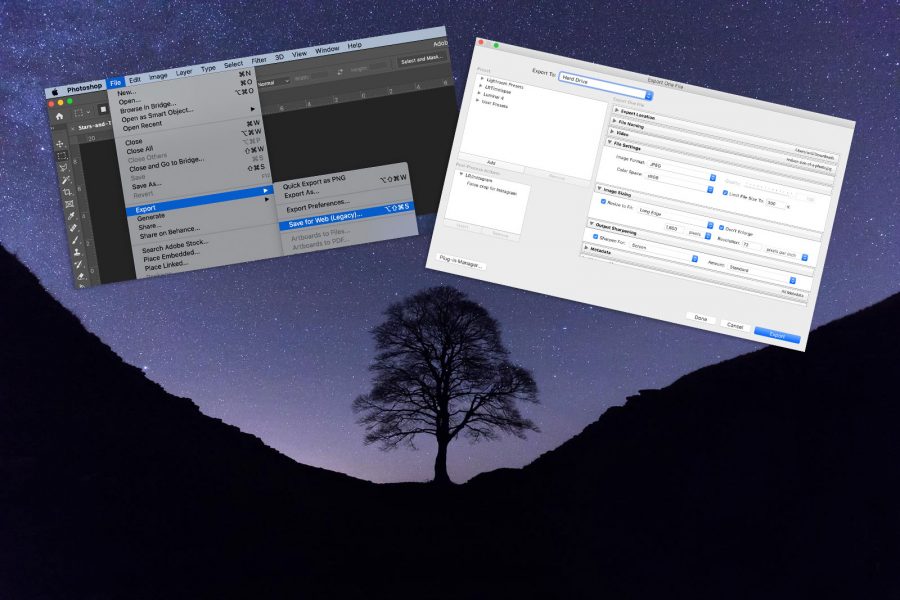
Firstly, open up the full resolution photo. For this example, I’m going to use an image of stars above a lone tree. If I were to save this file now using the typical “File > Save” option, the file comes out at 6.7 megabytes. That’s no use for working online, so I need to reduce the file size dramatically.
IMPORTANT: Before we go any further, the workflow within Photoshop can have you accidentally overwrite the full resolution file. When resizing JPEG files, the process is destructive if you overwrite the high resolution file. So, pressing “File > Save” or any keyboard shortcuts for saving will replace your high resolution file with the compressed version we are about to make. To avoid this accidentally happening, you should duplicate your high resolution file first. And remember to always have backups of your work.

To reduce the file size of the photo, the first thing to do is to reduce the pixel dimensions. Navigate to “Image > Image Size” in the toolbar at the top of the screen.

You are then faced with a pop-up. If you’re working with a horizontal format image, adjust the dimensions shown in the “Width” column. If you’re dealing with a portrait image, then adjust the value in “Height”.
The ideal size for use of the web is 1600px on the longest edge, so let’s go ahead and set this image to 1600px height. The width column will adjust itself to retain the correct proportions (as long as that chainlink is selected). Since I have “Resample” selected, there’s no need to apply sharpening after this change.

Now, if I were to simply save the photo as it is, I would get a file size of 1.6 megabytes. Better, but still not what I’m looking for.
The next trick is to use a different export window for Photoshop. Navigate to “File > Export > Save for Web”.

This window will show you the compression real-time, allowing you to see what the adjustments you’re making are doing to the final image.

In the above screenshot, you can see that I’ve adjusted the Quality field in the top right. To keep things looking good, I consistently go for “60”. I find that this value works well. 50 is fine too, and 40 is ok for some uses – but you’ll notice quality start to fall off here.
Typically, I’d like to have an image between 200 and 350kb in size. In this case, you can see the estimated file size in the bottom left (under JPEG). It’s telling me that file will be about 450kb. That’s above my ideal size, but there is a lot of detail in this shot and more information to pack into the file. So, all things considered, 450kb is acceptable.
Here’s the file we’ve just compressed:
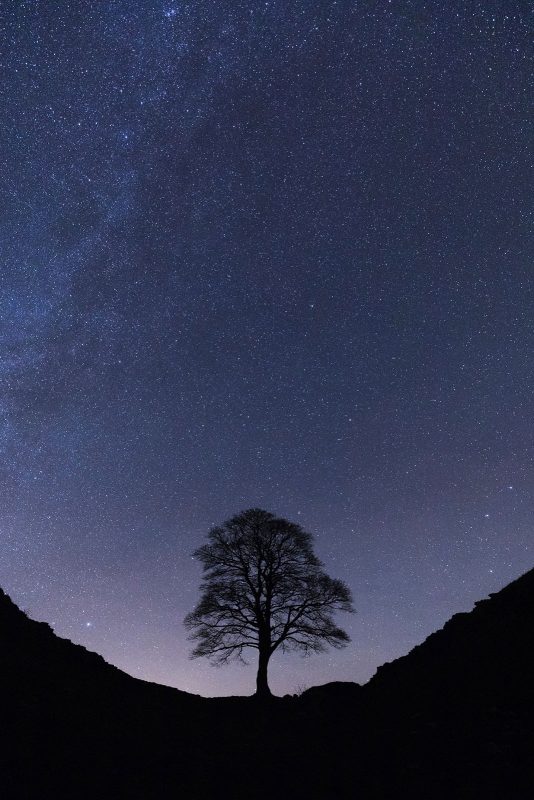
It looks good, right? And that’s at 450 kilobytes. Considering we started with a file at 6.7 megabytes, you can see that effective compression like this is possible.
How to reduce the size of a photo in Lightroom
My favourite way to reduce file size, especially in bulk, is through Lightroom. Since Lightroom is non-destructive, you’re not running the risk of overwriting your high resolution file by accident either.
If you thought that working in Photoshop was straight forward, then you’ll see how much of a breeze it is in Lightroom.
All you need to do is select your photo, Hit “Export” in the bottom left, and select the compression options.

Read more: Understanding the Lightroom Export Window
You can play around with the Quality slider, but I prefer to let Lightroom do this for me as it seems to do a great job. Just tick “Limit File Size To” and input your desired file size. It’ll come in at this file size or less. Sometimes you’ll be told it’s not possible and get an error message, in which case you’ll need to increase this limit.
In the “Image Sizing” tab, make sure to tick “Resize to Fit” and “Long Edge”. Then input your desired dimension – again, 1600px is ideal.
Remember, if you’re exporting a high resolution file you’ll want to add some sharpening. Just tick “Sharpen For” in the “Output Sharpening” tab. Then the options you want are typically “Screen” and “Standard”.
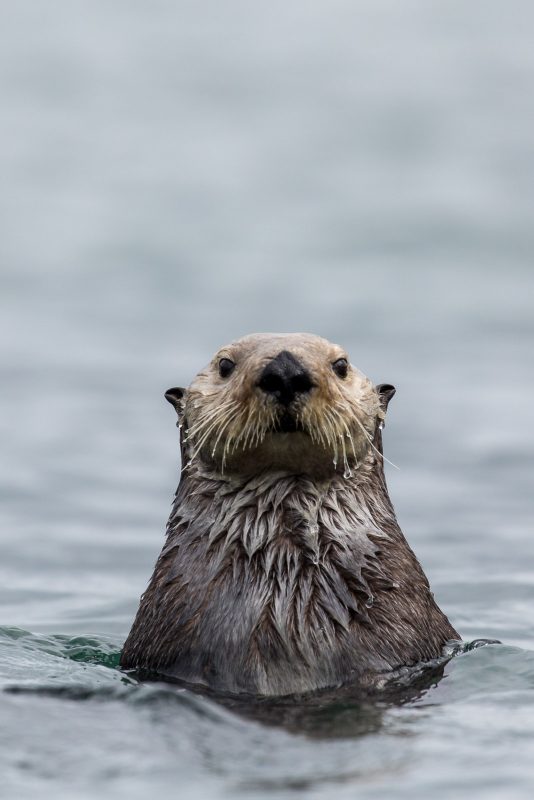
The result? Here’s a 275 kilobyte sea otter.
In conclusion
It’s as easy as that! If you don’t use Photoshop or Lightroom, just follow the practices I’ve outlined in the Photoshop section. This will, most likely, be a very similar process in all softwares. If you’re struggling, look up a YouTube video for your specific software in question.


