Butterfly Photography: How to Photograph Butterflies

It is fair to say that bugs and mini-beasts don’t have the same far-reaching photo appeal as other natural subjects. They lack the ‘ahhhh factor’ and interest of things that are feathered or furred. They can also prove difficult to locate, fiddly, and challenging to shoot. However, in frame-filling close-up, insects are actually hugely photogenic. Butterfly photography is easily accessible; you can find subjects to shoot in your own back garden or a local meadow.
Admittedly, some insects are more appealing than others. While ladybirds and dragonflies compete for top spot in the insect world for being most colourful and appealing, there can surely be only one-winner: butterflies.


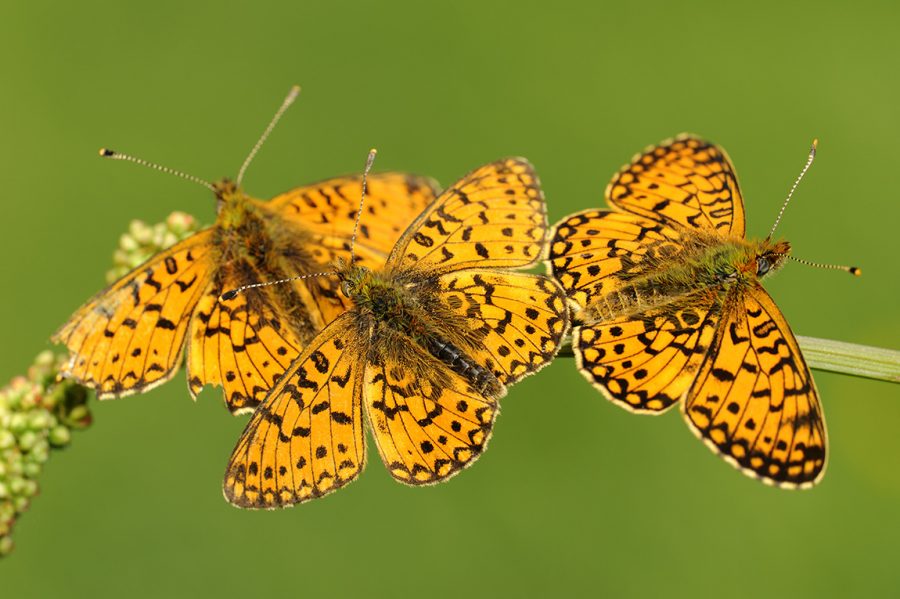
Butterflies are fantastically beautiful and photogenic – even fully subscribed insect-phobes can’t help but be seduced by their colour, intricate markings, delicacy and design. There is somewhere in the region of 20,000 species of butterfly worldwide, with fritillaries, swallowtails, blues and skippers being among the better known families. They’ve inhabited almost every type of environment and can migrate large distances – and in large numbers too.
The UK is home to around 60 types of butterfly and now, during summer, is the best time to dust off your macro lens or close-up attachment in order to embark on some butterfly photography. However, they are challenging subjects. To achieve both aesthetically and technically good butterfly images requires good field-craft, knowledge and skill.
Do your research
Just like any other animal, if you wish to get close to butterflies and capture their character, you need to do your homework first. Fail to do your research, and you won’t know when or where to look.
If you wish to target a specific species, study its preferred habitat – for example, does it favour heath, meadowland, unimproved grassland, chalk downland or woodland? Also, what months of the year do adults emerge and what are their larval food-plants?
You need to photograph butterflies soon after they emerge when they are still in pristine condition. The window of opportunity is brief – mistime your visit, and you may need to wait until the following year before you can try again. The Butterfly Conversation is a great source of information and your local branch will list a number of good butterfly-rich sites. However, butterflies can be found almost anywhere and nectar rich gardens are a good place to look for widespread species, like painted lady, small tortoiseshell and red admiral.

Once you’ve identified a butterfly-rich habitat to visit, you can begin taking photos. Regarding equipment for butterfly photography, I’ve already written about recommended kit and the best lens for macro. In summary, a tele-macro lens is the best choice as it provides a practical working distance from your subject, but you can capture good butterfly shots with any close-up attachment.
Finding your subject for butterfly photography
Butterflies are most active and easiest to locate on warm, still, sunny days. However, they can prove difficult to get close to, being flighty and sensitive to movement.
During daytime, stalking is the best technique. This is when you follow (not chase!) butterflies around, waiting for them to rest, feed or bask. When they do, you need to efficiently move into position – just be mindful of the sun’s position; if you cast your shadow across your subject, you will likely frighten it away. Also, do not disturb adjacent grasses or vegetation, as butterflies are very sensitive to movement.
Unfortunately, during the middle of the day, the light will be harsh and not particularly conducive to photography. Instead, early morning and late evening are the best times for photography, when butterflies are cool and inactive and the quality of light more attractive.

The majority of my butterfly photography occurs at either end of the day. During summer, this can involve a painfully early start but, being wildlife photographers, we’re fairly accustomed to tiring, unsociable hours, aren’t we?
I now know several nearby nature reserves intimately, so I know exactly where to look for different butterflies – never underestimate the benefits of local knowledge. I look for subjects roosting in tall grasses or on flowers. When they are cooler, butterflies are less likely to fly away and so it is often possible to set-up a tripod. Using a support is hugely advantageous, allowing you to compose and focus with greater precision.
Recommended camera settings for butterfly photography
Depth of field is inherently shallow at higher magnifications, so there is no leeway for error when focusing. However, if you are using a tripod you can focus via LiveView – something I always prefer to do when practical, as I’m able to magnify the live image and manually focus on the butterfly’s head/eyes with unrivaled precision. A tripod also allows you to select a smaller aperture to achieve the depth of field needed, and – if necessary – use a reflector to relieve ugly shadow areas.

Personally, I usually want my subject to stand out boldly against a nicely diffused, out of focus backdrop, so I will typically opt for the largest aperture possible (lowest f-stop number) that will still generate sufficient focus. Doing so also provides a faster shutter speed.
In fact, these days I regularly increase my ISO to 800 or 1600. Like many of the latest breed of digital SLRs, my Nikon D810 handles noise very well. Using higher ISOs doesn’t significantly affect image quality anymore, but the faster shutter speed helps to ensure sharp results when wind movement is causing problems.
The wind is a big consideration when shooting butterflies – even the slightest breeze can prove hugely problematic. Look at the forecast before you plan your shoot – a wind speed of below 10-15kph (kilometres per hour) is ideal. Not only are insects less active and flighty at either end of the day, but also the sun’s lower position allows you to be more creative with lighting. Personally, I love backlighting and this type of light suits butterflies well, highlighting the translucency of their wings and emphasising shape and form.
Background choice is also important when shooting butterflies, so explore the background for any distractions – for example, grasses, or ugly highlights. For more information about general macro photography technique, read my article “Introduction to Macro Photography: Technique“.
From a compositional perspective, butterflies can be photographed in many different ways and angles. The most popular is from above when the insect’s wings are open flat. To maximise depth of field, try to keep your camera parallel to its wings – this is because there is only one geometrical plane of complete sharpness, and normally you will want to place as much of your subject in this plane as possible.
Finally, be patient… very patient. When shooting butterflies, be prepared for moments of complete and utter hair-pulling frustration. You wouldn’t believe the number of times a butterfly will disappear into the distance just at the moment you are about to trigger the shutter! However, thanks to subject knowledge, good technique, perseverance and a little lady luck, you will soon be capturing great butterfly images this summer.


