
Preparing a Photo for Web Use
The two most important things about a photograph when viewed online is that it loads quickly (has a small file size) and still looks good. “How?” I hear you ask. Well actually, it’s not as impossible as it may first sound. This tutorial will show you how to do this using Photoshop, but most editing software is similar and you should be able to achieve the same results.
Image Size & Sharpness
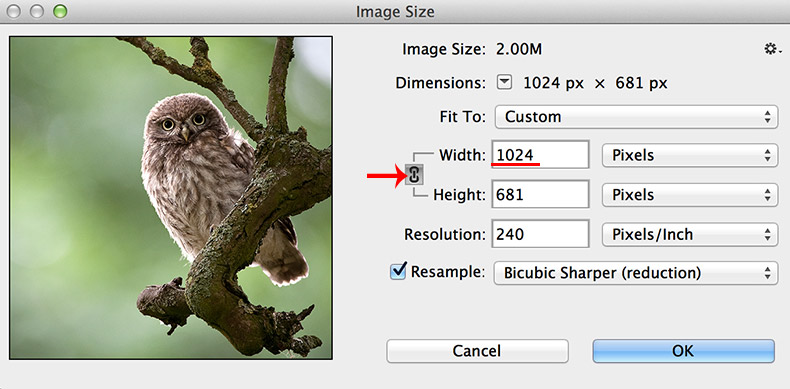
Many photos you see online are 1024px (pixels) on their longest side. This is a good size as it doesn’t look too big on smaller screens, and also doesn’t look too small on larger screens.


When you reduce a photo’s size using versions of Photoshop earlier than CC, you would lose a lot of its sharpness. If this involves you, you need to use the unsharp mask to bring this sharpness back. The tool can be found under “Filter > Sharpen > Unsharp Mask…“. A radius of 0.5 is perfect, and anything from 40-80% sharpening will bring back that crystal clear look.
If you have Photoshop CC, they have a tool called “Bicubic Sharper (reduction)” which is applied during compression and does a good job at keeping the smaller image sharp. Most of the time I don’t need to use the unsharp mask after compression because of this.
To resize your image, navigate to “Image > Image Size…“. Type in 1024px in the width box for landscape images, or the height box for portrait ones. Ensure that the link icon is depressed, as this will keep the proportions of your image correct.
File Size
It goes without saying that the smaller the file size, the quicker the image loads. People have very short attention spans, whether they like to believe it or not, and so a few slow-loading images on your website will send a lot of visitors packing. A fast loading online portfolio is paramount, and will keep your visitors engrossed in your images for longer.
When I save a photo, with dimensions of 1024px longest side, as a normal JPEG, it comes in at around 500kb. This may not sound like much, but two images like this are 1 megabyte. Ten images are 5mb, and very quickly your website becomes heavy and sluggish.
Luckily there is a way around this. If you save an image using the “save for web” setting the file size will reduce massively. For me, the same image showing 500kb originally will save at 140kb. The best thing is, the difference is almost negligible to the eye. It saves the image at 72 pixels per inch, so the file size is lower. An added bonus is that anyone trying to print this file would find it pixellated and of low quality! You can find this setting by navigating to “File > Save for Web…“.
You’ll be presented with a window like this, although hopefully with a different image!:

Choose your file type from the drop down labelled – this should be JPEG for a photo. There are a variety of quality settings you can choose from, Ranging from “maximum” to “low”. Use either “high“ or “very high“. The image on the left will give you a preview of what it will look like – but rarely can I see any major differences between the two modes. Any lower and the quality begins to noticeably degrade. Remember to make sure “optimized” is ticked for an extra bit of compression.
Final Thoughts
Remember that now your images look great online, people are more likely to want to use them. Whilst copyright infringement is illegal, it still happens. The most common deterrent used is to watermark your images. If you don’t know how, check out our “How to Watermark an Image” guide.


