
How to Make a Pop-up Nature Photo in Photoshop
Bored of 2D photos? Let’s take a look at how you can harness the power of Photoshop to give your photos a 3D effect and make the subject literally pop-up from the frame.
You don’t need any advanced Photoshop skills really, and the effect doesn’t take that long to apply. Any photos with a subject with distinct edges will work. That might be some mountain peaks or a cheeky squirrel – the possibilities are endless!


For the purpose of this tutorial, here’s the photo we’re going to be turning into 3D:

Step 1: Set Up the Layers
You’ll need to have 4 layers set up so that you can make this pop-up nature photo.
First, click the background layer and duplicate it twice. You can do this by hitting Ctrl + J (Cmd + J on Mac) on the keyboard. Next, click “New Layer” at the bottom of the layers window.

Now just drag this new transparent layer so it is the second from the top. Your layers should look like this:

Next, make sure that in the colour palette you have a black colour as the background selection. Click the bottom layer (Layer 0 / Background) and press Ctrl + Backspace (Cmd + Backspace on Mac) to cover the layer in black.
Click the eyeball next to Layer 3 to hide it, and you should be ready to go:

Step 2: Draw the Frame
Grab the rectangular selection tool, and drag a rectangle around the subject. Don’t go all the way to the edges of the image, and make sure that you leave a good portion of the subject poking out of the selection.
Once you’ve got your selection, navigate to “Edit > Stroke…” in the toolbar menu. Depending on the resolution of your image, choose a suitable width for the border. Make sure it’s set to white, and the location is “Inside”.

Once you’ve done this, go to “Edit > Transform > Perspective” and pull the top right tab to the left. This will mirror the change on the opposing side, and add depth to the frame.

Grab the transform tool again by hitting Ctrl + T (Cmd + T on Mac) and pull down the top-middle tab so that the frame is smaller in height. You should now get an idea of where the subject will pop out, so do this as you see fit.
If you want to make some cool 3D effects for the frame, go to “Edit > Transform > Warp…” and start pulling the edges around. You can add a drop shadow later from layer effects.
Step 3: Create the Masks
With your frame still selected, right-click the white area and choose “Select Inverse”. Now, hit “Q” on the keyboard to turn it into a Quick Mask. Now choose the paint bucket tool, and click anywhere outside of the mask. It’ll turn the whole background red. Press “Q” again and the mask will turn into a selection.

Now, click Layer 1 and click on the Layer Mask button.

Now you’ll see something like this:

Before proceeding to the next step, click the eyeball next to the top layer that we hid earlier, and you’ll see your photo again without any of the adjustments we’ve made.
Step 4: Select the Subject
Grab the Quick Selection Tool from the menu, and set it to “Add to Selection”. Choose your brush size relative to the size of the elements you need to select in your image. You want the brush to be able to fit within the edges and not overlap the subject and its background, allowing you to click around the shape you’re selecting.

Once you have the tool primed and at the ready, start clicking around. Photoshop will intelligently search for edges and select your subject. You can use the “Remove from Selection” version of the tool if you’ve made a mistake and want to clean up an edge.
With the subject now selected (remember, you only need to select the portion outside of the frame), navigate to “Select > Select and Mask…”.

Open up the “Edge Detection” tab, and tick “Smart Radius”. Choose a small radius to help refine the edges. I’ve gone for 11px but you can go lower. Ticking “Show Edge” (or pressing J to active it) is useful for showing you what it is you’re actually doing.
Click “Ok”, and then click the Layer Mask button again.

Voila! Your creation is alive. You can refine the mask even more by clicking on the mask itself in the layer panel and using the paint brush to adjust the selections.
If you’re not happy with how it looks, then you can refine the mask even more by clicking on the mask itself in the layer panel and using the paint brush to adjust the selections. Painting black colour onto the mask will hide parts of the layer, and painting white will reveal them.
Step 5: Create the Background
Now you have seen your creation, you probably want to add a nicer background to it. At the moment it will be black, so grab the gradient tool and choose a dark and light green colour in the palette.

Click the radius option, and then click and drag from the centre of the image to the bottom right corner. You’ll now have a nice, clean background.
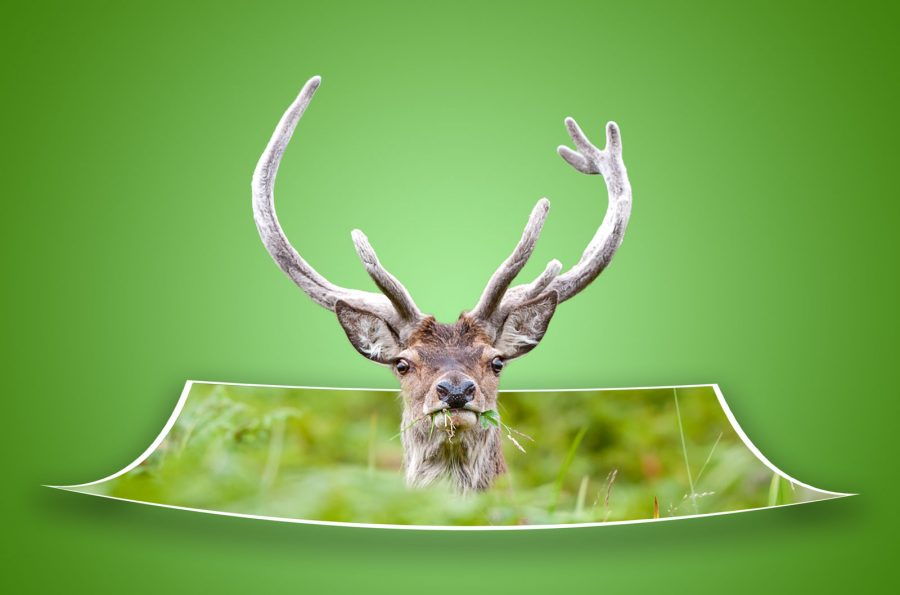
Hopefully your photo looks something like this:

Step 7: Warp the Edges
If you haven’t done it yet, and in hindsight want to make the frame 3D with funky edges, then select the transparent layer and go to “Edit > Transform > Warp…”. Start pulling the edges around and flick them upwards.

You can then add a drop shadow to the frame edge – just right click the transparent layer and hit “Blending Options”. Tick drop shadow and move the sliders around until it looks realistic.
Now, you can move Layer 1 above Layer 2 so that the drop shadow appears only underneath the image. To make the photo fit the frame, warp the edges of the photo (be sure to select the mask itself, and click the chain link between them) to fit the frame. This is a more roundabout way of doing it, but if you didn’t make the change in step 2, you can do it this way.

Show Us Your Creations!
Have you tried this out yourself? Please share your results in the comments below – we’d love to see how it worked out for you.
Want to go a little further? With some more Photoshop wizardry, you can utilise the “Warp” tool in the Transform menu to bend the frame around. Try adding a drop shadow to make it even more realistic.


