
How to Photograph Otters: Locations, Techniques & Fieldcraft
Otters have been a huge part of my life since 2012 when I first started studying and photographing them. At the start it was all new to me and I made a few mistakes, but now I have built up a wealth of knowledge surrounding these often hard-to-photograph mammals.
It has taken time. Hopefully this article will give you a head start and allow you to photograph otters without them ever knowing that you are there – the way it should be.


The UK is home to one otter species: the Eurasian Otter. They generally live in and around either freshwater or saltwater habitats, although your approach to photographing them will differ depending which of the two habitats you spot them in. I have been lucky enough to spend the last 6 years working with otters on Norfolk’s rivers, and 5 years on the coastline of Shetland.

Fieldcraft is important for otter photography
One of the main aspects of photographing otters is fieldcraft. Once in the right position, photographing them is fairly straightforward. So, to start you off, a few things you need to know about otters:
- An otter’s sense of smell is extremely good and it could smell you from hundreds of metres away if the wind is in the wrong position.
- Their hearing is also very sensitive; even the sound of a shutter going off can disturb them, or the rustling of waterproof trousers.
- Their eyesight is relatively poor.
With those three points in mind, photographing otters can become a lot easier.
Wind plays an important role in getting close enough to photograph otters. Wind direction is key – ideally you want a strong wind coming straight at you or onshore, staying upwind of the otters at all times. This means your scent will be going away from the subject and any sound you will make will also be taken away. The stronger the wind, the better your chances regarding noise.
On a calm day, however, you normally have to shoot on quiet mode combined with single shot (no bursts). This is where mirrorless cameras are incredible for otter photography, as the silent shutter is a game-changer and takes the issue of shutter noise away.
Frustratingly, there have been many times I drawn a blank photographing otters with my DSLR due to them being too close on a windless day.

With their eyesight being poor, getting close can sometimes be easy. You need to be able to read the environment and topography of the land, plotting your route and predicting the otters’ behaviour. Otters will quickly detect any sudden movements, so move slowly and when in position raise your camera slowly to your eye. Most people get excited once in position and ruin it by quickly moving the camera up.
Otters will spot you on the skyline, so make sure you have something obscuring your profile. Also, wear dull clothing to blend yourself into the background. In Shetland, the peat banks on the shore are great to walk under and provide excellent cover when approaching otters.
On the rivers it can be slightly harder to disappear. Try to use trees, foliage, or anything else to break up your profile. It’s best to move when otters are underwater – generally they dive for 20-30 seconds – so I will move for 15 seconds then stop near cover. Of course, dive duration is never an exact science, so study what your otters are doing first and adapt the technique to suit how they are acting.

Lastly, patience! There will be times when you feel you want to get closer or push your luck a little. If you get to the point where you are thinking “should I or should I not,” a word to the wise: don’t!
The more you push, the more likely you are to spook an otter. If this happens you won’t see it again, and if you do it will be very skittish. But, if you stay back and wait, another opportunity will normally come around and you may be able to get in a better position than before.
When to photograph otters and how to find them
The optimum time of day differs depending on where you are trying to photograph them.
In Shetland, and most coastal environments, the best time is between 2-3 hours before and after low tide. This is when they are more active and are out hunting, drastically increasing your chances of finding them. You can see them at other times but it’s a lot less reliable.
Otters do have particular routines and territories, so the more you are out, the more you will understand them and increase your photographic opportunities.
In Norfolk, and most freshwater environments in the UK, the best time is from dawn for two hours and then again two hours before dusk. Having said this, otters are starting to come out more in daylight hours in some parts of the country. Here in Norfolk, we are lucky to see them at all times of day on many rivers.

The time of year doesn’t overly matter. Otters are around all year and can breed at any time, although the peak for new families is in autumn. For me, this is the best time to photograph them as well as in the winter.
Sometimes new families will be appearing with smaller territories, and on the rivers it is easier to find them due to less vegetation covering the banks.

Use binoculars when you’re out looking for otters, especially on the coast. The further away you can spot one, the better prepared you can be to approach it. You are looking for the signature tail flick when they dive, or movement on the land and amongst vegetation.

Listen out for high-pitched squeaking: cubs are often vocal when trying to relocate their mothers. This is a great way to tell they are around, especially during rough seas or around an overgrown river when spotting them can be tricky.
If no otters are around, look for the signs. Footprints and spraints (excrement) are easy ones to identify. If a site has several spraint areas, then it will generally be used regularly. Check it again another day, or keep looking along the stretch of river or beach carefully.


Camera techniques for photographing otters
In terms of technical information, it all depends on the lighting conditions, type of shot you are after, and whether you’re using a wide-angle or telephoto lens. But here are a few general rules I use or think about when photographing otters:
1. Lens – For most otter shots, the longer the lens the better, as you don’t have to get to close and risk disturbing them. I’m a big fan of zoom lenses for otters, so I use a Nikon 200-400mm f/4. Otters move around a lot and it’s not always possible to move especially if they are close. This allows more flexibility with composition and a variety of shots are possible. This is a personal preference; I’m sure many photographers would go for a prime, but for me they are limiting for otters.
2. Tripods – I personally handhold and use rocks, trees, and other features of the landscape to support me. They can be a bit clumsy and noisy, and generally take slightly longer to set up. This is all time you don’t always have. Tracking down otters is highly active with situations happening swiftly and without warning, so tripods are far from ideal.

3. Shutter speed – Obviously depends on the situation but as a general rule, to get a sharp image of an otter, I try and get 1/1600th second to freeze everything. Always be prepared for action: one moment they can be laying around doing nothing, and the next second shaking or play fighting. If you aren’t prepared, then you might just miss that shot.

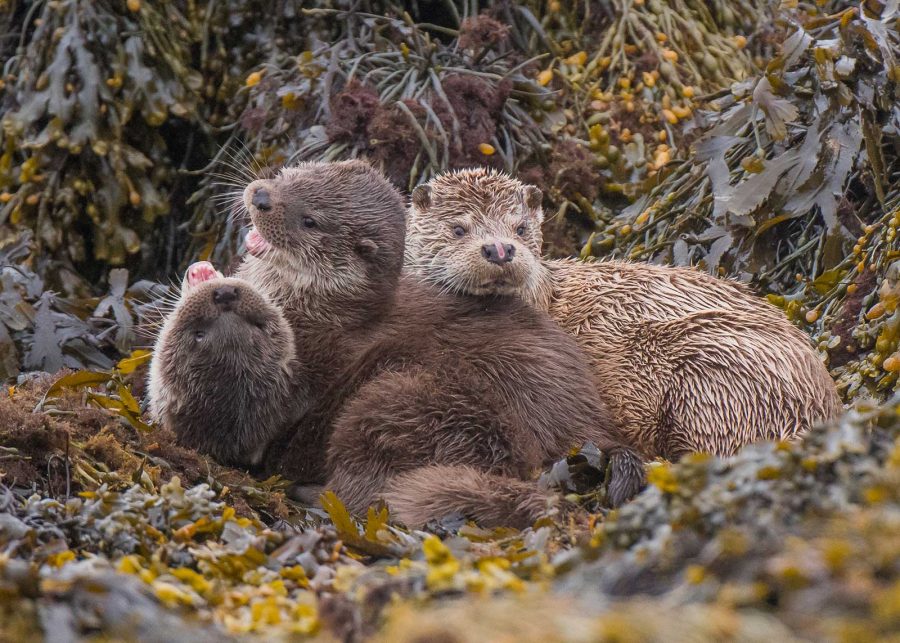
4. Aperture – If an otter is very close to you, keep in mind that their eyes and nose are a long way apart so a large depth of field is needed to ensure everything is in focus. Also, if you are photographing a family, you will need a larger depth of field of around f/8 or more.
5. Single shutter and silent mode – It’s always a great starting point and, if the otter is comfortable and undisturbed, you can then think about going onto continuous mode – but be careful not to disturb them.
6. Hides – I have never used a hide for otter photography. The only time they would be of use if it were for a bathing pool or hunting pond. Other than that they are pointless as otters are constantly on the move.

Otters can be a highly sensitive species, so always be overly cautious when photographing them. Their holts are protected under law, so never disturb or destroy these areas. If you do happen to disturb one, leave the area to allow them to get comfortable again and carry on hunting. Otters need to eat a huge amount each day, so if they get disturbed several times then they would struggle to get their daily food quota.
I hope this helps and that you enjoy your time trying to photograph otters. I still get the same feeling I did when I saw my first one in 2012, and now see them most days of my life. I hope you do the same.


