3 Ways to Automate Your Photography Business with Zapier

You’ve probably heard it before, or experienced it yourself, but being a professional photographer means you spend a lot more time in front of a computer than you would like. The ultimate goal is, of course, pursuing a life where you can be outdoors and surrounded by nature whilst your photography business ticks along in the background. I’ve been in business, to some degree, since about 2009 – at least that’s when I started actively trying to make money from my photos. I quickly learnt that there was a lot of social media management, web maintenance, and cataloging to work through. That means a lot of hours in front of a screen, but I’ve since come up with some great ways to automate basic tasks for your photography business.
If you’re looking to save time, then this could be the best tutorial you read today (or at least I hope so!). I use a fantastic tool called Zapier – it’s an automation website where you can link different applications and websites together using a mixture of triggers and actions. Seriously, it saves a lot of time. Think of all those remedial tasks you do day to do, whether that’s posting photos to multiple social media accounts or maintaining a neat database of email exchanges.


What is Zapier?
First off, I’d like to state that I’m not earning any kind of commission for this article. It’s worth saying, though, as I’m gushing about how great Zapier is. The service allows you to connect a huge number of websites and applications through APIs (application programming interface). Whilst that might sound totally technical and scary, don’t panic – the whole point of Zapier is that you don’t have to deal with any code or anything like that. You just use an extremely friendly user interface to pull together the connections and Zapier does the hard bit for you. See all of the possible applications you can connect here.
Zapier allows you to take the headache out of simple, remedial tasks that you might find yourself doing on a day to day basis. I have plenty of “Zaps” working for Nature TTL, and there are loads that you can incorporate into your business as a professional photographer to speed up your workflow and reduce your time in front of the computer.
The service has a free plan, allowing you to run 5 Zaps which perform 100 tasks per month. Each “step” in your Zap is counted as one task. After that, a $20 per month subscription will get you 20 Zaps and 3,000 tasks per month.
If you’re new to Zapier, I recommend getting a free account so you can see how the interface works – that’ll help you make sense of this article. Each action and trigger you create will require you to login and connect to the different services you’re integrating, and Zapier will then pull in a load of information from that service. You can easily select different elements and bits of information that you want to pass onto the next application from a dropdown list.
1. Automate posting photos to social media
Ok, so you’re probably posting on social media and that can be a real pain to manage. Photographers find themselves spreading their time thinly over Facebook, Twitter, Instagram, and other photo sharing websites including Flickr and 500px. The order in which you do things can be changed, but here is a handy Zap you can try to automate your social media posts.
With this Zap, every time you post a photo to Flickr it will take the image and its description and post it to your Facebook and Twitter pages. Firstly, I’ve set up the Zap to trigger when I upload a new photo to my Flickr page. Below you can see that trigger, and a sample post from Flickr that would trigger the Zap:
Now that that step is created, I can move on to add an action that needs to take place whenever I upload a photo to Flickr.
In the above screenshot you can see the next two actions that are taking place. The first is posting a photo to Facebook. Using the pre-defined information fields that Zapier has pulled from Flickr, I am able to automate the action that should take place on Facebook. What you’re seeing here is a post going to my Facebook Page, “Will Nicholls – Photography & Film-maker”, every time a new photo is uploaded to Flickr. In the photo field I have specified the URL of the image posted to Flickr, showing Facebook where to take the photo from, and then in the description field (that’s the text that will accompany the photo on Facebook) I have pulled in the same description I have posted on Flickr.
The second action is a bit more advanced, but it will help you for posting to Twitter automatically. For example, if you’ve posted a particularly long description for your photo then you’ll have trouble when posting the photo to Twitter. Twitter has a 280 character limit on your posts, so your post would cause an error if your description was over this count. The Formatter step is taking the description from Flickr and truncating it, should it be over 280 characters in length.
The next step takes that formatted description field and posts it through to your Twitter account:
There you have it! If you’re reading this article so far and are a little confused, then I really recommend signing up to Zapier and trying this out yourself. You’ll realise that it’s very straight forward and the whole trigger and action relationship will start to make more sense to you.
2. Subscribe your customers to your mailing list
If you’re selling your photos online, then you’re going to want to keep in touch with your customers. After all, someone who spends money in your online store is most likely to do it again. Keeping in touch with your customer base is so important, but it’s really easy to forget to update your mailing list and keep on top of new subscribers.
Creating a Zap to connect your PayPal account with your MailChimp account (or other mailing list provider) will allow you to automate this task easily.
Here you are seeing a Zap that triggers every time there is a successful payment received. This Zap then takes the customer’s email address and adds it to your newsletter.
It’s likely that you have payments that aren’t from just your photography eCommerce store coming into your PayPal account. In this case you’ll want to add some kind of a filter to your Zap between the Paypal and MailChimp step. This is tricky, though, as you need to find something that can clearly identify where the sale is coming from. If you’re selling multiple products, the description of the product is going to change each time.
I use Zenfolio to sell my photos online, and each order that comes through PayPal has an item name of “Order ZF-XXXXX-XXXX” – the XXXX replaces each time with a unique order number. So, to only add customers from my Zenfolio store, I have created a filter that only allows the Zap to continue if the item name contains “ZF-“.
If you use a different service to sell your photos, look at your PayPal account and see if there are any consistent descriptions that occur only with your eCommerce orders. You can then use these terms to identify and filter out other payments. If that isn’t appropriate for you, you could set up a PayPal account that only receives payments from your eCommerce store, allowing you to eliminate the filter step.
3. Automate reminders for workshop clients
You can also use Zapier to send out email reminders to people based on a trigger. For example, you might be offering workshops and would like to automatically remind people of there upcoming booking so that everything is crystal clear with regards to the timings of the session.
To do this, I’m going to create a Google Sheet where I’ll manually write in all of my workshop bookings. You can do this for free with Google Drive. Here’s a quite sample template I’ve created to show you how you might like to organise your booking information:
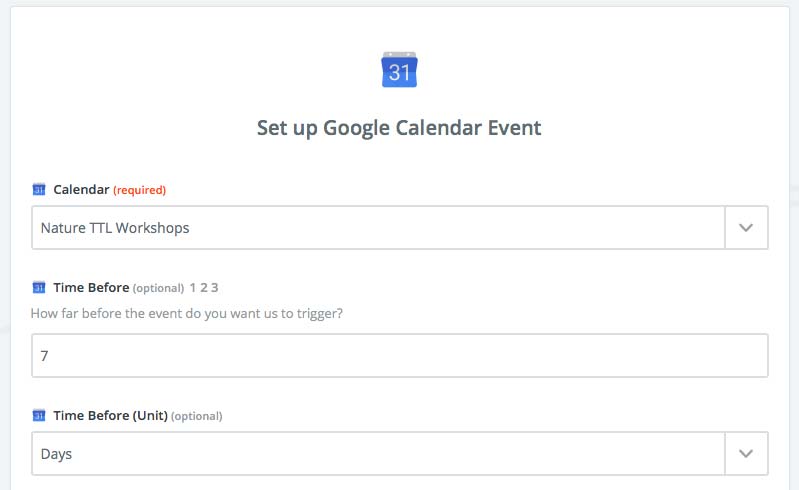
Firstly, I’m going to trigger my Zap every time I create a new row in my spreadsheet. The first action will create an event in your Google calendar, allowing you to keep track of all upcoming bookings easily. It is important that you create, and specify in Zapier, a calendar unique to your workshop bookings. You can have multiple calendars all showing up in one overall calendar, but it’ll mean that workshop bookings are isolated into one separate section.

Once you’ve got that action setup, you’ll want to create a second new Zap to react to upcoming Google Calendar events. The Zap will trigger 7 days before an event in your Google calendar.
What we want to do is lookup the email address of the client based on the information given to us from the Google Calendar event. To do this, create an action using Formatter by Zapier. Select the “Text” task and from the Transform dropdown menu choose “Extract Email Address.” You can then select the description field for the “Input” field.
Now you’ve got the email address of your client, you can send a reminder email. For the final action of this Zap, use the SMTP action. You’ll need to connect up your email address to Zapier, and then you can send emails automatically. On the template page, fill out the necessary informations and write your email address.
And there you have it! 7 days before every workshop, your client will now receive an email to let them know that the session is coming up. If you’re running multiple workshops, you can customise the Zaps using Filters to set up different emails for different workshops. But if you’re just running the one session, then this will work nicely without any filters. Just remember to create that unique Google Calendar for your workshops!
In Conclusion
Hopefully that made some sort of sense and gave you some ideas of how you can save time by automating your photography business. If you’re a little confused, feel free to reach out to me in the comments below and I’ll be happy to help. You can also contact Zapier’s support team at [email protected] who are super friendly and will help you set up the kind of Zap you’re looking for – just tell them what you’re after and they’ll point you in the right direction if it’s possible.
Are you already using Zapier? Let me know what you’re using it for in the comments below. It’ll be great to pool some ideas and see what kind of thing you’ve found it useful for!


