
How to Make a Solar Eclipse Filter for a Telephoto Lens
Solar eclipses are fantastic things to photograph, however they naturally come with risks for your camera when you’re aiming at the sun. You might have taken photos at night of the moon or stars at some point, and this is something which mostly doesn’t need special equipment. However, taking photos of the sun during a solar eclipse requires a slightly different approach. So to safely photograph a solar eclipse you will need to buy or go homemade and make a solar eclipse filter, protecting the sensor (and your eyes).
First things first, safety: remember to never look at the sun directly through any optical equipment! That goes for cameras, telescopes, binoculars, anything – even for a split second, as it will damage your eyes. The best and safest way to look at or photograph the sun is with a solar filter. These specially produced filters, or pieces of film material, are extremely effective. They only allow a small amount of light through, ensuring safe viewing at high magnification. You may think you could use welding glass in front of the lens or a high-density ND filter instead but, even though they do work to some extent, there is one major difference. That difference is to do with types of light: ND filters and solar film will both reduce visible light rays, but solar film will also stop infrared and ultra-violet rays, both of which are extremely damaging to camera sensors, and your eyes, over prolonged periods of time.


What You’ll Need to Make a Solar Eclipse Filter
Ideally, for solar eclipse photos, you’ll want to use the longest lens you have. Attaching extenders works great, or using a crop sensor body can help too, with the ultimate aim of filling the frame with the sun. The best way for safe viewing and imaging is attaching a solar filter to the front of the lens, but you’ll have to make this at home for telephoto lenses as you can’t buy screw-on filters that will fit (although they are available for smaller lenses).
The most common choice of film is the SolarLite film or the Baader AstroSolar Safety Film. It’s an A4 sheet of what at first appears to be thin kitchen foil, but is actually a specially coated double sided film that stops any harmful light and rays from damaging your camera’s sensor. With the solar film installed, the sun appears as its real colour: neutral white. Other films and most glass filters produce a blurry bluish or reddish solar image, thereby cutting part of the spectrum. For small telephoto lenses that take screw on filters, it’s easy to attach solar filters this way by purchasing one with the right thread size for your lens.
However, when using larger primes it gets a bit more specialised. Big prime lenses tend to have large front elements too big for screw-threaded filters, plus hoods that go on top too. There are film holders available on the market (which can also be used for telescope tubes) but these cost quite a bit on their own. Don’t worry – it’s quite easy to make your own, so let’s take a look at the instructions for building your very own solar film holder.

How to Make a Solar Eclipse Film Filter Holder
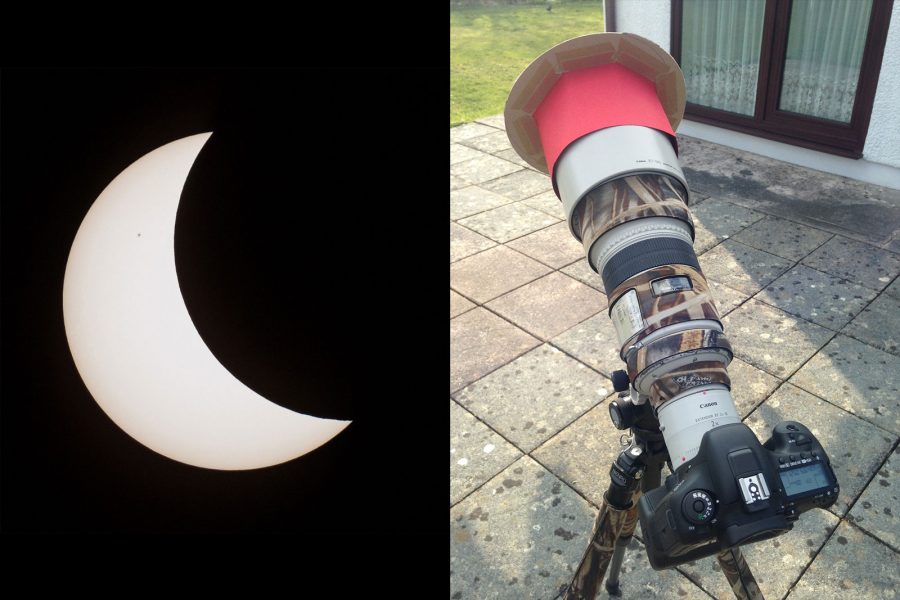
The filter we make shouldn’t be a completely tight fit, but neither do you want it to slip off. Here’s the final product which you’ll finish with by the end of this tutorial:

Step 1 – First thing is to measure your diameter of your lens hood aperture, and then add half an inch. Expand a drawing compass to this measurement and, on some cardboard, draw a circle. Add another 2-3 inches to the drawing compass measure and, using the same midpoint, draw another larger circle around the original.
Step 2 – Cut out the circle in the middle and also the overall doughnut from the cardboard. You’ll want to repeat step 1 and 2 again to make a second doughnut shape. Craft knife and cutting mats work best for this.
Step 3 – Using a glue stick, rub it all over one side of both the cardboard doughnuts. Place the solar film over one of the cardboard doughnuts, then stick the other doughnut on top to sandwich the film in between them. Trim off any spare film, and you’ll now have the front of your solar filter made.

Step 4 – Next up is the barrel part, so get a longer piece of thin card, roughly 6 inches wide, and wrap this around your lens hood, marking where the circumference meets. Again, add half an inch or so, so it’s not tight to the lens hood and allows it to be easily installed and removed. Cut this out and stick the edges together to make a ring.
Step 5 – Now we need to attach the barrel to the filter disc, so you’ll need to make 8 or so inch long cuts along the length of one side of the ring. Bend these flaps back evenly.
Step 6 – Place the filter disc down on a flat surface and then put the ring down onto it with the flaps down, providing a surface to stick it to. Then you’ll need to tape along all of the flaps to stick both pieces together – and that’s it! You could paint it, or neaten it up somehow, but fundamentally this is a great, cheap and cost effective way of creating a homemade solar film filter for your telephoto lens.

Solar Imaging
A sturdy tripod is a must when shooting at long focal lengths as this will help combat camera shake, coupled with a cable release (or self timer) should result in sharp shots. Live view works great too as a helpful aid to get the right settings. Almost any ISO can be used because the sun gives off lots of light. Lenses are generally sharper stopped down too, so definitely don’t shoot wide open and also use a shutter speed more than what focal length you’re using. So if it was a 500mm lens on a full frame camera, use shutter speeds higher than 1/500.


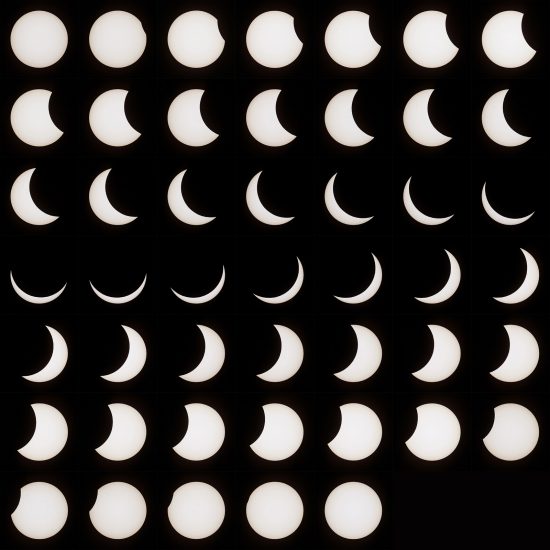
As well as capturing the eclipse stages (perhaps try out a time-lapse?), look out for sun spots too as these are interesting features to photograph. As the moon passes in front of the sun it’s great to see the bumps and crater shapes backlit by the sun. It’ll be a very special moment and one to cherish for years to come.


